


")


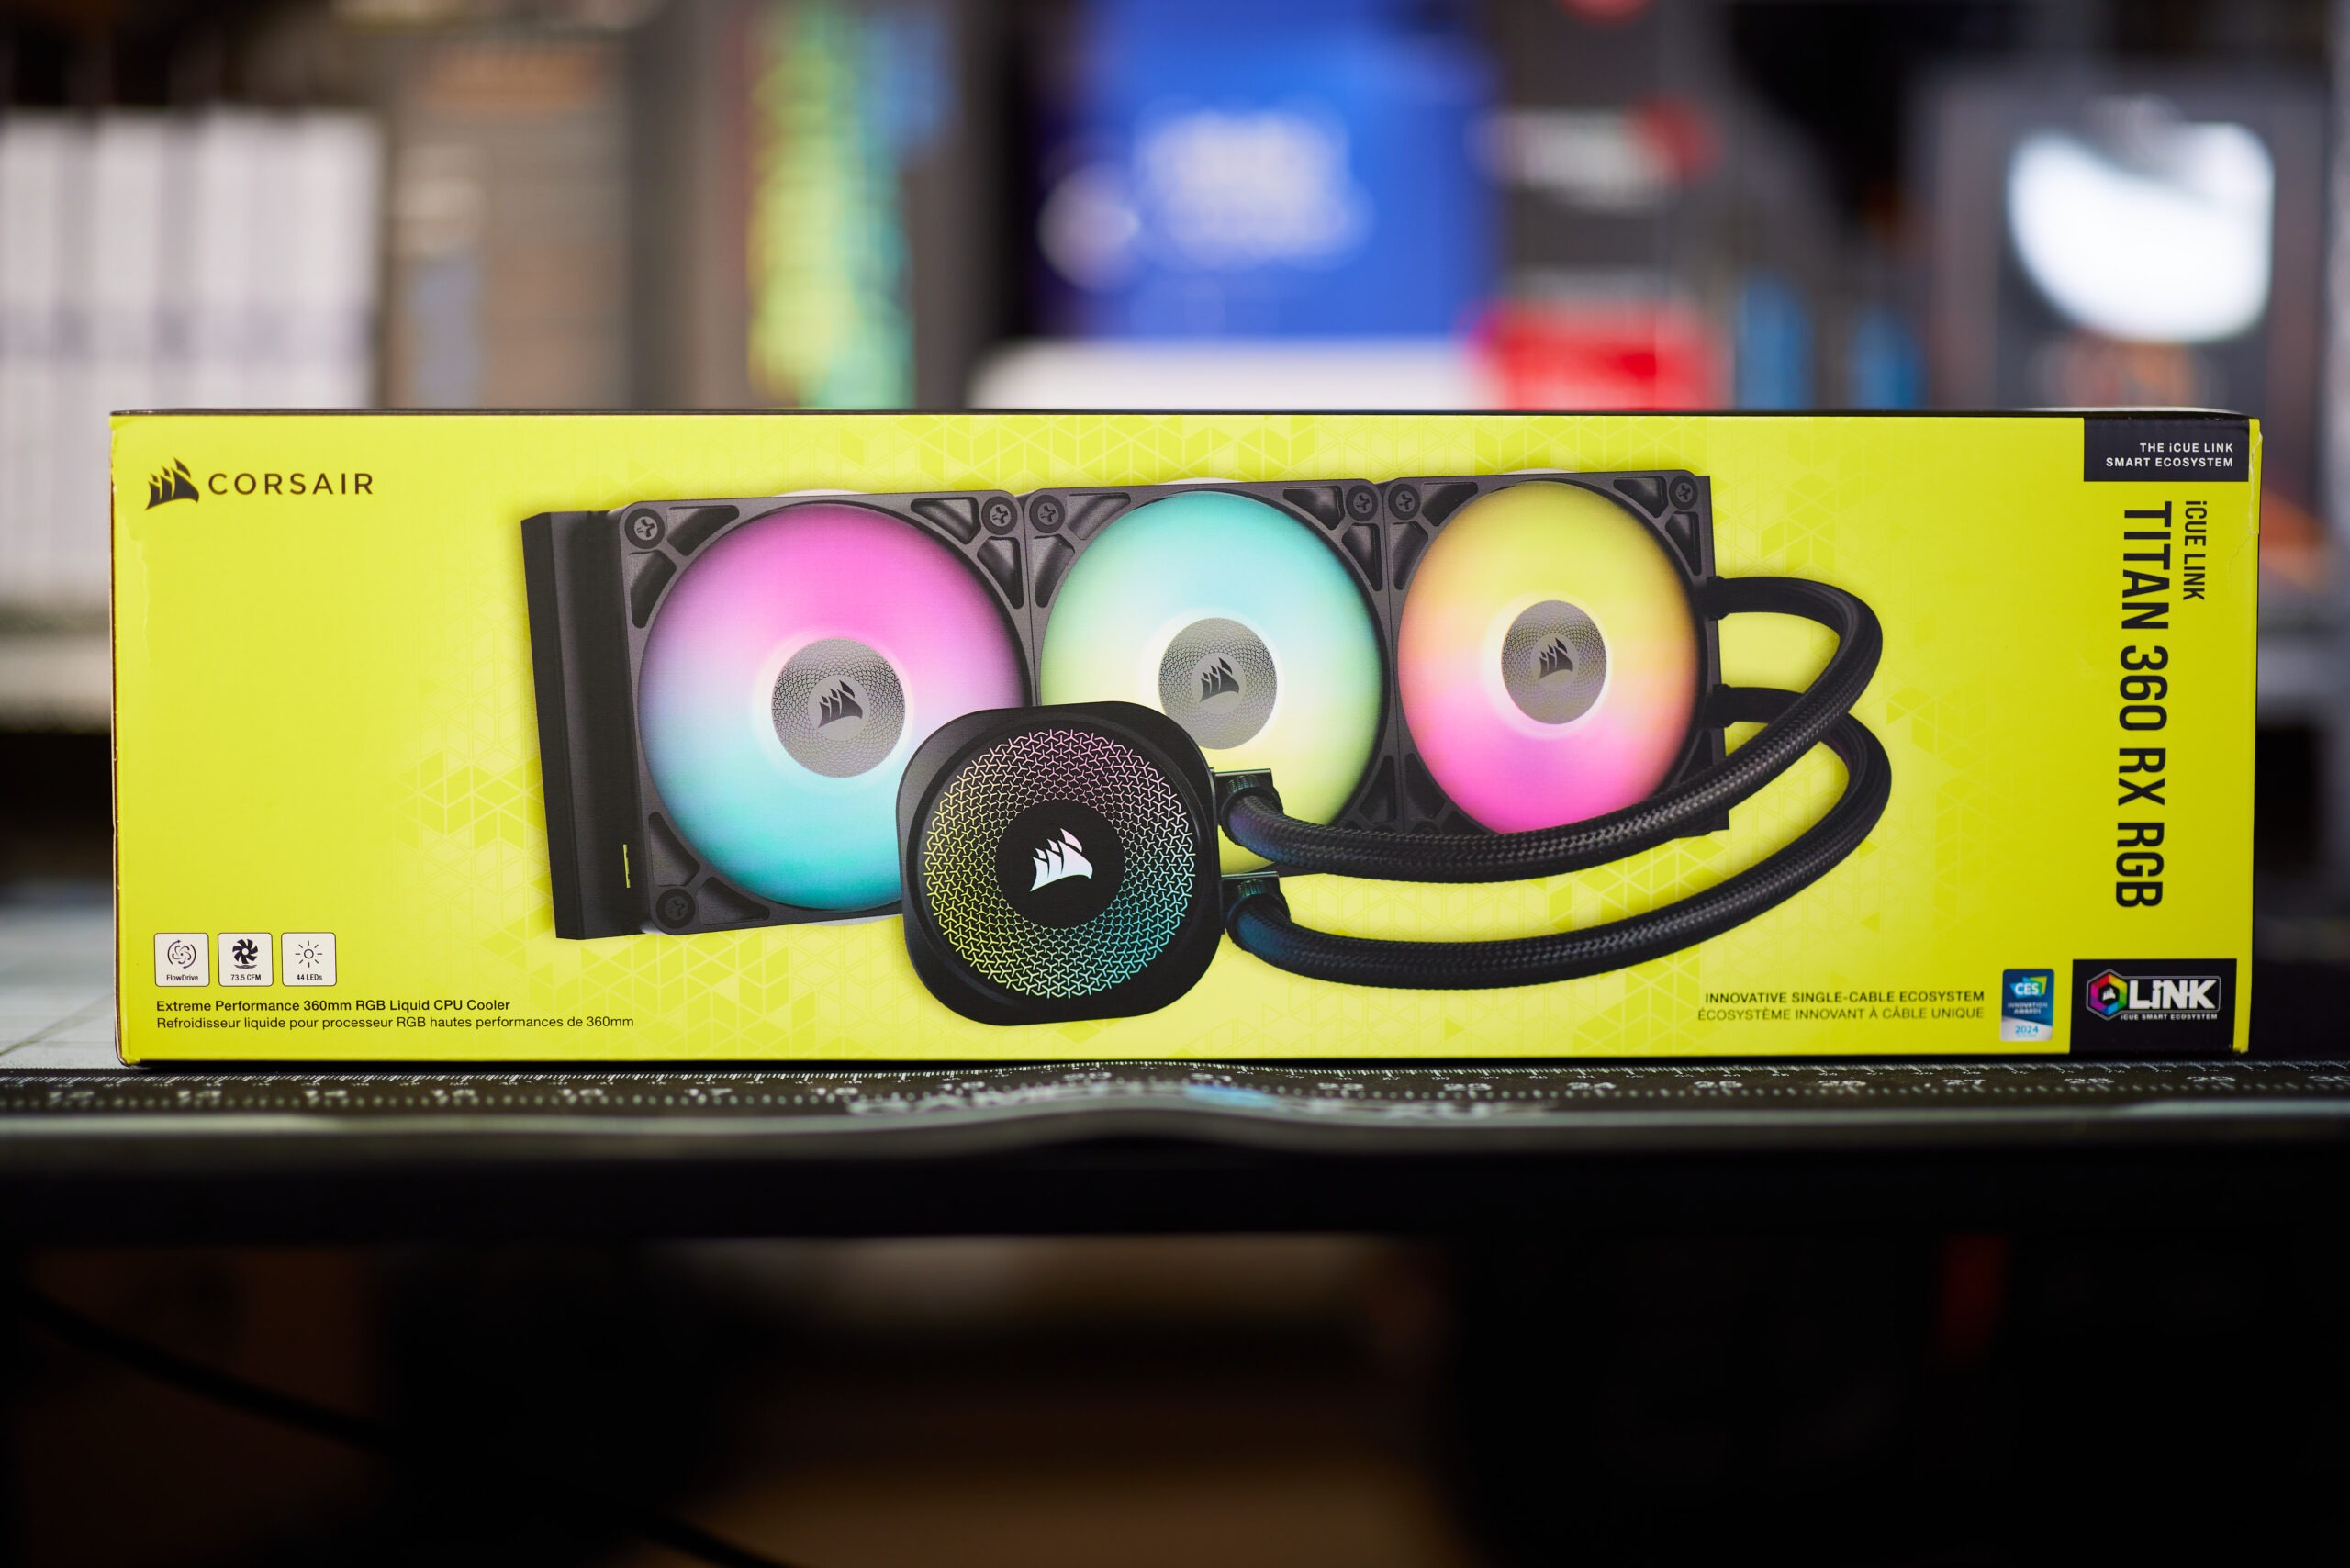
The discussion around All-In-One (AIO) CPU coolers versus custom loops will always be ongoing. However, recently there has been a lot of innovation in the AIO market by manufacturers to try to match the performance and customizability of custom loops. Corsair, not to be outdone by its competitors, is launching its next-generation AIO CPU cooler, the iCUE LINK Titan RX RGB. The Titan combines Corsair's latest advancements in cooling engine technology, replaceable pump caps, and iCUE LINK RX120 fans in hopes of being your next CPU cooler.
In addition to the Titan AIO, Corsair supplied me with three of its CapSwap modules. This review will examine the iCUE LINK LCD Screen, VRM Fan, and Pump Cap Groove modules. Is the Titan good enough to topple another AIO I've recently reviewed, the Cooler Master 360 Ion? Continue reading to find out.
![]()
Corsair, a name we know all to well in the DRAM market. Well, today is no different with their release of the new DDR5 Dominator Titanium line. A line being touted as “Extremely Rare & Meticulously Crafted”, we felt very privileged when Corsair was kind enough to send us along a 64GB Kit clocked at 6000MT/s (EXPO). Let’s crack into this and see what we find.
Features
Before we run into the review, let’s take a moment to check out the features as touted by Corsair.
CORSAIR DOMINATOR TITANIUM DDR5 Memory combines clean, refined styling with superior forged aluminum
construction and vibrant RGB lighting for a premium memory experience. Tightly-screen high-frequency, low latency
memory chips backed by patented CORSAIR DHX cooling ensure your system can handle complex tasks faster and
smoother than ever. Preset and custom dynamic RGB lighting profiles via CORSAIR iCUE Murals software make the
most of the 11-zone RGB LEDs featured on each module, while setting your memory to its optimal speed is easy thanks
to support for Intel XMP 3.0. With its elegant styling and premium construction, DOMINATOR TITANIUM sets the
standard by which others are judged.
Key Features1. Sophisticated Styling, Premium Quality: Clean, refined styling combines with premium forged aluminum
construction, for quality you can feel.2. Beyond the Cutting Edge of Performance: Push your system to new heights with the latest DDR5 memory,
unlocking even faster frequencies, greater capacities, and better performance.3. 11 Vibrant Addressable RGB LEDs: Each module boasts 11 individually addressable LEDs to illuminate your PC
with spectacular customizable lighting.4. Swappable Top Bar: Time for a new look? Change your memory’s style and cooling capacity with official
accessories or 3D print your own top bar for your own unique style.5. Patented CORSAIR DHX Cooling: Cools the memory through both the ICs and the ground plane of the PCB
itself with its own dedicated heatspreader, ensuring high performance even under extreme loads.6. Simple Setup with customizable Intel XMP 3.0 profiles: Set your memory to its rated speed in seconds, via a
single setting, then customize and save your own XMP profiles via iCUE to maximize performance by
application or task for greater efficiency.7. Wide Compatibility: Optimized for the latest Intel processors and DDR5 motherboards.
8. Powerful CORSAIR iCUE Software: iCUE Murals software unlocks dynamic RGB lighting control, synchronized
across your entire CORSAIR setup, with real-time temperature, voltage, and frequency monitoring.9. Hand-Sorted, Tightly Screened Memory Chips: Ensures consistent high-frequency performance with
aggressive timing options.10. Custom High-Performance PCB: Guarantees signal quality and stability for superior overclocking capabilities.
11. Limited Lifetime Warranty: For complete peace of mind and years of worry-free performance.
Specifications
UnboxingWhen awaiting to receive this kit, I was unsure what to expect but with it being from Corsairs premium line, expectations were high. Fortunately my high expectations became reality. As soon as I opened the brown outer packaging, I was met with what I can only describe as a “statement piece”. With a move away from Corsairs trademark black and yellow colours, I was met with a pure black box with with the product name written in an eye catching platinum. “Dominator Titanium First Edition”. What an impact!
Upon opening the box, you are first met with a glossy insert with a message from Corsairs Andy Paul, the founder and current CEO. The message reads:
CONGRATULATIONS
In your hands you hold a special and very rare collection of CORSAIR DOMINATOR TITANIUM DDR5 FIRST EDITION MEMORY.
These exclusive modules have been meticulously crafted to the highest standards, with painstaking attention to detail and manufactured in very limited quantities-each is individually numbered.Congratulations on being part of the exclusive group of enthusiasts to own this rare and special memory kit.
OUSTANDINGLY CRAFTED
Each module employs our patented DHX cooling technology to ensure you’ll enjoy incredible performance and cooling, while the anodized aluminium heatspreader guarantees this memory looks every bit as good as it performs. Our world-class memory engineers carefully screen the specially selected ICs and supervise the assembly of each assembly. This kit also includes our modular finned top bars to ensure you have the perfect aesthetic for your build. Each kit is rigorously tested to ensure that it has ample overclocking headroom, and then numbered, packaged, and sent to you to enjoy.
Performance memory is key to so much of what we do here at CORSAIR, and we’re delighted to share with you the next chapter in that legacy.
Enjoy
Andy Paul
Moving further into the unboxing is where the real excitement begins to start. Inside the box we are presented with:
- 2x Corsair Dominator Titanium Memory Modules
- A Set Of Copper Heatsinks
- A Corsair Branded Screwdriver
The Contents
Let’s take a moment to a take a closer look at the contents of the package, generally speaking when buying RAM, you are not usually treated to all these extra’s, so I think its worth taking stock of what you receive.
Copper heatsinks
As part of Corsairs aim with this product to allow for “ample overclocking headroom”, it is a no brainer to ensure that the memory modules have efficient heat dissipation and Corsair are not oblivious to this. As part of this kit, Corsair has provided a copper heatsink accessory which you can fit to your RAM modules in place of the RGB. These modules come equipped with “DHX Technology” as mentioned above, but Corsair further this technology by including the copper heatsinks to allow for better heat dissipation from the top of the memory module. Let’s take a look.
The screwdriver
To help you with your journey of swapping out the heatsinks, or to indeed allow you to dismantle the modules heat spreaders, Corsair has provided little screwdriver which I think was a nice addition to the package and means you have it immediately to hand. So no having to look for your pesky tools.
The modulesSo, here we are, the main event. The modules for AMD only come in a matt grey finish, at least at the time of writing. I guess for some that could be a problem if you are super strict on colour co-ordination that does not include grey, but I was pleased with the aesthetic look of the modules, they certainly give an impression of sophistication. Corsair has definitely taken some time to get the look right, especially considering the optional copper heatsinks. Lastly, with respects to the First Edition kits, these are numbered in order of production, as we can see I received lucky number 8! Let’s take a look.
Swapping RGB for CopperSo, I have no issue with RGB but I prefer my memory modules to have the best cooling chance possible. With DDR5 running a little on the hotter side and seemingly stability being more sensitive to higher temperatures, It was a no brainer to swap out the RGB profile for the copper heatsinks. The process was VERY easy.
It is a process of taking the supplied Corsair screwdriver (or your own with the right bit) and removing two screws from the top of the module, one to each side. This then allows for the RGB top profile to be removed. Once removed, you will be left with the RGB profile with its connector. On a side note, I was rather impressed with the simplicity of the RGB top profile having a single (I assume proprietary) connector that connected to the top of the modules PCB rather seamlessly, Lets take a look.
Now it’s time to install the copper heatsinks. There is little preparation needed, all you need to do is to remove the protective film from the thermal pad and you are ready to go.It is as simply as placing the copper heatsinks to the top of the module, lining up the screw holes and installing the screws. There you have it, you now have copper heatsinks that will aid in cooling your modules when you are overclocking. Let’s take a look at the modules with the copper heatsink.
Corsair iCUE
As with many Corsair products, Corsairs iCUE management software adds additional capabilities and monitoring options, lets take a look at iCUE adds to the management of your RAM.
- DIMM Setup
This allows you to setup the DIMM orientation in relation to your CPU position on the motherboard so that iCUE matches your real world layout. - Lighting Effects
This allows you to change the RGB effects profiles of your RAM. iCUE comes with a fair few pre defined profiles to get you started, of course you can add your own custom lighting profiles to get the RGB effect just right for you. - Hardware Lighting
This allows you to co-ordinate your RGB lighting effects with other Corsair devices and some other 3rd party devices such as motherboards that come equipped with RGB lighting. Though it needs to be noted not all 3rd party devices with RGB functionality will work with iCUE. - Cooling
From here you can monitor the current temperatures of your RAM modules, current voltages and total power draw. - Alerts
This allows you to set up custom alert profiles based on temperature related criteria. You can set iCUE to carry out tasks when a temperature criteria is met such as “Set all fans to 100%”, “Trigger all RGB LEDs”, “Run a file”, “Shut down the PC”. - Device Settings
This allows you to check your current firmware version of your memory modules, get future firmware updates and adjust the overall brightness of the RGB.
Corsair offers a video guide on how to use the iCUE software, see specifically below their video on setting up your DDR5 memory with iCUE.
Testing
Before we move into the testing let’s take a look at the testing platform and testing application.
Relevant system specifications:
CPU: AMD Ryzen 9 7950X3D
Motherboard: MSI MEG X670E Ace
RAM: Corsair Dominator Titanium
Testing applications:
We will test three scenarios, EXPO, Overclocked @ 6400MT/s & Overclocked @ 6600MT/s. We will run the above test applications in each scenario and we will use ZenTimings to reference the RAM timings for each scenario.
Stability of all overclocked results were tested via:
GSAT
Karhu
Ycruncher VST (via Benchmate)
Results
Firstly, we should test the EXPO profile which is 6000MT/s running primary timings of 30-36-36-76, I left all timings at the stock EXPO profile and all system voltages were set to AUTO and managed by the BIOS. Let’s see what we find below.
Now let’s fire up the first Overclock at 6400MT/s running primary timings of 28-37-37-30. I spent some time tweaking the timing profile for this OC to improve performance and latency. Of course, I needed to make some suitable voltage adjustments to make this happen which you will see in the ZenTimings screenshot below. A couple of settings ZenTimings does not detect are my VDDG CCD and IOD voltages which are set at 1.100v & 1.050v respectively. This gives the below results. Lastly let’s fire up our second and final Overclock at 6600MT/s running primary timings of 28-37-37-30. This OC runs the exact same timing profile as the prior 6400MT/s OC but this OC required some increased voltages to get things stable. Again, see below the ZenTimings screenshot below for more details. The VDDG CCD and IOD voltages however were not altered and remain the same as per the 6400MT/s OC. This gives the below results. In the end an OC of 6600MT/s was the farthest I could push for. 6800MT/s was not possible even with increased voltages and playing around with the FCLK. Ultimately, even IF 6800MT/s was possible the voltages required would not have made it suitable as a daily driver OC.It is also worth noting that when pushing DDR5, it is highly advised to have very good airflow in your case, failing that have a fan pointed directly at your RAM to help dissipate heat. Achieving high overclocks will prove difficult if you allow your RAM to approach 50c. It is highly likely you will see instabilities as result of temperatures due to increased voltages needed for your OC.
For context, with the copper heatsinks (No Fan) installed stress testing at EXPO 6000MT/s I was hitting 38-40c with an ambient of 19c. When running 6400MT/s, due to the increased voltages I was hitting 42-45c. It was at this point a fan became sensible. When running a stress test at 6600MT/s with a fan now installed I would hit 42-43c MAX, again assuming an ambient of 19c with the fan running at 1900RPM .
It is worth noting, in all scenarios the DIMMs where within approx. 0.3c of each other.
Conclusion
This was certainly a journey. In fact this article took a lot longer than I would have liked. It took a considerable amount of time to tune settings for the Overclocks, but if you are going to do something right, it is going to take time. I had more system reboots than I care to count based on either non posting due to unstable settings or reboots for tests and profile changes. However all in all it was worth it in the end. From my results above, there is actually little difference in performance between the 6400MT/s and 6600MT/s profiles. Considering the increased voltages to make the 6600MT/s profile stable, the 6400MT/s profile actually makes far more sense as it is not all that far behind and the voltages used are more comfortable.
The Corsair Dominator Titanium kit has definitely had some attention paid to it and does certainly allows for the enthusiast to chase for that extra hidden performance. So they keep on their promise in that regard. While aesthetics is definitely subjective, I really like how the kit looked. With the copper heatsinks, it certainly looks more fierce and ultimately allows for better heat dissipation, so for me it is a win win. Regarding the copper heatsinks, if you are looking to take the Titanium beyond its EXPO profile, ditch the RGB and get these installed. With memory IC’s being sensitive to heat, chasing performance will be harder without them. Even then, I would still recommend a fan pointed at the RAM or at minimum really good case airflow.
A personal opinion regarding iCUE. Making the assumption you are not managing any other Corsair devices with it. If you are indeed ditching the RGB element of this kit, I would not bother installing iCUE. Ultimately iCUE is only worth having if you are managing the RGB element. Yes, iCUE does allow for hardware monitoring of the RAM, but there is in my opinion better, and lighter weight software for achieving this goal such as HWINFO, not only that but HWINFO gives you a far better monitoring of a variety of system components and other aspects. If you are keeping the RGB element of this kit or have other Corsair devices to manage, then sure, iCUE certainly makes sense.
The Titanium First Edition is a premium kit, both aesthetically and regarding performance it offers, especially when you let it stretch its legs. I was pleased with overall experience, from a marketing perspective, the kit was very well received. The premium packaging, personal touch and included extra’s definitely made you feel as if you had been treated to something special. You could argue that is to be expected for anything “First Edition”, and you would be right, but what is more important is that Corsair delivered on the experience and didn’t leave you wanting.
I have mentioned a fair few positives, so what are the negatives. Well from a technical stand point, None. The only grip I could see from those wanting to take advantage of the EXPO kits would be the lack of module colour choice. As previously mentioned, right now at the time of writing, you are limited to grey. Whereas the Intel XMP variants get the additional choices of white and black. I personally find it puzzling why Corsair have differentiated between XMP and EXPO kits with the colour choices. Why not allow both to share the same styling choices?. Perhaps in time, Corsair will open up the colour choices for the EXPO kits, I hope they do.
With everything considered, if you are looking for a kit that delivers, then this one is for you. Whether or not you opt for the standard or first edition of this kit comes down to personal choice but either way, I am pleased to say this is a must have item.
[table id=172 /]
Want to discuss this product or give your views and feedback from your own usage? Leave your comments and discuss HERE, on the ExtremeHW Forums (No Sign Up Required)
Like our content? Please consider Donating to help us to continue our writing.
Related Posts