
The discussion around All-In-One (AIO) CPU coolers versus custom loops will always be ongoing. However, recently there has been a lot of innovation in the AIO market by manufacturers to try to match the performance and customizability of custom loops. Corsair, not to be outdone by its competitors, is launching its next-generation AIO CPU cooler, the iCUE LINK Titan RX RGB. The Titan combines Corsair's latest advancements in cooling engine technology, replaceable pump caps, and iCUE LINK RX120 fans in hopes of being your next CPU cooler.
In addition to the Titan AIO, Corsair supplied me with three of its CapSwap modules. This review will examine the iCUE LINK LCD Screen, VRM Fan, and Pump Cap Groove modules. Is the Titan good enough to topple another AIO I've recently reviewed, the Cooler Master 360 Ion? Continue reading to find out.

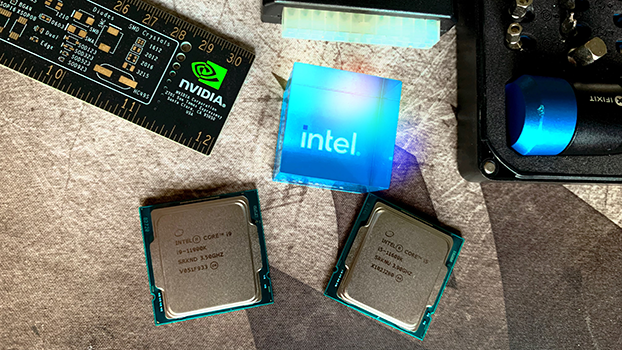
Intel has released its 11th gen CPUs based on the Cypress Cove architecture and continues to push 14nm to its limits. These new CPUs have a ton of negative press surrounding them but especially the 11900K. There are some serious holes with the new product stack but also a lot of good that the processor brings when considering generational leaps and what 14nm++ is capable of. We are going to do something a bit different here with this overclocking guide by comparing Intel’s recommended test settings versus a manual all-core overclock. Intel’s recommended settings are going to offer a bit more performance than just basic default settings. Let’s see what we can get out of this CPU.
It’s only been about a year since “Comet Lake” and the new 11th gen CPUs have spawned a new Z590 chipset and introduce IPC (Instructions Per Cycle) gains on the 14nm architecture. I’ll be doing a rundown over the important changes that “Rocket Lake” brings and what Z590 can offer for anyone looking to upgrade. I will be overclocking with the new ASUS Z590 Hero and other parts provided by Corsair and Open Bench Table. I’ll pick out important new settings and cover both basic and advanced tweaking methods.
What is Cypress Cove?
Cypress Cove is the new architecture for the 11th gen desktop CPUs. Their entire purpose is to transform workload efficiency and increase gaming performance. The IPC increase I mentioned brings a 19% generational improvement. Since we are focusing on the 11900K, it brings eight cores up to 5.3GHz, 16 threads with smart cache, and increased DDR4 speeds to 3200MHz and beyond. It also covers Deep Learning Boost/Vector Neural Network instructions, AI inference for increased performance on demanding workloads, and improved overclocking tools for fine-tuning your performance levels.
Remember that negative press I mentioned? There are great things this CPU can offer but it lacks in a ton of areas too. For starters, the 11900K has been marked by many reviewers as a worthless upgrade if you already own a 10900K CPU. This is primarily because the 11900K CPU lacks two fewer cores and a slightly smaller L3 cache. The problem here is that 11900K is marketed as a flagship product but looks like a step back on paper. The difference will be with multi-threaded workloads vs raw gaming performance. If you are looking for a faster workflow CPU then the 10900K will beat out the 11900K but gaming mileage may vary. The increased IPC can show a bigger difference in some single-core use scenarios.
Some newly added features will affect overclocking scenarios but mostly for good allowing for higher frequencies. Most of the items we are going to cover below primarily relate to what Intel wants you to have enabled for the best experience out of the box. These technologies are an integral part of how the 11900K operates and functions to allow for higher/lower TDP (Thermal Design Power), Power Limits, Tau (Intel’s rated timing function for turbo threshold in Seconds(s)), and DPTF (Dynamic Platform Thermal Framework).
The 11900K offers new boost algorithms and improved UHD 750 integrated graphics powered by Xe.

11900K Specifications 8C/16T
TVB (Thermal Velocity Boost) Up to 5.3/4.8 GHz
Turbo Max 3.0 Up to 5.2 GHz
Single-Core Frequency (GHz) Up to 5.1 GHz
All Core Turbo (GHz) Up to 4.7 GHz
Base Clock (GHz) Up to 3.5 GHz
PL1 (Power Limit) (Watts) 125W
PL2 (Power Limit) (Watts) 250W
New improvements:
- IPC improvements
- Enhanced Xe graphics architecture
- 20 CPU PCIe 4.0 lanes
- Deep learning boost
- DDR4 3200 support
- Enhanced HEVC compression
- Overclocking tools
- Support for resizable BAR
- Advanced AVX 2 & AVX 512 vector extensions
- TVB (Thermal Velocity Boost) and Adaptive boost
It’s important to note that only the 11900K offers TVB (Thermal Velocity Boost) and requires your motherboard to have the proper UEFI.
While you think you might know Intel, now is the time to throw everything you thought you knew about voltages away. Reframe your thinking because you’re dealing with higher voltage caps and thermal thresholds, despite the two fewer cores.
TVB (Thermal Velocity Boost): This technology allows higher performance on top of your Turbo boost by automatically increasing the processor’s clock frequency temporarily. The better your cooling, the better the boost will be. Turbo will be 100MHZ depending on Turbo Boost 2.0.
Adaptive Boost: When using Turbo and 3 or more cores, the CPU will attempt to achieve the best frequency regardless of Turbo 2.0. It’s important to know that Adaptive boost overrides TVB when over the 3 cores.
Turbo Boost 2.0: Uses defined frequency values based on how many cores are in use.
Turbo Boost 3.0: When in turbo mode the best cores will get a higher frequency. This is usually 1-2 cores and how the 11900K offers the 5.3GHz boost.
We will go over the P1/P2 limits in more detail under the overclocking section.
Z590 and ASUS Hero Improvements
Z590 offers only minor details when upgrading from Z490. However, the items that are improved upon, substantially improve performance.
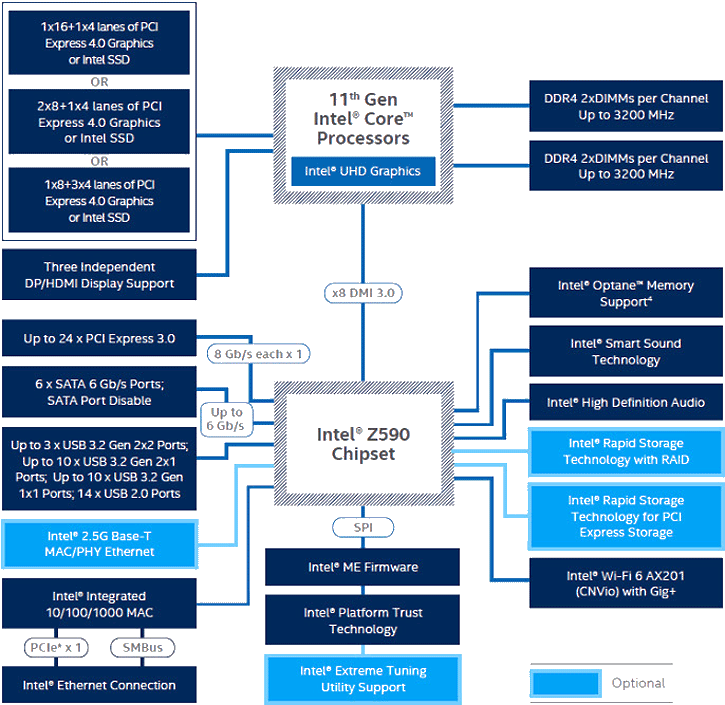
Z590 offers flexibility by adding more support for:
- PCIe 4.0
- Improved DMI x8 bus
- Native support for USB 3.2 Gen 2×2
- Thunderbolt 4
Probably the most exciting thing is the PCIe 4.0 support. It effectively doubles the bandwidth using the x16 interface. Z590 and the 11900K offer 20 PCIe 4.0 lanes and are divided across the x16 and x4 and share bandwidth. This isn’t going to offer much performance for graphics cards but storage is another story. The 11900K also has 24 PCIe lanes over the PCH (Platform Controller Hub) for additional needs.
The Z590 hero specifications are as follows:
- Socket LGA 1200
- Robust 14+2 teamed power stages rated for 90A (Amps)
- Optimized thermal design: Enlarged VRM heatsinks, quad m.2 heatsinks/covers, and embedded backplates
- AI overclocking: AI overclocking profiles in UEFI
- AI Cooling: Proprietary Asus algorithm for balancing thermals
- AI Networking: Optimized networking performance
- Asus OptiMem III
The Z590 chipset itself is pin-compatible with Z490 but the power delivery will be different. The Z590 Hero now uses ISL power controllers instead of the old Digi power ones that are ASUS customized IR chips. The VRM uses an ISL69269 and it’s a 12 phase design but the Hero is advertised as 14+2? The way Asus uses the new controller is interesting because instead of using basic doublers, it uses two sets of the same controllers in sync for each phase of power delivery. The advertised 12 phase design is 14+2 but instead is 7+1 phases with double the controllers.

The Mosfets are M13H and can deliver 90A of power.
ASUS became the first manufacturer to implement phase-doublers with the A8N32-SLI Deluxe motherboard, back in 2005. The board’s VRM was awarded for elegantly overcoming the power handling capabilities of components that were available at the time while also reducing voltage ripple. Those benefits led to phase-doublers becoming universally accepted in the industry, and they are still used for similar purposes today.
The memory trace layout tweaks allow for lower latencies, reduced voltages, and higher frequencies with Asus OptiMem III. The VRM aluminum heatsink offers an L shape heatpipe for better heat transfer and the m.2 heatsinks offer backplates and thermal pads.
Parts/Test Bench
Test Bench

The open benchtable is a test bench that prioritizes portability and layout. It’s made from precision anodized 8mm thick aluminum. The test bench includes standoffs, brackets, and mounting support for a variety of configurations. Streacom was kind enough to send over their Titanium model for this article. To put it into perspective, I was able to get my test bench for this overclocking guide set up in under 10 minutes.
RAM
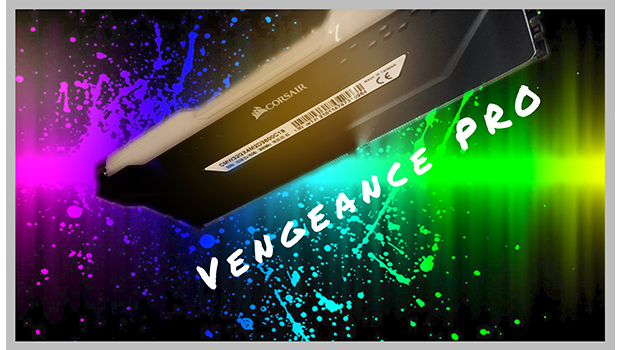
The Vengeance PRO from Corsair offers a custom performance PCB. They sent over their 32GB kit (2x16GB) 3600MHz rated for CL 18. With the 11900K/Z590 and different gear ratios, memory overclocking allows for speeds exceeding 5000MHz. We will explain more about this under the overclocking section but these modules offer carefully screen ICs, aluminum heat spreader, and XMP 2.0 support.
Vengeance PRO specifications are as follows:
- DDR4
- 32GB 2x 16GB
- Latency: 18-22-22-42
- Voltage: 1.35V
- Speed: 3600MHz
- Rated Speed: PC4-28800 (3600MHz)
- 288 pin package
Cooler (AIO)
To keep the 11900K cool, Corsair sent over the H150i Elite Capellix. Before I explain the benefits, it’s important to note that even a 360mm AIO (All-in-one) cooler of this magnitude will struggle to keep the 11900K temperatures down. You will find yourself throttling down quickly over temperatures of 100°C. Without extensive tweaking or proper tuning, throttling will occur. This is primarily a concern more during extensive AVX loads and not so much during normal workloads and gaming. The other concern is how each motherboard handles Intel’s power limits. Not every board follows Intel’s guidelines while some do. It makes benchmarking hard because this can vary from review to review depending on the hardware. If you’re wondering why I didn’t just use custom water cooling, this is because I wanted to reflect what a majority of people use in their everyday systems. This is also what I meant earlier when I mentioned forgetting what you knew about Intel because higher voltage and thermals are more obtainable and tolerated vs older generations of processors. It wouldn’t be outrageous to run a Vcore of 1.4V as an example.
Forget all the RGB here, it’s nice but not what I’m concerned with. The Capellix has a split flow copper plate that helps the cold plate dissipate heat more efficiently. It’s also fully digital, meaning I can control everything with iCUE ignoring any UEFI adjustments. This is ideal for quickly increasing fan speeds while benchmarking. It includes a commander core that can control a total of up to 6 Corsair RGB fans. It includes 3 RGB fans with the H150i and I set them up as intake to blow some air over the heatsink and VRM. Since my test bench is open-air, warm air is better than no air!
The H150i specifications are as follows:
- 5-year warranty
- Copper cold plate
- Aluminum high-density radiator
- PWM control
- iCUE compatibility
- 400mm tubing
- 56x56mm cold plate
- 360mm thick Radiator 397mm x 120mm x 27mm
- Fan speeds up to 2400 RPM
- Intel/AMD socket compatible
- RGB lighting
- Fan airflow 75 CFM / Static pressure 4.2mm- H20
- Noise level 10-37 dBA
PSU
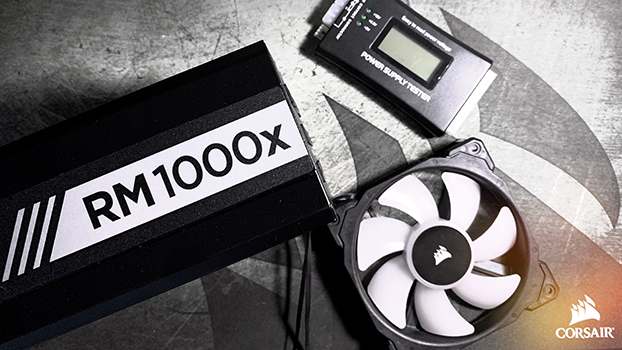
Corsair also sent over the RMx 1000W series PSU. I’ve been studying power supplies from Jonny Guru for years. Ever since he started his career at Corsair, I’ve been eager to work with several of their models. The RMx line of PSUs is 80 PLUS Gold and offers extremely tight voltage regulation.
The RMx 1000W is built with 105°C Japanese capacitors, 80 PLUS Gold efficiency, fully modular cables, and zero RPM mode.
The RMx 1000W specifications are as follows:
- ATX 12 v2.4
- Continuous temperature output rated for 50°C
- 1000W
- Rifle bearing 135mm fan
- MTBF 100,000 hours
- Multi GPU ready
- 10-year warranty
- 80 Plus Gold efficiency
- Zero RPM mode
- Sleeved black cables
- 150mm x 86mm x 180mm
- c6c7 compatible
- Special voltage tech: OVP (over-voltage)/ UVP (under-voltage)/ SCP (short circuit)/ OTP ( over temp)/ OPP (over power)
Power supplies provide critical power to your PC, and it’s important to find one with a good rating. The included Corsair PSU at Gold means the PSU is 87% efficient at 100% load. Typically using lower rated PSUs are fine for gaming and can also save you some money.
I generally look for Gold certified but Bronze is an option if you want to save even more money. The lower the standard, the less efficient the PSU is at 100%. Since the i9-11900K offers 8C/16T, we are going to want a decent PSU to provide enough power to the test bench.
The RMx PSU will be way more than enough to power this PC at 1000W. Gold just means it’s not as efficient as a Platinum rating but should have little impact on overclocking. The only other thing that would be nice is the ability to switch between “Multi” or “Single” rail distribution, this PSU offers single rail, which can be better for overclocking. This PSU offers important over current protection for the single 12V rail.
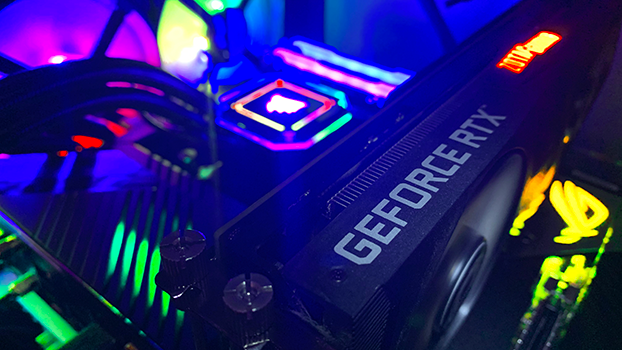
GPU
The GPU isn’t as important in this situation because we are going to focus on overclocking the CPU. I still wanted to list it as a point of reference because we will be testing the CPU overclock in benchmarks. We are going to focus on 1080P so we can put more stress on the CPU. For our bench setup we will be using the Zotac RTX 2080.
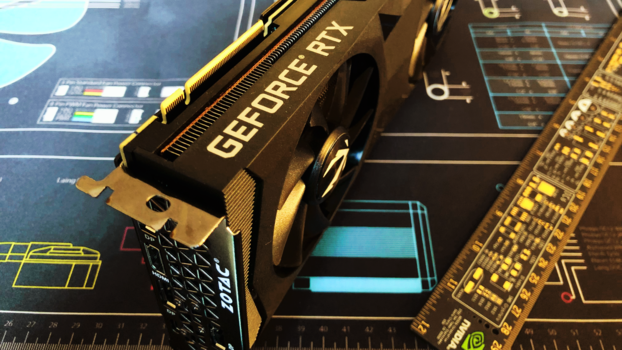
Zotac RTX 2080 Specifications:
- GPU GeForce: RTX 2080
- CUDA cores: 2944
- Video Memory: 8GB GDDR6
- Memory Bus: 256-bit
- Engine Clock Boost: 1770 MHz
- Memory Clock: 14.0 Gbps
- PCI Express: 3.0
- Display Outputs: 3 x DisplayPort (4096×2160@60Hz) / HDMI 2.0 (3840×2160@60Hz) / USB Type-C
- HDCP Support: Yes
- Multi-Display Capability: Quad Display
- Recommended Power Supply: 650W
- Power Consumption: 215W
- Power Input: 6-pin 8-pin
- DirectX 12 API feature level: 12_1
- OpenGL: 4.5
- Cooling: 2 x 90mm fans
- Slot Size: Dual Slot
- SLI NVLink: (SLI-ready)
- Supported OS: Windows 10 / 7 x64
- Card Length: 268mm x 113mm x 38mm (10.55in x 4.45in x 1.50in)
NVMe SSD
Lastly, Corsair sent over the MP600 CORE 1TB. This is important because the 11900K supports Gen 4 lanes and therefore Gen 4 bandwidth and speeds. What this means is Intel finally has caught up with AMD supporting PCIe Gen 4.0. This effectively doubles the available bandwidth for connected devices and offers 16 GT/s to 32GB/s over the x16 interface. The 11900K offers 20 PCIe 4.0 lanes and is divided over x16/x4 lanes.

The CORE offers incredible performance up to 4,950MB/sec sequential read and 3,950MB/sec sequential write speeds.
The MP600 CORE specifications are as follows:
- 1TB capacity
- PCIe Gen 4 x4
- SSD Max Sequential Read CDM Up to 4,700MB/s
- SSD Max Sequential Write CDM Up to 1,950MB/s
- Max Random Write QD32 IOMeter Up to 480K IOPS
- Max Random Read QD32 IOMeter Up to 200K IOPS
- Form Factor M.2 2280
- Dimensions 80mm x 23mm x 15mm
- NAND Technology 3D QLC NAND
The CORE does come with a massive heatsink to keep those temperatures in check but I did have to remove it for this guide. I ended up using the ASUS heatsink with thermal pads and found temperatures just as good if not better.
Overclocking & UEFI
Disclaimer: To start our overclocking adventure, I want to make a few things clear! Before you overclock your system, I can take no responsibility for any damaged hardware that may result from overclocking. There are risks involved with pushing your system further than its intended and also causes more system heat as a result. You will need adequate cooling for overclocking, and the proper hardware for achieving a satisfactory overclock.
Also, keep in mind that overclocking your system will vary across different types of hardware, and even using the same hardware I used may not provide the same results as we are all subject to the silicon lottery.
Before you start overclocking the first step is DON’T! You need to make sure that your system is running well before you do any overclocking. Once you’re in Windows make sure you either run a few quick stress tests or play a few games to make sure your system is running well. This can help eliminate and faults and reduce factors that may occur after overclocking your hardware.
First, get all your appropriate drivers installed and make sure your system is running the way it’s intended to. Then you can start overclocking your hardware.
Before I get into the UEFI and explain how to configure the settings manually, I’m going to give you a quick run down of some best practice settings as per the image below. Also, the settings I’m suggesting are directly from Intel to take advantage of all their new boost features.
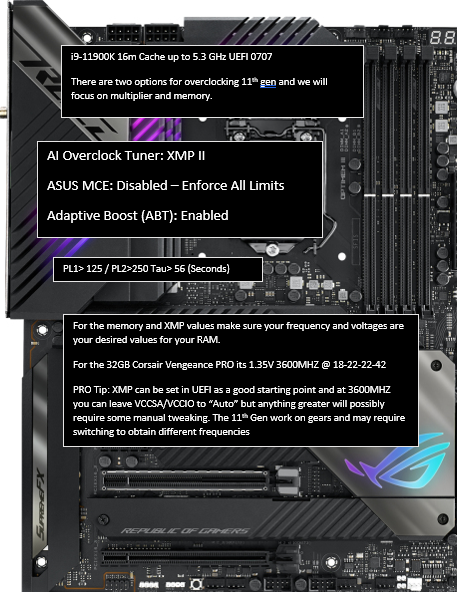
I also want to take a moment to correctly identify the 5.3GHz boost suggested by Intel. The settings they sent me neglected to reflect this specific board’s AI overclocking features. While they suggest disabling specific settings like MCE (Multi-Core-Enhancement), you also need to enable under “CPU Core Ratio” to enable “AI Optimized”. This will correctly set the specific core that the 11900K identifies as its best core to boost to 5.3GHz. Remember the 5.3GHz is not all core and only boosts to this level over a single core, so do not expect 5.3GHz across all cores.
UEFI adventure
To configure any setting in your UEFI hit the “Del” key to enter the environment. Also, ASUS boards take significantly longer to boot, so be patient as it may take a few minutes to register your settings.

The first thing that needs to happen is we need to set CPU Fan Speed to “ignore”. We need to do this because I chose to use the AIO header on the motherboard. Since nothing is plugged into the CPU fan header, the board will give us an error upon every reboot when it does not detect anything in the CPU fan header.
Depending on your system you will also need to optimize your fan control. I’m using an open-air test bench and having the AIO fans blow air across the VRM. Some air is better than no air moving across the motherboard. For the H150i pump, I just made sure it was set to DC and 100% for best performance possible. The fans for the H150i are controlled by the unit itself and through iCUE. there is no need to plug them into motherboard headers.
I am choosing to stick with an AIO because they are still widely popular among PC enthusiasts. I want to demonstrate what you can do with something more reminiscent of what the majority would buy for a new build. Certainly, you can get a much better cooling experience from a custom loop or exotic cooling choices.
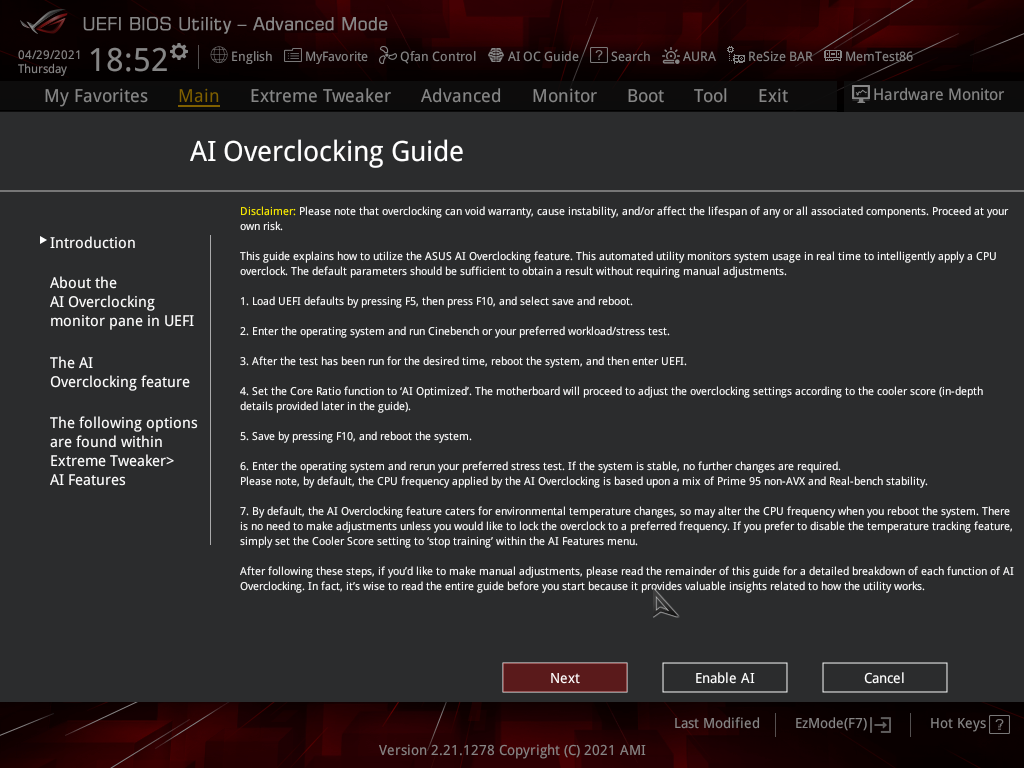
Z590 ASUS boards offer AI Overclocking. My first tip is to press F11 for the AI OC Guide. This will introduce Ai Overclocking and briefly give you setup procedures, options, and tips. For the 11900K, ASUS recommends an LLC level of 4 to strike the best balance for VRM temperatures. There is some good information listed here, so I recommend you read through everything.
SP: Represents the estimated quality of your CPU.
Cooler Score: Refers to the efficiency of your current cooling situation. This value is constantly collected and updated depending on your AI settings. The higher the number the better your prediction speeds will be. The better your cooling situation is the higher the score will be.
Important: All voltage recommendations are from your (AUTO) settings from load line calibration.
Non-AVX req for target: Determines minimum voltage required for normal non-AVX workloads.
AVX req for target: Determine minimum voltage required for AVX workloads
Cache V req for target: Refers to minimum voltage for Cache frequency during non-AVX workloads
Max-Non-AVX Stable Frequency: Determines capabilities of CPU cores under Prime 95 small FFTs loads (non-AVX)
Max AVX Stable Frequency: Determines capabilities of CPU cores under Prime 95 small FFTs loads (AVX)
Max cache Stable Frequency: Determines capabilities of CPU cache and CPU cooler under Prime 95 small FFts loads (non-AVX)
Optimism Scale: This is how aggressive your prediction rates are. This is useful for trying to target a specific frequency. For example, If you want 5GHz you will raise this number until it shows what it predicts the non-AVX/AVX stable voltages to be for your frequency.
My target is going to be 5GHz LLC all core with adaptive voltage and AVX offset 2. I am going to manually tune everything so I won’t enable AI Overclocking. I will, however, take advantage of the prediction tab values. Spoiler Alert, I’ve tested manually overclocking vs these predicted values and they are very close. You can probably squeeze a bit more from manual tuning but just use the predicted values for a quick and easy overclocking experience.
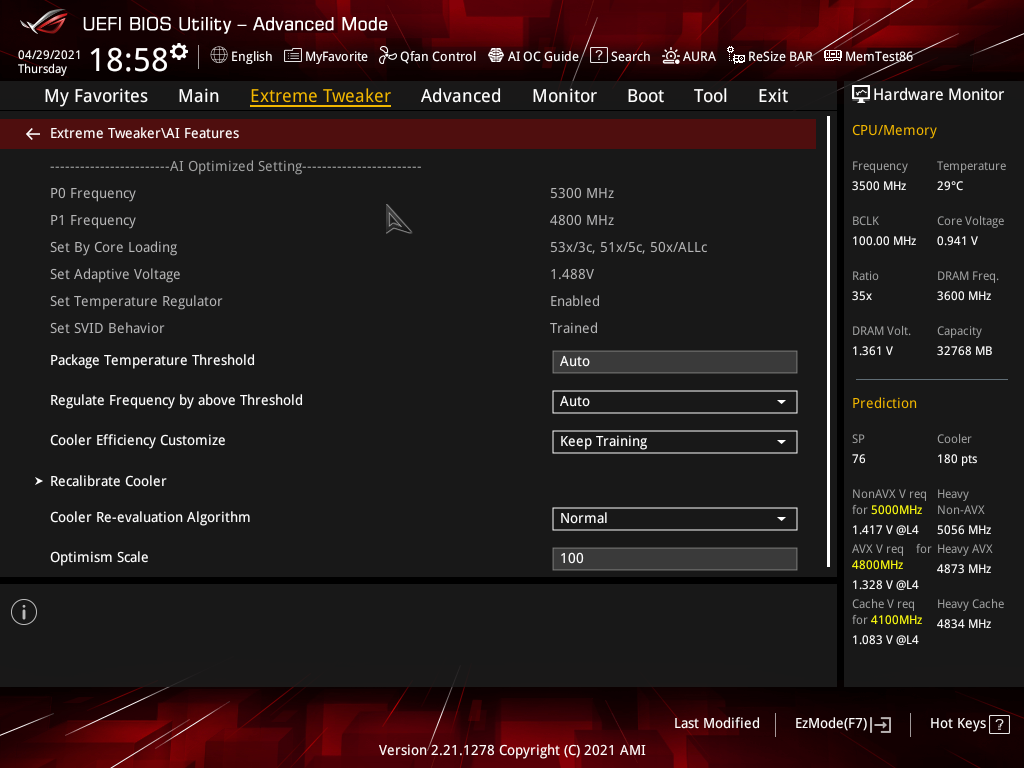
If you decide to stick with AI overclocking, this takes all the guesswork out of overclocking. The new prediction tab allows you to see how golden your CPU is by the predicted values. Everything is based on silicon quality and cooling thermal performance. For this 11900K, I have 76 Silicon and 180 cooler points. We can see what the potential of our overclock will be here and benefit from the prediction.
This 11900k supposedly can use P0 for 5300MHz and P1 for 4800MHz. Core loading can do 5.3Ghz on 3 cores,5.1GHz for 5, and all core of 5.0GHz. Asus suggest an adaptive Vcore of 1.488V with temperature regulation set to “Enabled” & SVID to Trained. You can choose to keep training for AI temperature curves to keep monitoring your scenario for optimal ranges. This is ideal for keeping those temperatures in check but you can also stop training if you become happy with your setup. It’s also important to note that while this is all predicted, it’s not set in stone and is to be taken with a grain of salt figuratively. For instance, 1.5V is pretty high but not unimaginable here. However, I think ideally you would want to be at 1.4 or below depending on your setup. Most people here should be able to get 5.0GHz all core but this all depends on your cooling and quality of silicon. LLC will also be a factor in actual Vcore ranges while in Windows, so keep that in mind for stability.
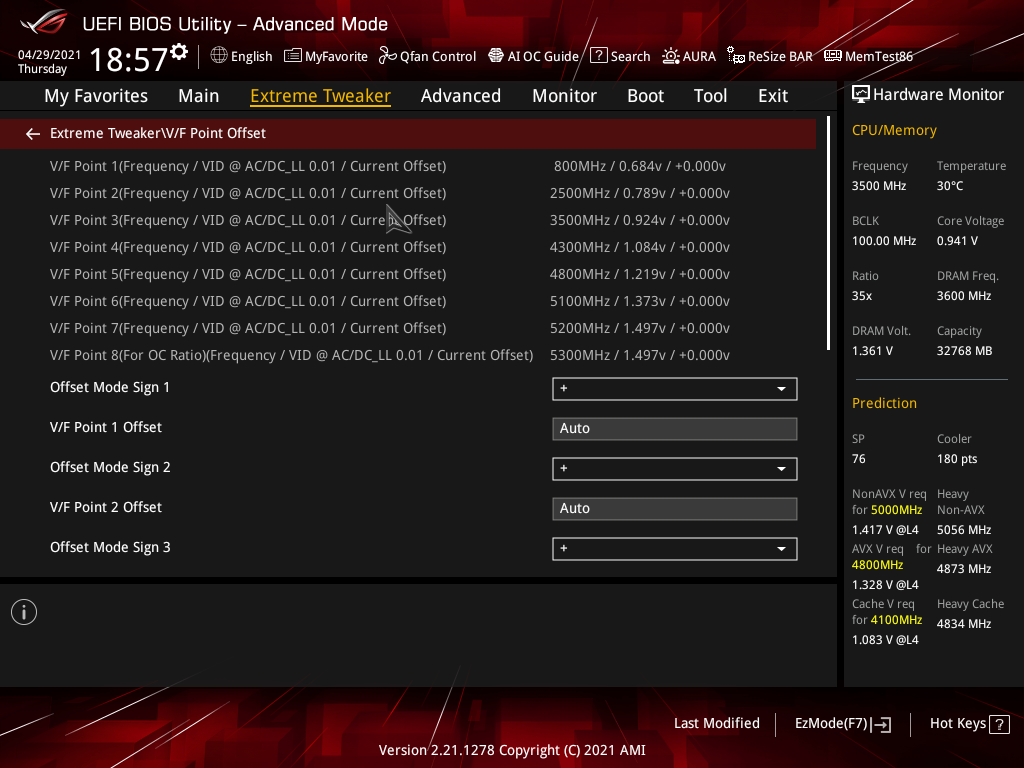
There is another way to cheat your overclock. The V/F point offset under “Extreme Tweaker”>”V/F point Offset”. This explicitly defines each stepped frequency range and what it believes the required voltage will be. While this doesn’t define the actual overclocking values of our CPU, it does provide some useful information that we can draw an inference from. My 11900K is to believed to have stability @ 5.3GHz at 1.497V / 5200MHz at 1.497V / 5100MHz at 1.373V / 4800MHz at 1.219V etc. There are a few things that you’ll want to take note of and primarily what frequencies require what voltage. For instance, we can figure out quickly what an all-core overclock will require or even what voltage the AVX load will need. This is going to be critical here because the 11900K runs HOT! You are going to want to use an AVX offset because of how these extensions work.
Since we know what Intel specified as the optimal settings let’s dig into how we can take the above information and manually tune the system using an all-core overclock. To overclock further let’s head over to the “Extreme Tweaker page”.
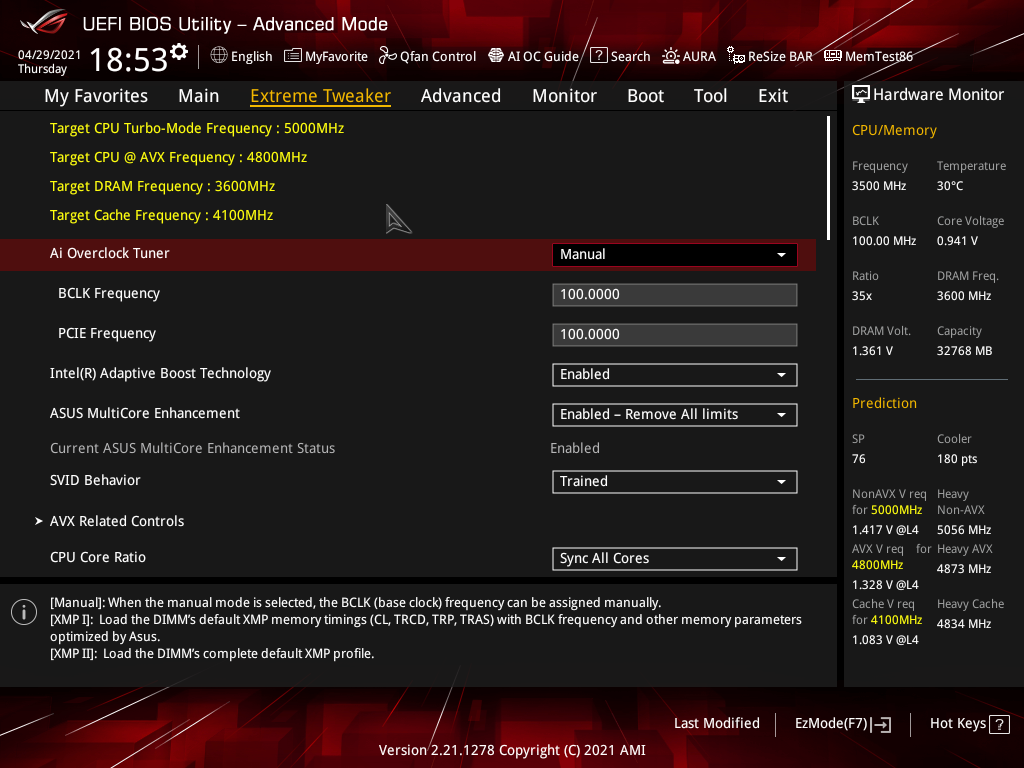
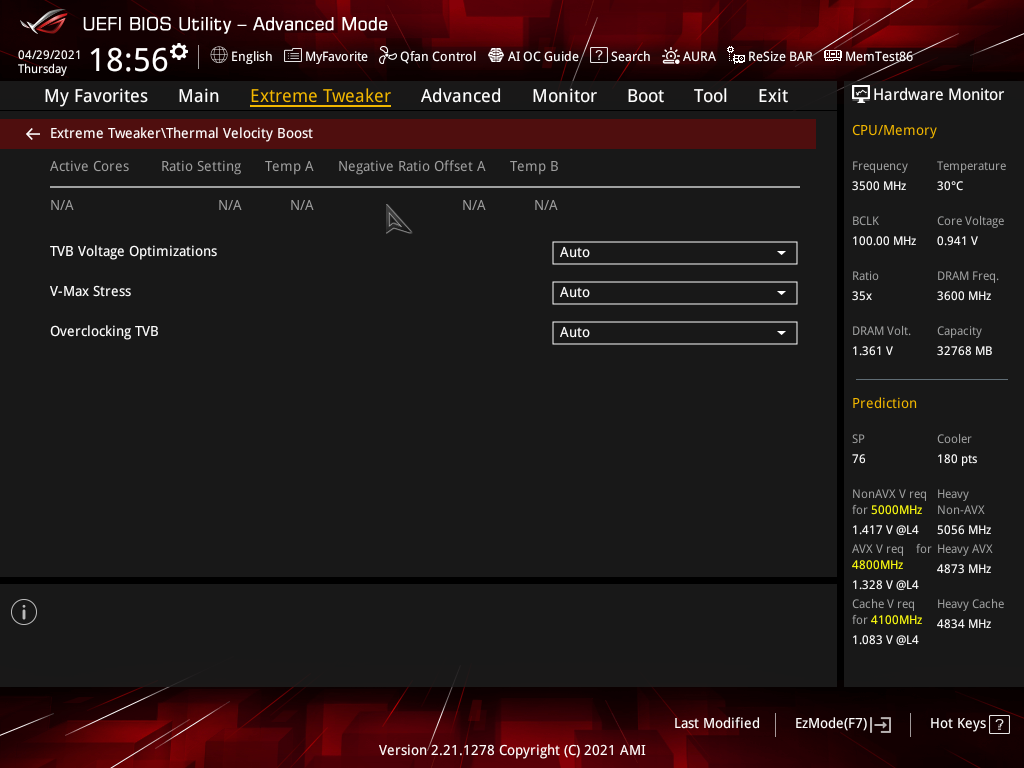
To begin manually tweaking you need to set “AI Overclock Tuner” to Manual. Since we are using the 11900K we have a few more settings like “Adaptive Boost. I already explained above briefly but Intel Adaptive Boost and TVB (Thermal Velocity Boost) could interfere with your overclock. I can say it’s probably best to disable these but I tried testing both scenarios. I found them more helpful than a hindrance when trying to keep the temperature threshold manageable. Even though we are going to manually set a frequency, it will dynamically manage your target all core frequency. It’s determined by workload, temperatures, silicon, and Tau. You can leave this to AUTO or just disable it if you don’t want it to interfere with your overclock. You can find TVB in the “Extreme Tweaker” tab and “Thermal Velocity Boost”.
Adaptive boost will primarily depend on temperatures/VRM and LLC. So again if you want you can disable this but I found both settings to not interfere with my all-core overclock but help keep it manageable. I never had any issues with it causing voltage spikes or frequency drops. It helped maintain the all-core frequency during heavy loads and when the AVX offset kicks in, it helps drops voltage/frequencies to another manageable level. It also helps with adaptive voltage but if you’re looking to lock in a steady Vcore and constant frequency, then you may want to disable the new boosting technologies.
An explanations of the settings:
Ai Tuner: I like to set this to manual. You can select XMP to set your RAM XMP profile. I always choose no for MCE settings. This is something that will allow ASUS to set what it determines the best values regardless of what Intel’s defaults are. I’m going to set manual because I want to manually adjust my settings.
BCLK Frequency: If you want to adjust your BCLK manually you can but be warned it will affect other hardware. My recommendation is to set it to 100.00 for normal overclocking and if you wish to squeeze out more you can with BCLK overclocking. This will alter DRAM ratios and isn’t recommended but can be useful when targeting higher memory ratios. Remember that the 11900K uses Gear Ratios for memory. This is going to affect how the CPU handles the memory speeds against the IMC (Integrated Memory Controller).
ASUS Multicore Enhancement (MCE): Setting this to Enabled is probably your best option for the 11900K. I’ve determined that it helps force the all-core Turbo policies from ASUS rather than Intel’s. It was recommended to disable this from Intel and for good reason but turning it on allows you to remove all of Intel’s power limits out of the equation. P1/P2 should operate outside Intel’s limits with it on.
For setting our all core overclock to 5GHz you need to change the CPU Core Ratio to “Sync All Cores”.
Sync all cores: Syncs all cores to the same value
Per Core: Allow ratios to be individually targeted.
If you want more of a quick auto overclock, you can just set this to “AI Optimized”.
AI: Sets targeted CPU frequency to predicted AI values. Sets up automatic overclocking based on Sil quality and Cooler scores. Optimism scale plays a role in achieving higher Core Ratios.
Enable MCE to remove all limits and set “SVID behavior” to “Trained”: This is ideal for allowing the predicted values to affect the SVID from the AI tab.
For this overclock we will set all cores to a multiplier of 50x. This will give us 5GHz across all cores. This is an easy target with the 11900K. It’s not guaranteed but most CPU’s should be able to handle this, especially if you have adequate cooling. Again make sure you pay attention to your LLC levels and voltage caps. ASUS also offers a feature called “Auto Voltage Caps” under “Extreme Tweaker” that lets you set a cap on your Auto voltage. This is ideal for stopping the CPU from going over what can be unsafe from the “Auto” Vcore pulling way too much Vcore when unnecessary.
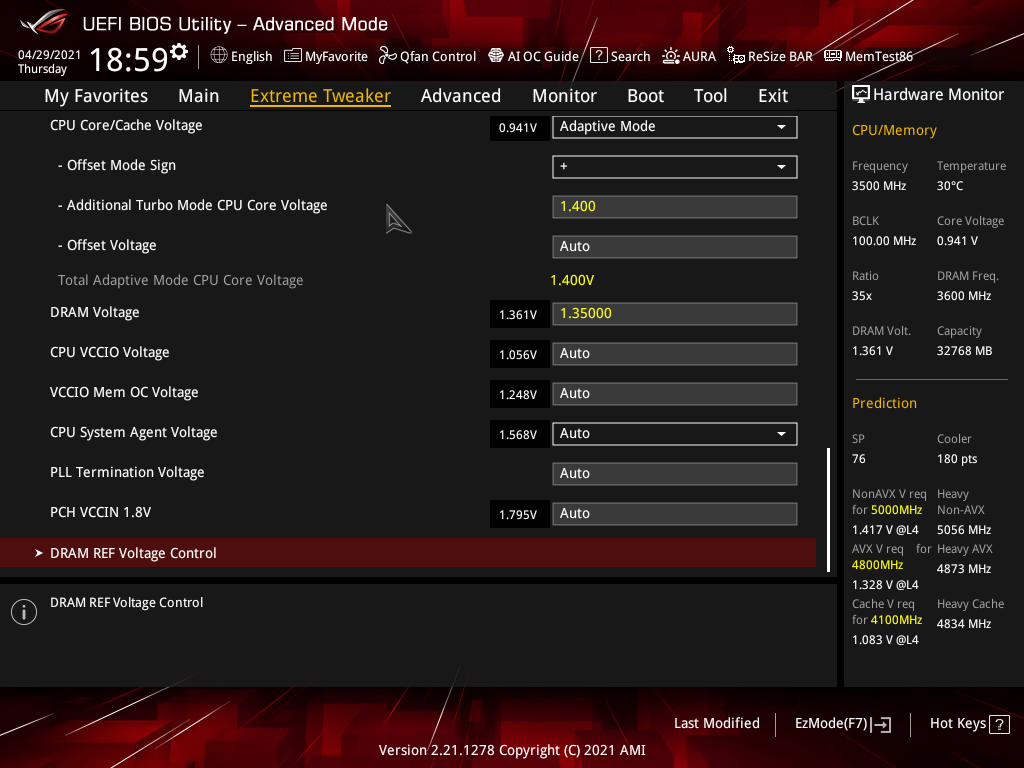
Set “CPU Core/Cache Voltage” to “Adaptive Mode” and I put 1.4V. This is change depending on your silicon quality and AI predicted values.
I’m going to take a risky approach here with adaptive Vcore. It’s normally better to fine-tune your voltage in increments for overclocking but we already know from the AI settings what we can potentially get. Just a heads up I went ahead and took the guesswork out for you. I manually tested each setting and found the AI settings to be very close. The only area they overcompensated for was Vcore voltage ranges but not by a ton.
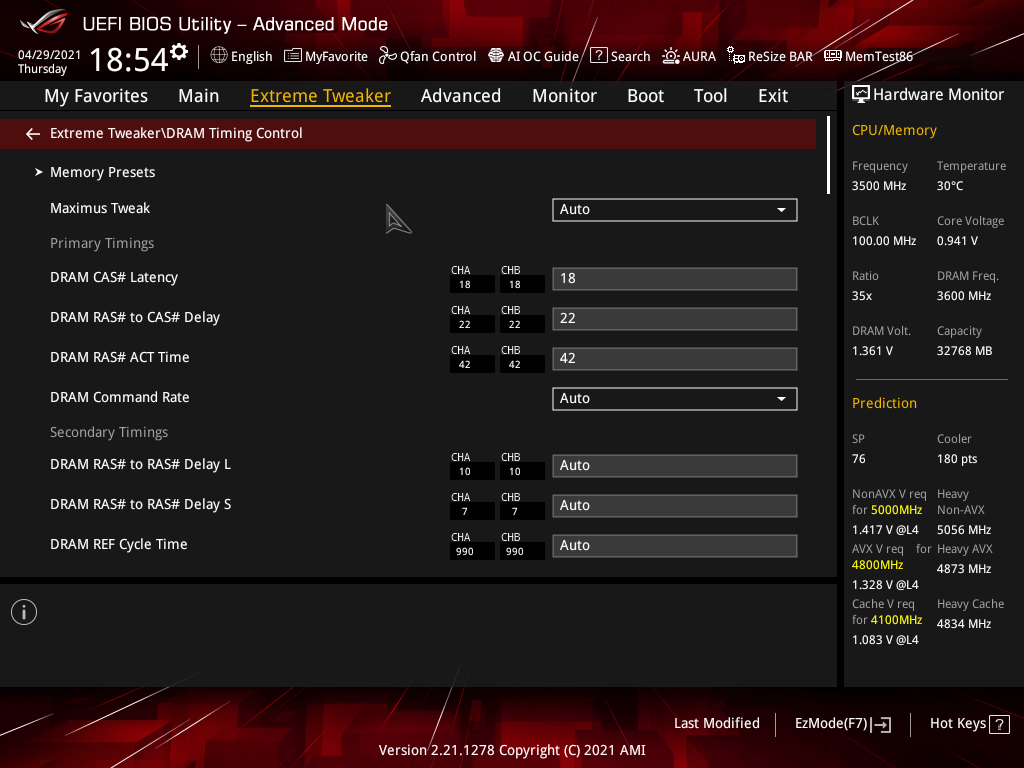
For the Vengeance PRO, we need to manually set the values for our memory kit. For “DRAM Frequency” under “Extreme Tweaker” I set the 3600MHz for my kit and then enter DRAM Timing Control. Most things you can leave on “Auto” here except we will change “DRAM CAS# Latency” from the default value to 18 / “DRAM RAS# to CAS# Delay” to 22/ “DRAM RAS# ACT Time” to 42.
The big changes here with the Gear Ratios can be found under “Extreme Tweaker”>”Memory Controller: DRAM Frequency Controller”. If you’re not doing anything extreme here chances are you can leave this to “Auto”. Gear 1 allows Intel’s traditional 1:1 ratio on the memory controller up to 3200MHz. This setting adheres to JDEC specifications and allows for a ceiling range of around 3600MHz-3800MHz depending on your CPU. The 1:1 ratio is favourable among low latency applications like gaming. Gear 2 however is how Intel’s new CPUs can reach frequencies beyond 5000MHz. Gear 2 is favored for higher data transfer rates but at the cost of latency. It isn’t as bad as it sounds and this all sounds familiar because AMD has had a similar setup with its Ryzen CPUs. Gear 2 allows for a more relaxed 2:1 ratio which puts less strain on the IMC. I set “DRAM Voltage” to 1.35V for my Vengeance PRO kit.
Set “Extreme Tweaking” to Enabled
Set “CPU SVID Support” to Auto
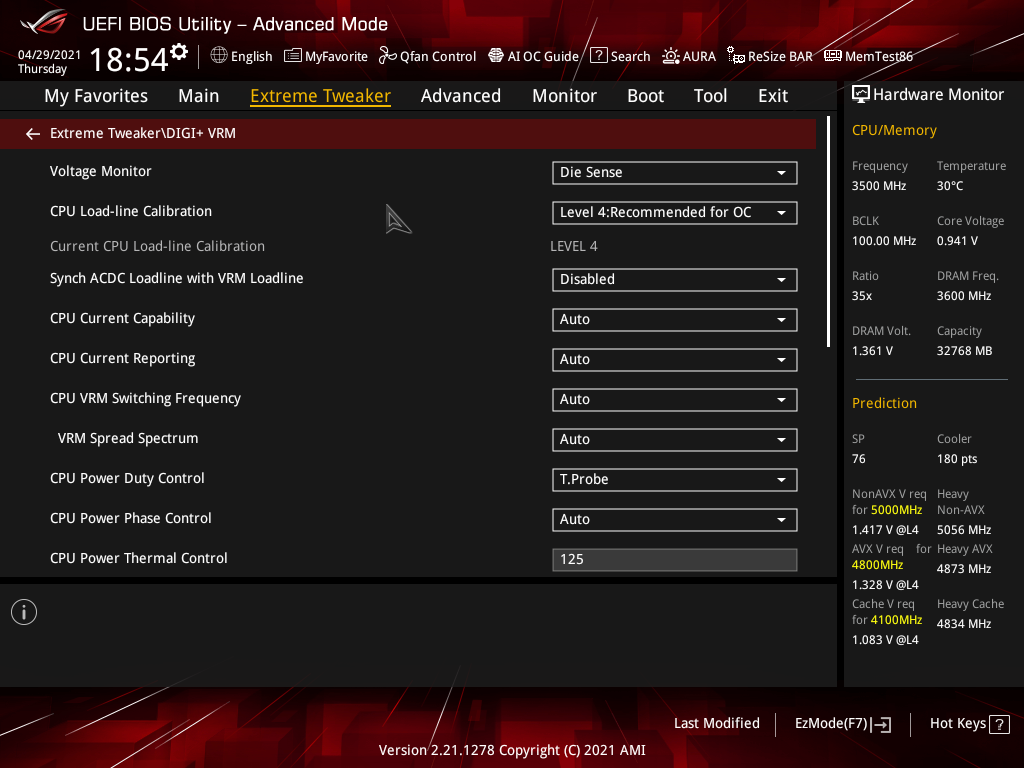
Now head into DIGI+VRM> make sure “Voltage Monitor: is set to Die Sense / “CPU Load-Line Calibration” to Level 4 (ASUS recommends this level for normal overclocking)
Make sure “ACDC Loadline with VRM Loadline” is set to Disabled.
You can also set CPU Current Capability to your desired level. For normal operation, you can leave this alone. Setting a higher number only regulates the shutoff point when the current limit is exceeded.
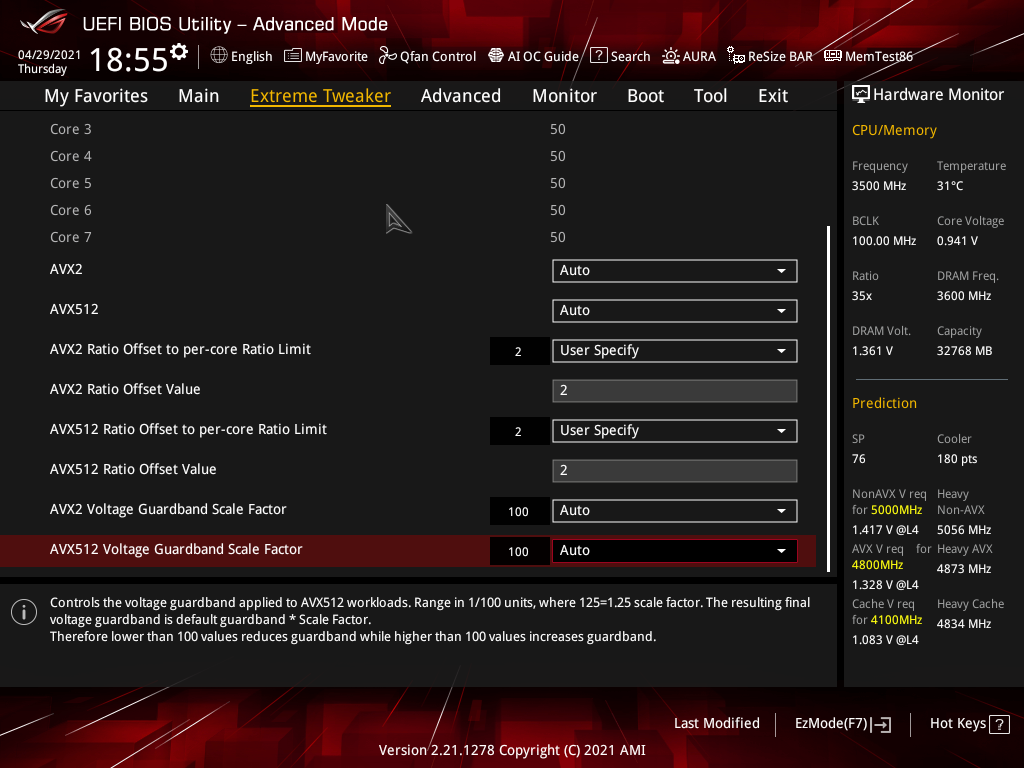
Lastly for CPU overclocking head to “AVX Related Controls” under “Extreme Tweaker”. We will be setting an offset of 2. This will force the CPU to lower our frequency by 2 from our all-core frequency. This is important because AVX can and will most likely cause the 11900K to thermal throttle. Be sure to set an offset of 2 to both AVX2 and AVX512 extensions.
Most of the other settings can stick to “Auto” for being managed. If you are going to hit higher frequencies using the Gears you may need to tune “CPU System Agent Voltage” / “CPU VCCIO Voltage”. The “Auto” values for me are healthy ranges for Z590 and the 11900K. Older CPU’s like the 9900K wanted you to stick around 1.2V-1.3V but now It’s much higher, and my “Auto” value shows 1.568V. In terms of acceptable voltage levels for daily use, you can reference Core Voltage: 1.45V (AIO) as long as temperatures are in a comfortable range for you/ DRAM: Primarily memory dependant but you can go up to 2.1V (Please note: This is scalable by kit and may change depending on frequency)/ VCCSA: 1.4V to 1.65V/ VCCIO_Memory: 1.4V-1.65V/ VTTDDR: Auto almost always.
You can fine-tune your IO/SA voltages if you’re still not stable with “Auto”. The values above are a reference ONLY! Some CPUs will require more than others and will depend solely on your CPUs memory controller and the memory kit used.
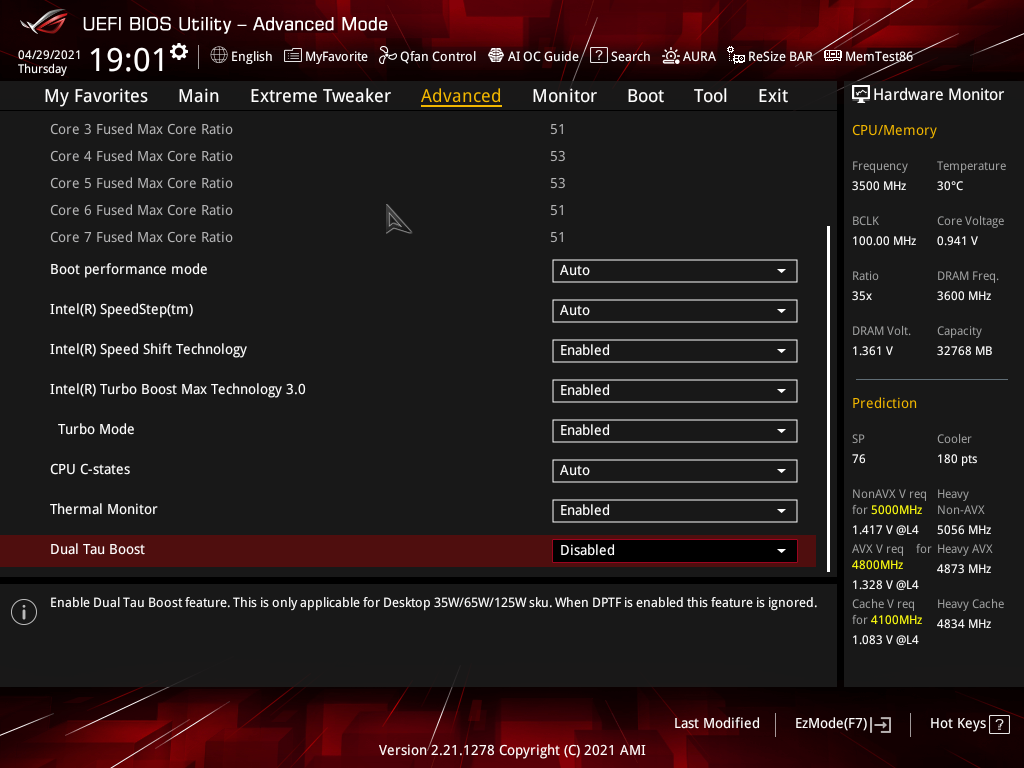
There are a few more things you can pay attention to. Intel Tau and TDP PL (Power Limiters) that Rocket lake can take advantage of. Remember I mentioned those Intel limits, turbo boosts, and MCE? The reason MCE helps is it removes Intels limits from the equation and allows for a longer tau. Tau is a timing variable Intel uses for how long the turbo duration is rated in seconds (s). The 11900K under Intels limit PL1 draws 125W TDP (Thermal Design Power) and PL2 up to 250W TDP. When tau is increased and the Pl caps removed we can work with higher turbo frequencies for a longer duration. Intel’s smaller TDP parts rated for 65W/35W have a shorter tau rated for 35s. You can leave the setting disabled here by default for the standard 56s duration. This should only be enabled when using the lower power consumption parts.
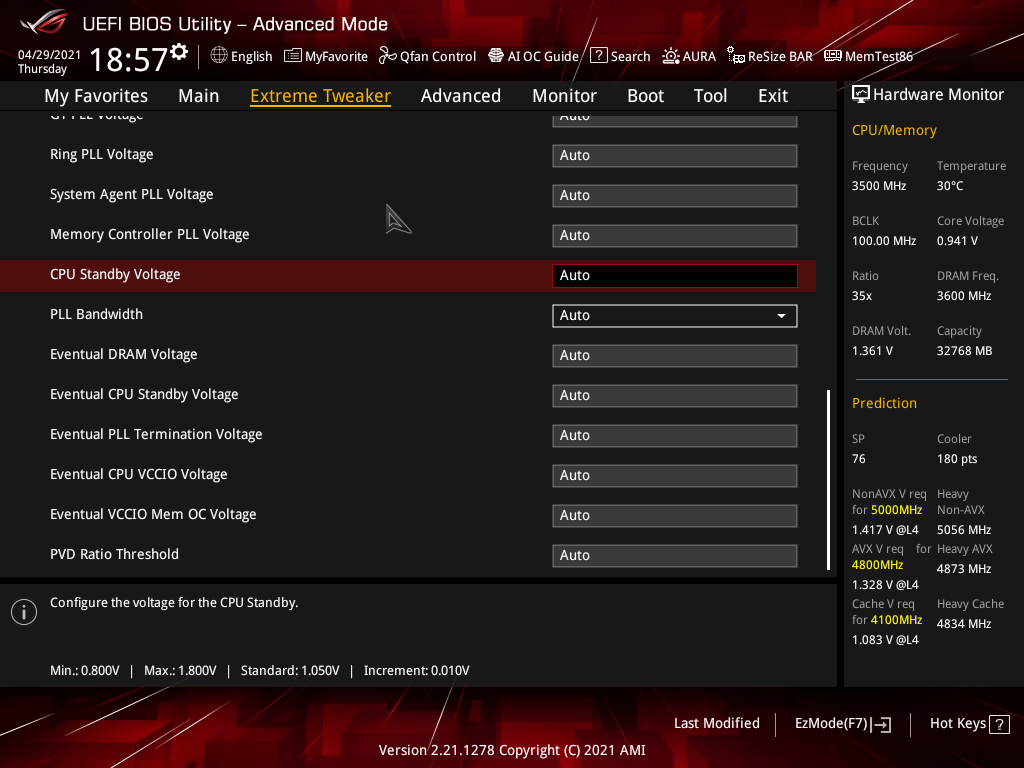
The other item you can tweak for stability is “CPU Standby Voltage under “Extreme Tweaker”. This can help when the CPU goes idle or drops adaptively for system stand by using Intel’s power-saving features. If you’re looking for a static overclock and Vcore you can disable all the power-saving features but since we are using “Adaptive Voltage” we will keep them enabled.
I do have some specific notes from JJ from ASUS. If you guy’s don’t know JJ please check out his weekly streams on the ASUS Facebook page.
CPU
- Target frequencies are the same but on average will be a little lower, this will be most likely evident in all core OC as opposed to per core OC.
- Voltage considerations – Adaptive vid you are fine with 1.5v for light and 1.3 for heavy ( if accounting for AVX offset ) as well as LLC.
- Do not worry about SAGV
- The cores perform slightly differently as the same frequencies, with the middle cores yielding the best performance and the first or last being the slowest. If the processor’s favored cores are at the front or back, the single-thread performance may be slower than a processor with favored cores closer to the middle. The cores have their own PLL and can run at different frequencies compared to the shared PLL in the prior gen.
- AVX offset is a reference against each individual cores ratio as opposed to all core active ratios.
- Performance testing at “stock” to run pure Intel default settings you must disable MCE. That being noted we have refined the MCE implementation. We use a temperature-based mechanism to keep the processor’s package temperature from constantly exceeding 90C. This is to ensure reliability and usability. This regulating is only in place at stock, not when you overclock. You can turn this off manually by disabling the temp regulator in AI Features/CPU internal power mgt.
- Each core has its own PLL(Phase Lock Loop) and can run at different frequencies
- The Rocket Lake CPUs scale differently: Do not modify the cache because of how the VID is managed and this can affect your overclock scaling
RAM
- The IMC scaling is very good but is a little different due to the gear ratios. It is not like AMD though with a hard line in that you want to stay under a certain divider and 1 to 1.
- There are 2 VCCIO voltages for RKL. VCCIO Mem OC Voltage is the rail that would need to be raised during overclocking Memory. Typically in the range of 1.25~1.45v. CPU VCCIO voltage at default of 1.05v powers everything else.
- Gear 1 is best suited to 3600 and below while gear 2 allows for higher frequencies it is not a question of comparing gear 1 to gear 2 as they are meant for different frequency pursuits. There are also changes in the sub timings between each gear where shifting to gear makes some adjustments to attempt to maximize efficiency while extending scaling. This is important as the ability for the IMC to readily hit frequencies above 4000MHz is a reality and key benefit of the platform.
- Only the odd DRAM ratios are favored by much higher frequencies
Stability Testing / Benchmarking
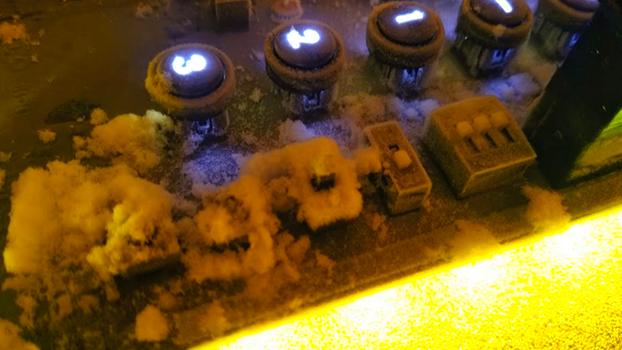
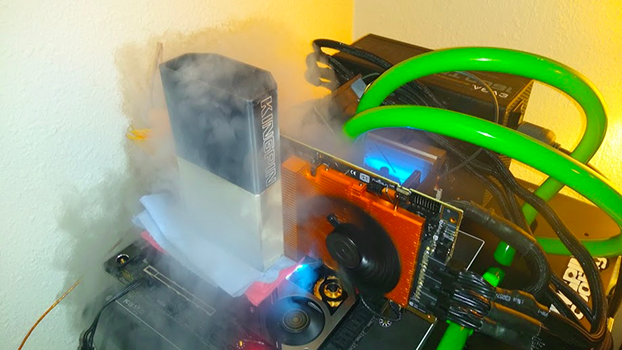
Thanks to David Miller for LN2 Photos.
Once all the settings have been changed to the desired values, it’s time to save and exit the UEFI to test for stability.
It is critical to test for everyday stability, otherwise, the infamous BSOD can occur. There are several tests available but which one should you use? I like to use a mix of testing tools\software but the 11900K is new and I experienced bugs with CPUID. The latest version 1.96 is required to properly display the correct voltage. I tested this against a multi-meter to verify results.
The 11900K and Intel Extreme Tuning utility offer a new power plan in windows called “GameTurbo(High Performance). I would recommend enabling this for the best performance and turbo durations. However, I’ve been doing a similar plan for years called the “Ultimate Power Plan”. You can enable this in Windows by opening a Command Prompt as administrator (CMD) and enter “powercfg -duplicatescheme e9a42b02-d5df-448d-aa00-03f14749eb61“. This plan is perfect for gaming desktops or workstations. If you want better power-saving features, then do NOT use this plan. It will run your CPU in maximum performance mode.
For testing load conditions we will be using a KILLAWATT. This will help show what the load in WATTs from the wall socket is with each phase. I will test high (100%) / gaming / idle (desktop) conditions.
For testing the NVMe performance of the MP600 CORE we will be using Aida64 Extreme & AS SSD. This will help show the best possible read/writes you can expect.
I will be looking at VRM temps with my FLIR ONE. The FLIR ONE tool is fantastic because it will allow tech enthusiasts and reviewers to show visual results for thermal testing. It is a next-generation thermal camera that works with iOS and Android devices. If you want to buy one look here. I’m using the new Pro Gen 3 model.
Tools
Aida64 Extreme: Great benchmarking utility with several built-in system benchmarks. It monitors sensors in real-time, it can gather accurate voltage, temperature, and fan speed readings, while its diagnostic functions help detect and prevent hardware issues. This program also has a good built-in stress test utility for testing your overclock and looking for instability.
CPUID (CPU-z): This is an ideal tool to check on voltage, CPU speed, memory timings, and memory frequency.
iCUE: This software is used for monitoring and controlling the H150i Elite Capellix. You can customize RGB lighting, control fan speeds, and monitor important system data. This was used to monitor the temperatures during my stress tests.
Intel Extreme Tuning Utility (XTU): Intel XTU is a Windows*-based performance-tuning software that enables novice and experienced enthusiasts to overclock, monitor, and stress a system. The software interface exposes a set of robust capabilities common in most enthusiast platforms along with new features available to Intel-based systems.
ROG RealBench: For a well-rounded test of stability, RealBench is going to be your best choice. It aims to test real-world load scenarios with stress tests from Handbrake, Luxmark, and Winrar.
Prime95: This tool is good for pushing your CPU to its limits. It’s a synthetic benchmark that pushes AVX workloads to the CPU. To really test the thermal limits of your CPU you can run the small FFTs test. it is not normally recommended to run synthetic tests with adaptive voltage on but in this case, it works well. Max temps of 65°C- 85°C are very reasonable with an AVX offset of -2. I am running at 4.8GHz AVX offset all core and 5GHz all core for gaming and other non-AVX loads.
If you want to test memory stability Prime 95 also has a “Blend” test that will test everything but test more RAM.
CinebenchR23: The problem with the 11900K is that it’s not a bad gaming CPU but rather shows its limits during multi-threaded workloads. You will see much better performance on newer Ryzen CPUs and even their last-gen 10900K because of the extra cores. Cinebench will help show this because it’s one of the best multi-threaded benchmarks available. Cinebench leverages the same powerful 3D engine found in the award-winning animation software Cinema 4D Release 23 to accurately evaluate CPU rendering performance capabilities across various systems and platforms.
Hardware Monitor: Offers hardware monitoring that reads PC system’s main health sensors: voltages, temperatures, fans speed.
PowerMax: This is a great small easy to use program that is a power virus. It will let you load as much power on your CPU over SSE/AVX as possible. This is ideal for testing overclocks and how much power will be put over your CPU power package.
3DMark (The gamers Benchmark): This utility hosts a bunch of different benchmarks to help showcase your PC’s performance and allows you to compare scores for competitive fun. We are primarily interested in the benchmarks that will show off the 11900K. We also disabled GSYNC for this as it can interfere with the test suites.
PCMARK10: This is another benchmark from UL that will help utilize system/content creation performance.


Since I covered overclocking, let’s see how much of an advantage you can gain from Intel’s recommended settings vs our all-core overclock. The 11900K is impressive because it offers a Max Turbo Frequency of 5.3GHz already. Most people won’t even bother overclocking this CPU but can easily get all cores to 5GHz. Remember, we have an AVX offset of -2 and only hit 5GHz during regular workloads/gaming with our all-core overclock. During regular operation, the speeds\voltages will reduce based on the adaptive voltage settings.
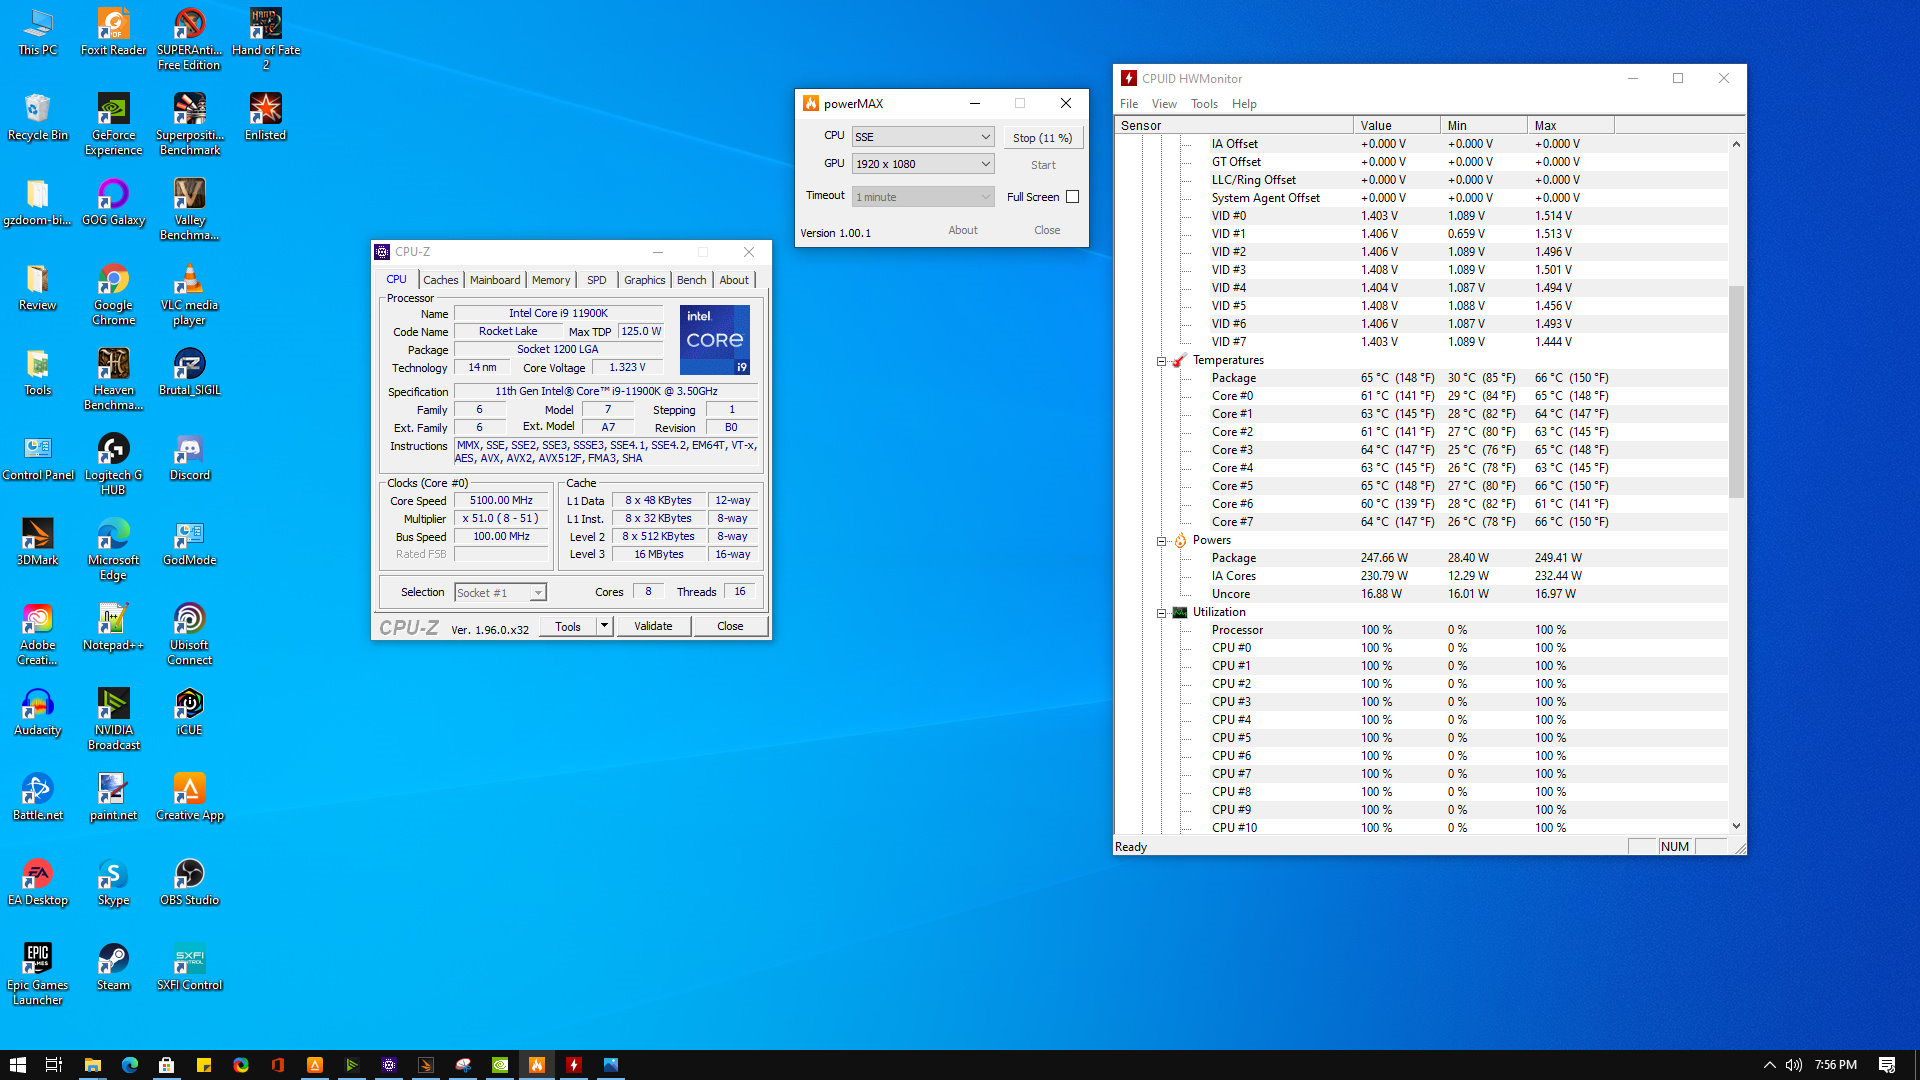
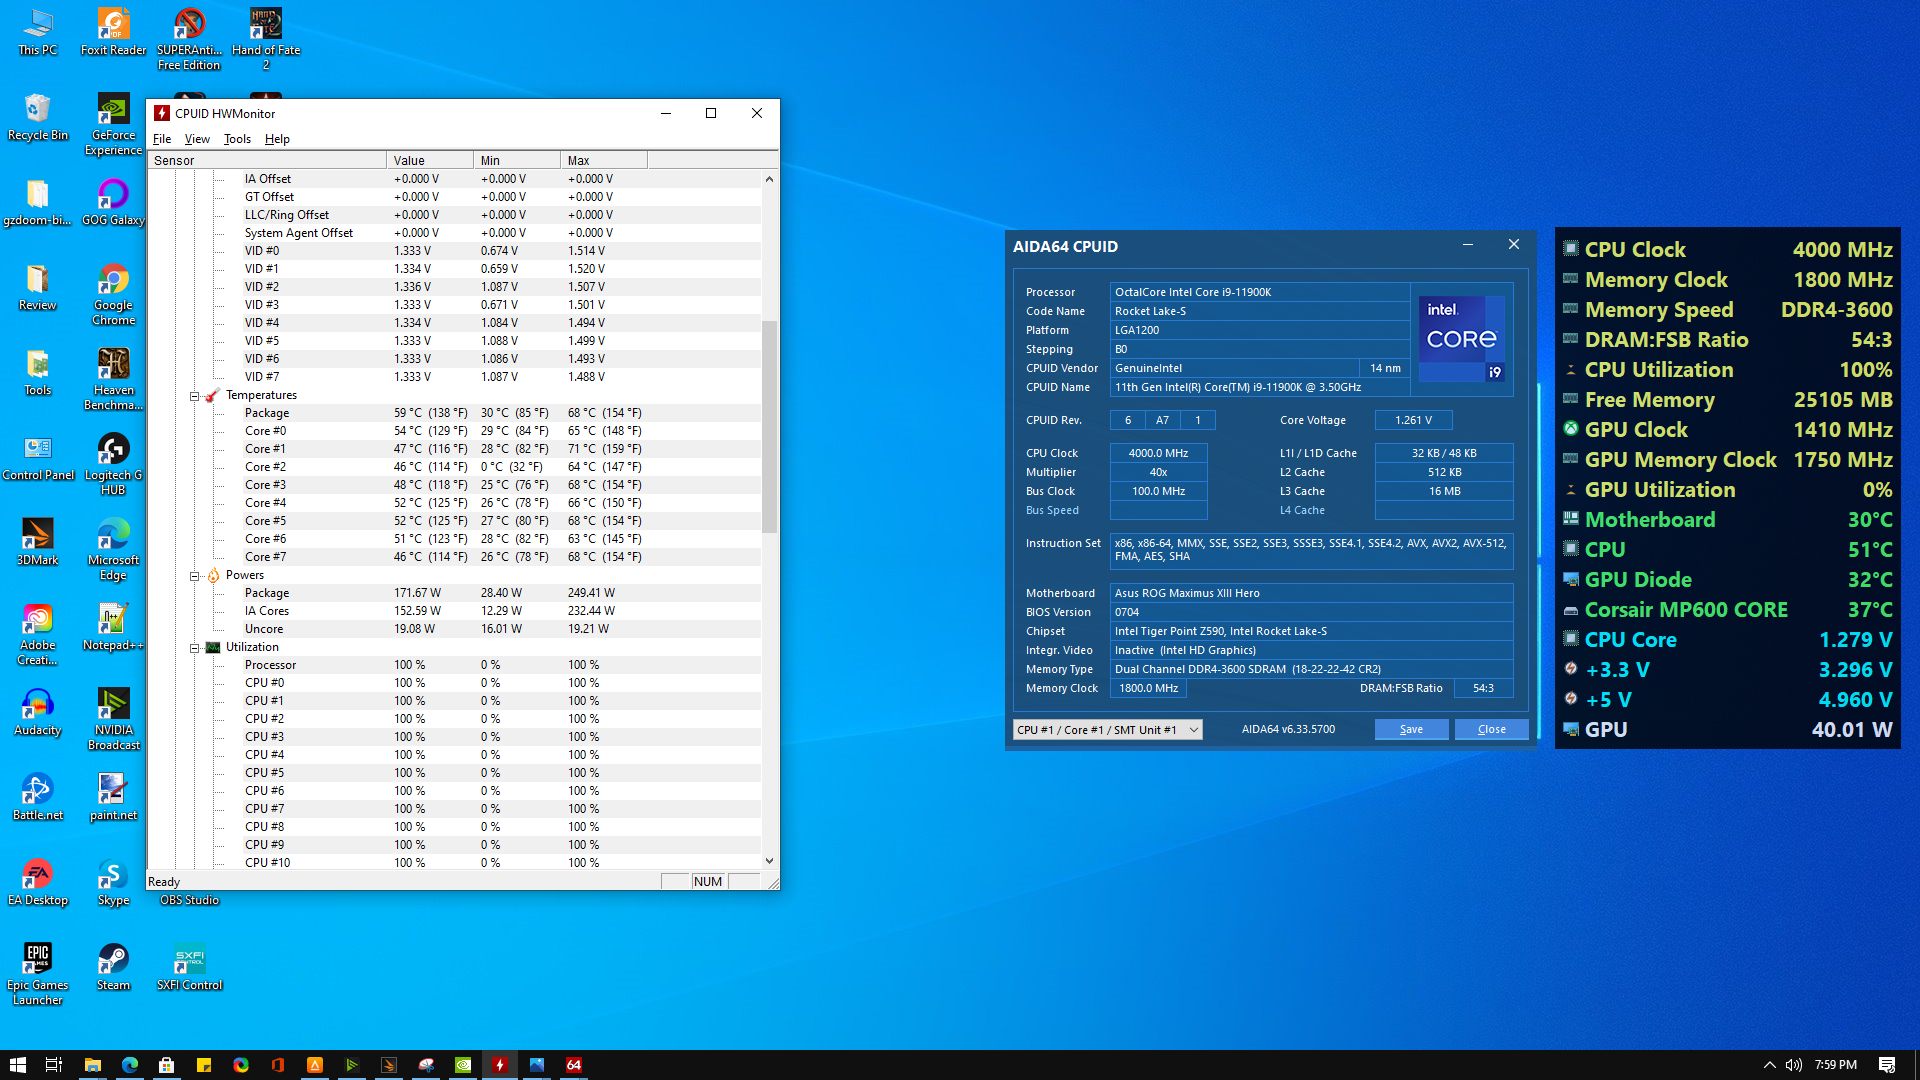
The first photo shows the boost to [email protected] with a package power of 250W. What’s interesting here is that the AI optimized is off and the CPU isn’t reaching the 5.3GHz but if you enable this, it should boost one core to 5.3GHz. We are still at the 125W max TDP. Power max allows us to see the max power because it’s a target power virus. With power max running the AVX test the CPU properly drops to 4.2GHz because the temperatures were getting out of hand. This test shows after dropping the frequency the temperatures hover around 65°C and in photo 3 we really have a problem when stressing under Aida64 using AVX workloads. The frequency dropped to 4.0GHz because temperatures exceeding 100°C. This dropped to help bring the temperatures back down to around 65°C-70°C. We know Intel’s limits and TVB/Adaptive boost is working here.
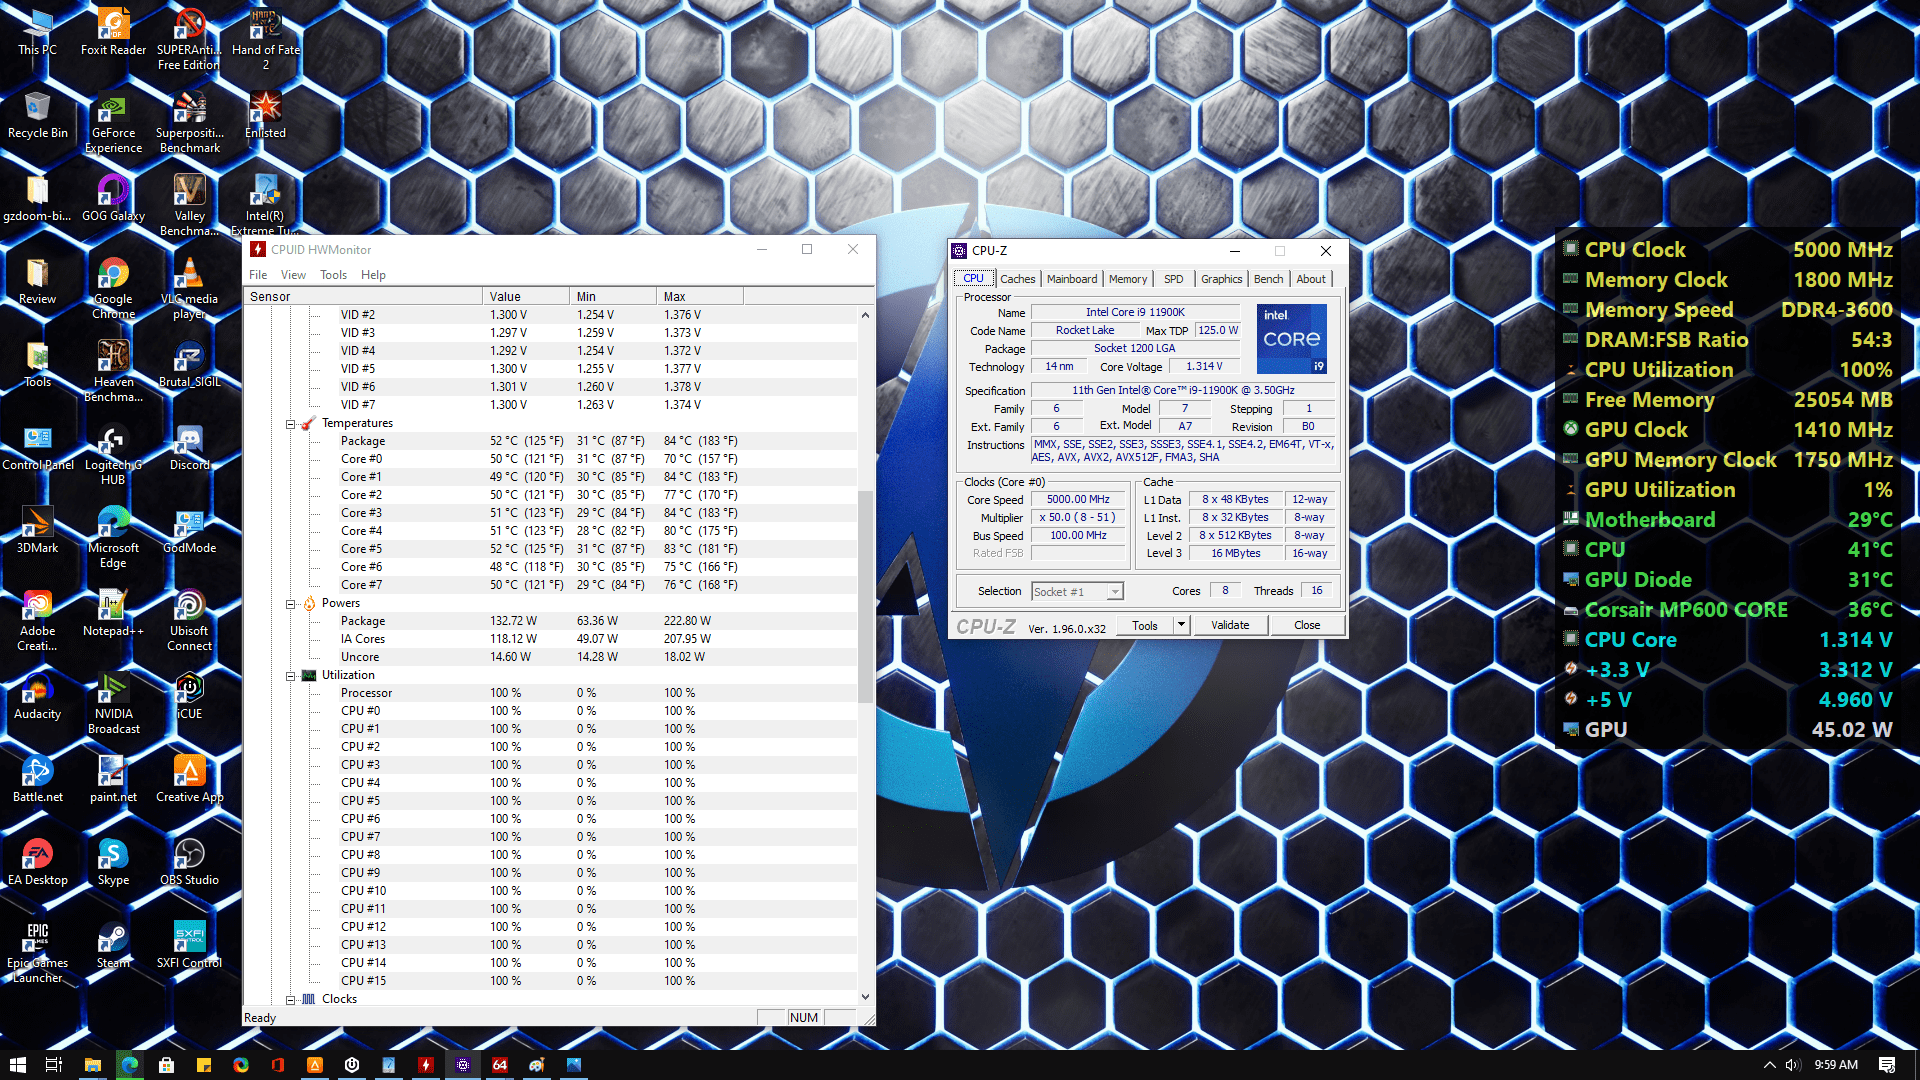
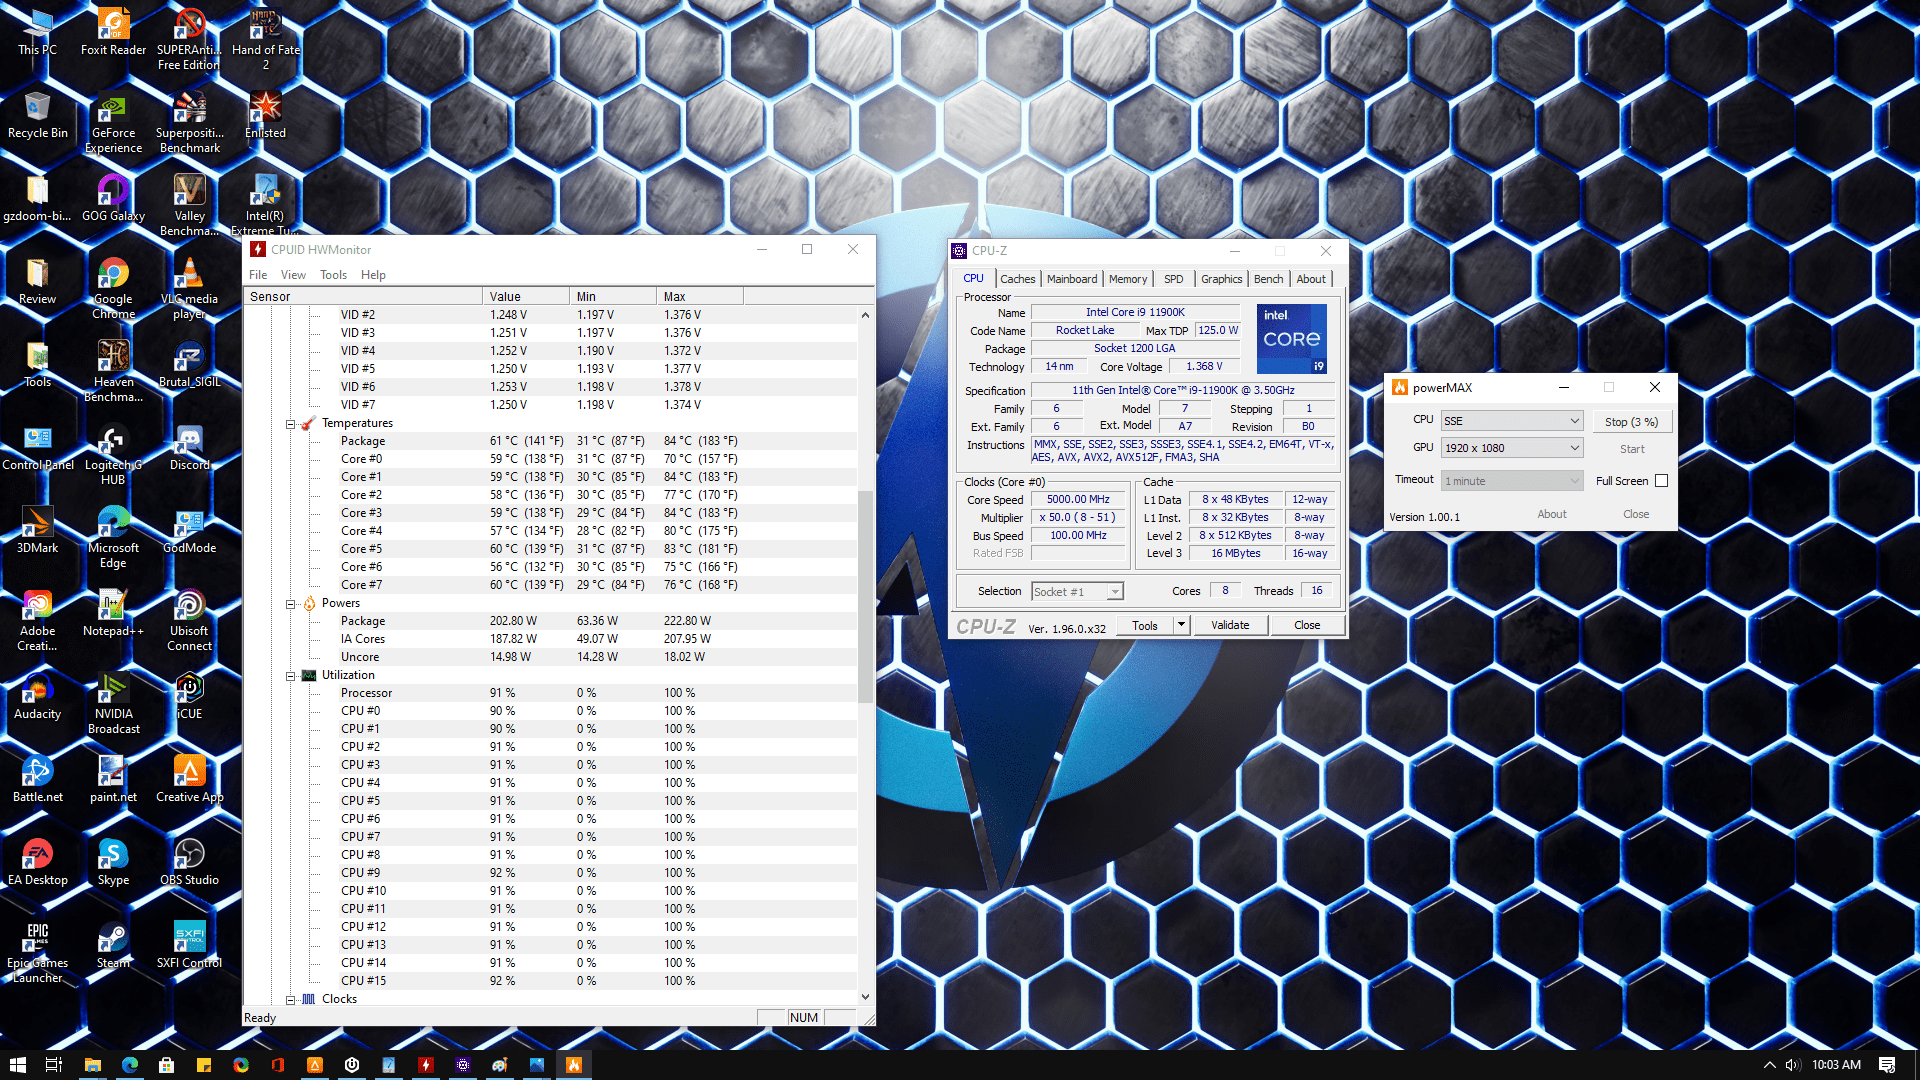
In photos 4&5 we can see the difference in the all-core 5GHz overclock vs Intel’s recommended boosts. While stressing Aida64 with No AVX/AVX, we can quickly understand why it’s important to have proper cooling and regulate the Vcore. With temperatures hitting 82°C-85°C, I’ve reached my comfort level for an AIO cooler. You can safely go up to 90°C but just remember throttling can occur and isn’t out of the question with these CPU’s. When we run the AVX workload and we see our offset drop to 4.8GHz, we get a healthy reduction in Vcore @1.305V. Temperatures also reduce to around 78°C. You’re going to see some variance between cores and it isn’t even outrageous to see up to a 10° difference. I also want to point out that the adaptive voltage is doing a fantastic job keeping voltages in line with my 1.4V limits/LLC 4 and helping keep the CPU stable. You can also play with the Auto voltage caps for even more regulation. The highest the CPU got on the Vcore was 1.368V for 5.0GHz across all cores during a Power Max test.
The biggest difference between the two configurations is the Intel recommended settings will boost to 5.3GHz and may actually be better for gaming and the 5.0GHz all core will do better over multi-threaded workloads like Cinebench R23. It’s hard to argue that automatic boosting/overclocking has really come a long way with what you can expect out of the box. Nowadays, you really don’t have to put in much effort to overclock your system. Intel’s settings will get you close to what a manual overclock can do. You may be able to squeeze out some extra performance by manually tuning your system but automatic tuning seems to be the way to go for basic gaming. If your into LN2 or extreme overclocking then most of the voltages and turbos will need to be disabled and turned off. The 11900K under the right conditions can hit some impressive CPU/memory frequencies.
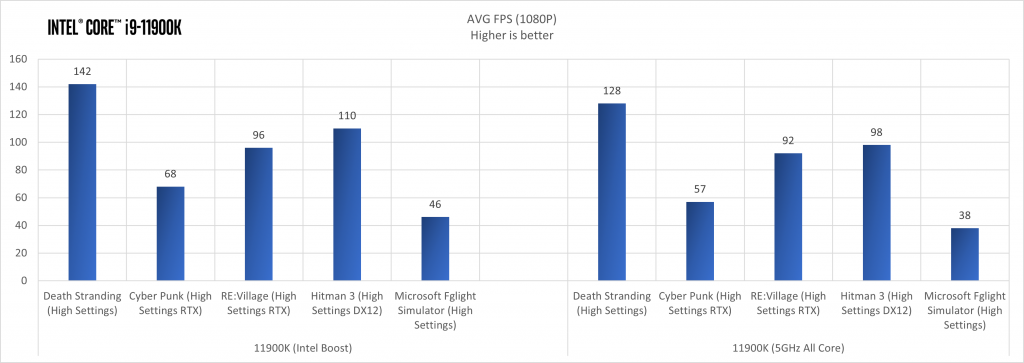
The 11900K is a beast with the Intel boost features enabled for gaming. This shouldn’t be a surprise though with the 5.3GHz boost. If you’re looking purely at game performance then the 11900K shows IPC gamins from previous generations. This will matter solely per title but we can see some benefits here. The 5GHz all-core overclock isn’t bad but will start to show more of a performance lead when we utilize benchmarks that take advantage of multi-core workloads. There is little to complain about here when comparatively looking at game performance because 5GHz+ with decent cooling will yield a decent average FPS for most titles and only hit temperates ranging from 54°C-68°C.
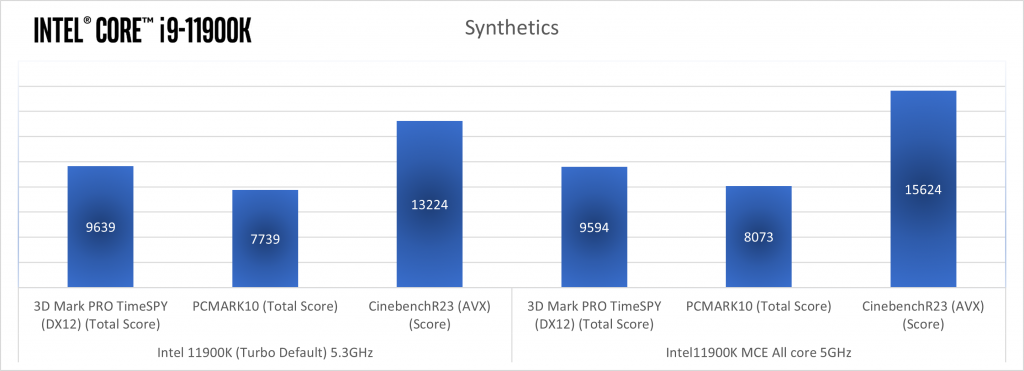
These tests prove the point about gaming performance with 3DMark TimeSpy. Obviously, the score is higher because it heavily relies on the CPU/GPU for calculating its score. On the other hand with Cinebench R23 and PCMARK10, the all-core overclock leads due to every core performing at 5GHz. Generally speaking if you just game, you can pretty much expect the 11900K to perform well but if you’re into content creation or multi-threaded workloads then it definitely is lacking behind. If you do both then doing an all-core overclock will be your best bet for the best performance for everything.
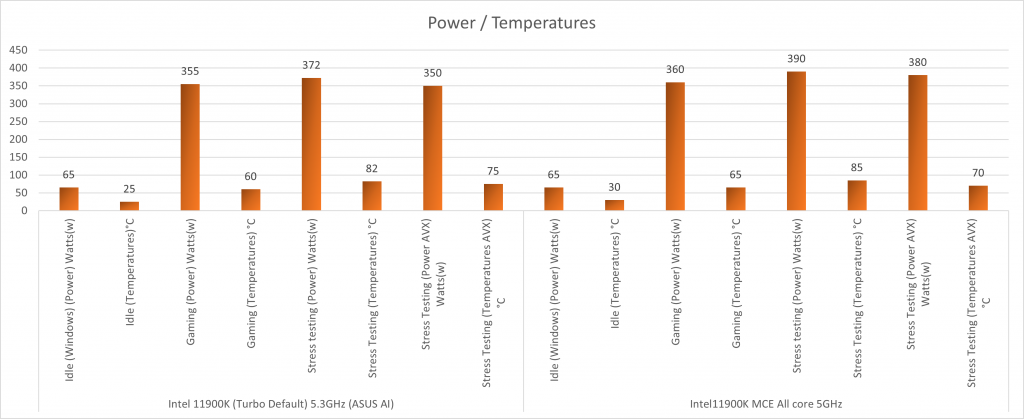
Temperatures are going to be a major problem with this platform. You really have to manage your overclock with a decent cooler and Vcore. The Intel Turbo settings show less power consumption due to fewer cores being hit at the same time but not by much. This will mostly be because of Intel’s power specifications and no MCE. Either way, your system will show the increased power consumption of the 11900K and the temperatures will also struggle without adequate cooling. You won’t see it above but I did throttle without the AVX offset.
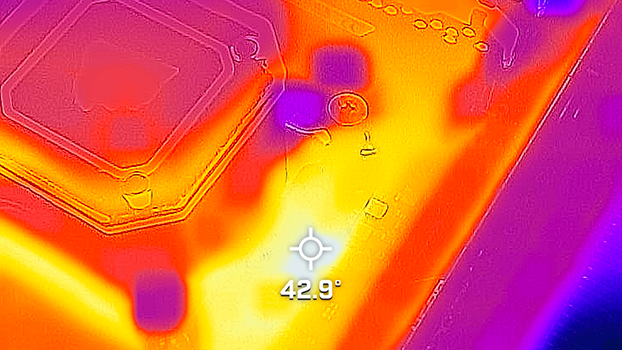
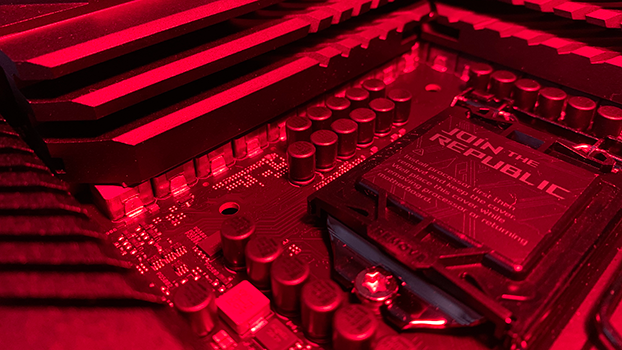
Power and load conditions also didn’t surprise me here but the Z590 Hero does have a much beefier VRM solution. It offers a massive heatsink design that seems to offer proper VRM cooling while under load. You can see this from the FLIR images.
The lower part of the heatsink surrounding the VRM only hit 42.9°C during load. This is outstanding considering I was stressing the VRM & CPU for over 60 minutes.
UPDATE: Updating benchmarks please look back soon for updated scores
We can tell from the Aida64 tests the 3600MHz does an excellent job scaling at 5GHz but we can gain a lot more performance with higher rated kits. The strength of the 11900K will come with higher-rated kits beyond 3200MHz-3600MHz. Give some time and we will probably see kits hitting beyond 5000MHz soon out of the box. The MP600 CORE really shines with the Gen4 speeds leveraged from the 11900K and Z590 platform.
Conclusion
I am not yet familiar with other Z590 boards but the new ASUS AI tools make overclocking a breeze. Just be wary that other boards implement Intel’s power limits while others don’t. This makes testing hard and therefore should be hard to identify some metrics. The 11900K provides capabilities beyond 5GHz but be cautious of the temperature threshold. I did at least stay within my comfort level of 85°C and the H150i Elite Capellix did a great job for an AIO. I don’t think many people will even bother with overclocking but that is okay. Intel has brought IPC gains and stretched out 14nm to its limits. You can expect 5.0GHz-5.3GHz but sufficient cooling will be required.
Out of the box, the 11900K provides some very impressive FPS. This CPU is going to be ideal for gamers but beware of the lacking cores when compared to the 10900K. The 11900K is hard to justify when compared to AMD’s offerings but buy anything tech-related is a challenge. The 11900K on NewEgg is $589.99 which still makes AMD the better option for people on a budget. This especially holds true when the comparative AMD CPU’s outright beat the 11900K in almost every multi-threaded benchmark.
Considering the 11900K is a tough sell unless it’s the only CPU available to buy. It’s not a terrible product in the sense of performance but what you’re getting for the cost makes it hard to justify. If you already have Z490, the small changes to USB and chipset are nominal but Gen 4 makes it appealing if you’re into storage. The 11900K is truly an impressive 14nm processor when compared generationally but at what cost.
We would like to extend our thanks to Corsair & Open Bench Table for providing us with the gear to make this article possible.
Want to discuss this product or give your views and feedback from your own usage? Discuss on the ExtremeHW Forums
Like our content? Please consider Donating to help us to continue our writing.
Related Posts
This Post Has 5 Comments
Leave a Reply
You must be logged in to post a comment.
“Older CPU’s like the 9900K wanted you to stick around 1.2V-1.3V but now It’s much higher, and my “Auto” value shows 1.568V. In terms of acceptable voltage levels for daily use, you can reference Core Voltage: 1.45V (AIO) as long as temperatures are in a comfortable range for you/ DRAM: Primarily memory dependant but you can go up to 2.1V (Please note: This is scalable by kit and may change depending on frequency)/ VCCSA: 1.4V to 1.65V/ VCCIO_Memory: 1.4V-1.65V”
Seriously? You are telling us that ONLY 1.45v is acceptable vcore for the 11900k, but its ok to go up to 2.1v on the dram voltage! And on air/water? And 1.65V is ok for SA/VCCIO!
This sounds extremely high to me aside from the Vcore on the 11900k which can actually handle more voltage than previous chips.
The M13HERO (just like previous ROG boards) sets the auto voltages for SA/VCCIO far too high & manually tuning them can yield impressive lower results. You cannot go as low on them as you could with previous chips like the i7-7700k but these voltages sound extreme, especially the Dram voltage of 2.1 VOLTS (isnt that extremely high for even LN2 overclocking?)
Please correct me if Im wrong, I havent had my 11900k for all that long but surely there is a misprint or three in the above quote from the article
Hey Jay, you are right to question those limits and those were suggested and tested over and up to with different conditions. LN2 was the high point and yes those are considered high and should be used with caution. Think of them as above extreme limits. I am NOT suggesting people who overclock with an aio, or even water go that high. I collaborated those numbers with ASUS and a few extreme overclockers I talk to. I should have posted in the article a few times what I recommended for normal conditions. Should be up to about 1.4 but obviously lower the better. Those are ranges and should be approached with caution. I do 1.4 adaptive voltage with llc4 on this chip and it normally sits around 1.36 in normal/gaming conditions. The picture I wanted to paint was 1.4 should be the new max I would recommend for air/water but obviously lower is better. The 11900K can handle a bit more voltage than previous generations Like you said.
If I didn’t state that clearly I would be happy to go on and elaborate and make it clearer. Overclocking can be hard to explain past a certain point and I was showing ranges from air-ln2 and even then those higher ranges are extreme limits.
As for the memory it depends on the kit and this is for people trying to go way beyond xmp, we’re talking the 1:2 gear ratio kits far exceeding 4000Mhz range. I am not saying you should set that voltage and go to town on your normal everyday kits, I’m just suggesting that some kits may tolerate those values if your looking to go towards world records. Most people won’t ever go near that, so perhaps I should explain better in my article if I didn’t make the clear. I apologize for the confusion and will try to edit some of those statements to line up with the proper voltages and conditions.
What I can not find anywhere, how does all Core OC (e.g., 4.8GHz) in conjunction with Single Core Boost? I have a 11700kf and that is stable at ALL CORE 4.9, OUT OF THE BOX he clocks 5GHz SC, but if I only set a core over Core Ratio on 5GHz freezes the PC. I overclocked with Turbo Ratio (1 Core 5GHz, 7 Core 4.99GHz) run all cores in Prime only with 4.9GHz. AVX is off and dew and Powerlimits on maximum (4096 watts). MSI MPG Z590 Carbon WiFi
The 11 series has a few new ways to overclock including turbo ratios but if I gather what your say correctly, you said avx was off. You should try turning that on with an offset of 2 or more. It will only lower the clock to those limits when a program initializes the avx extensions. It can also help with the higher temperatures.