
Corsair, a name we know all to well in the DRAM market. Well, today is no different with their release of the new DDR5 Dominator Titanium line. A line being touted as "Extremely Rare & Meticulously Crafted", we felt very privileged when Corsair was kind enough to send us along a 64GB Kit clocked at 6000MT/s (EXPO). Let's crack into this and see what we find.

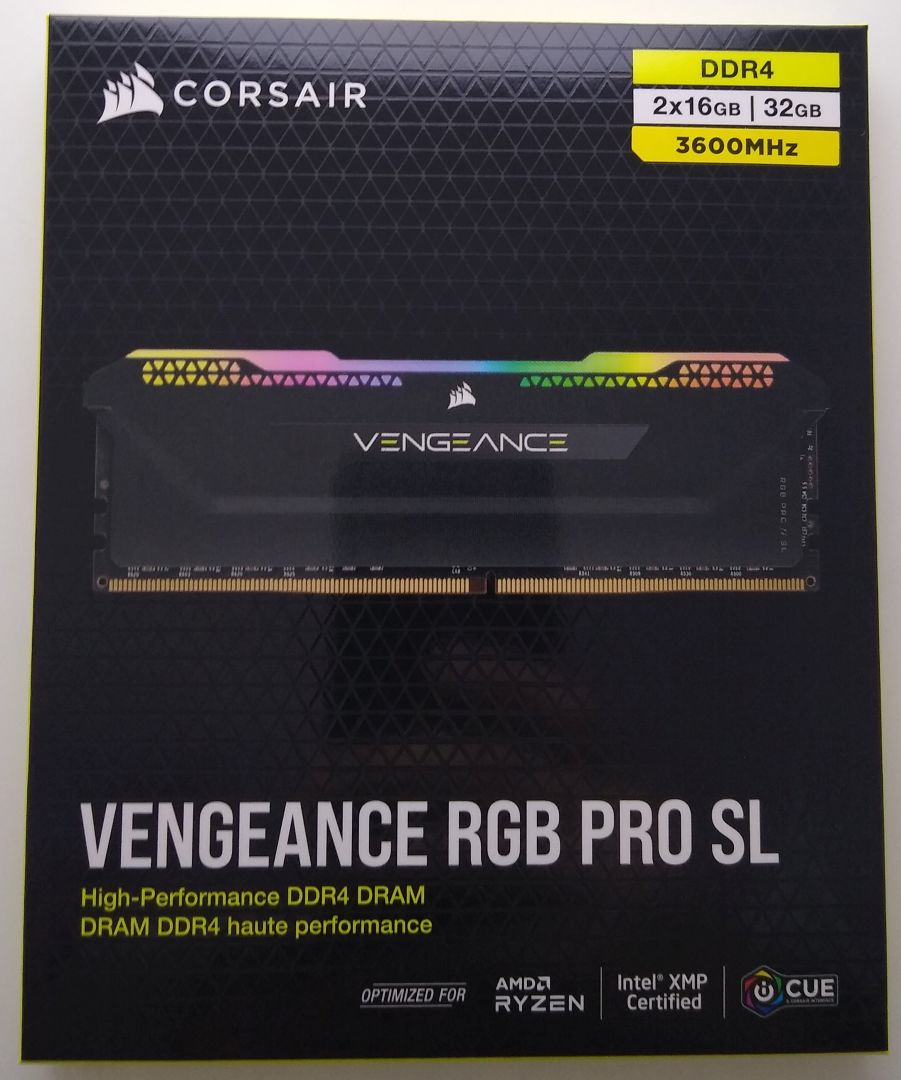
Back in June of 2018, Corsair launched the Vengeance RGB Pro line of DDR4 modules. That product line was targeted at budget gamers and became popular because of its excellent price/performance for being RGB memory. If you didn’t have deep pockets to get the Dominator series, then the Vengeance RGB Pro was your best bet within Corsair’s product line. That memory, which is now iconic in the computer world, just got a makeover. Today we are reviewing the Corsair Vengeance RGB Pro SL, in black. Join us as we check out this memory and give you a full product tour.
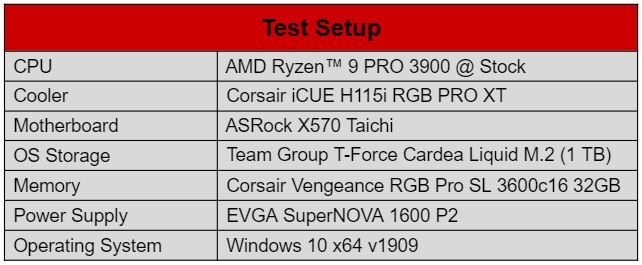
Specifications
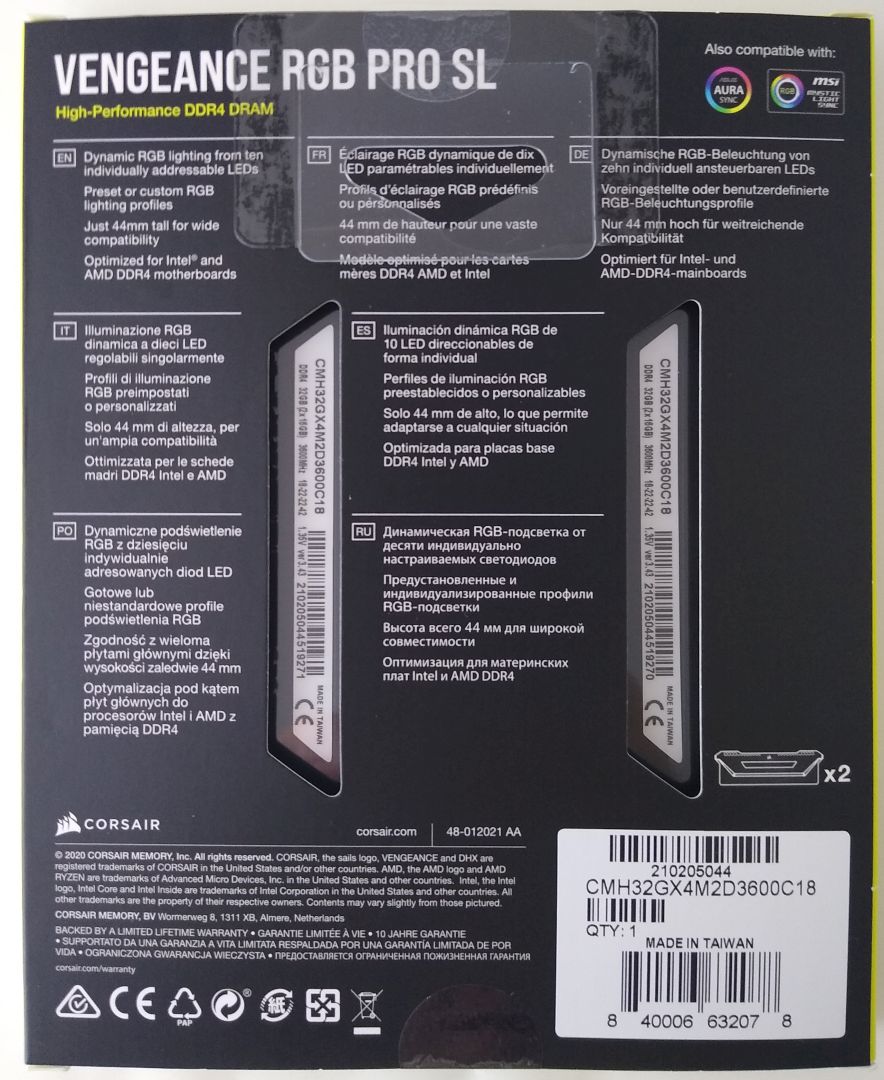
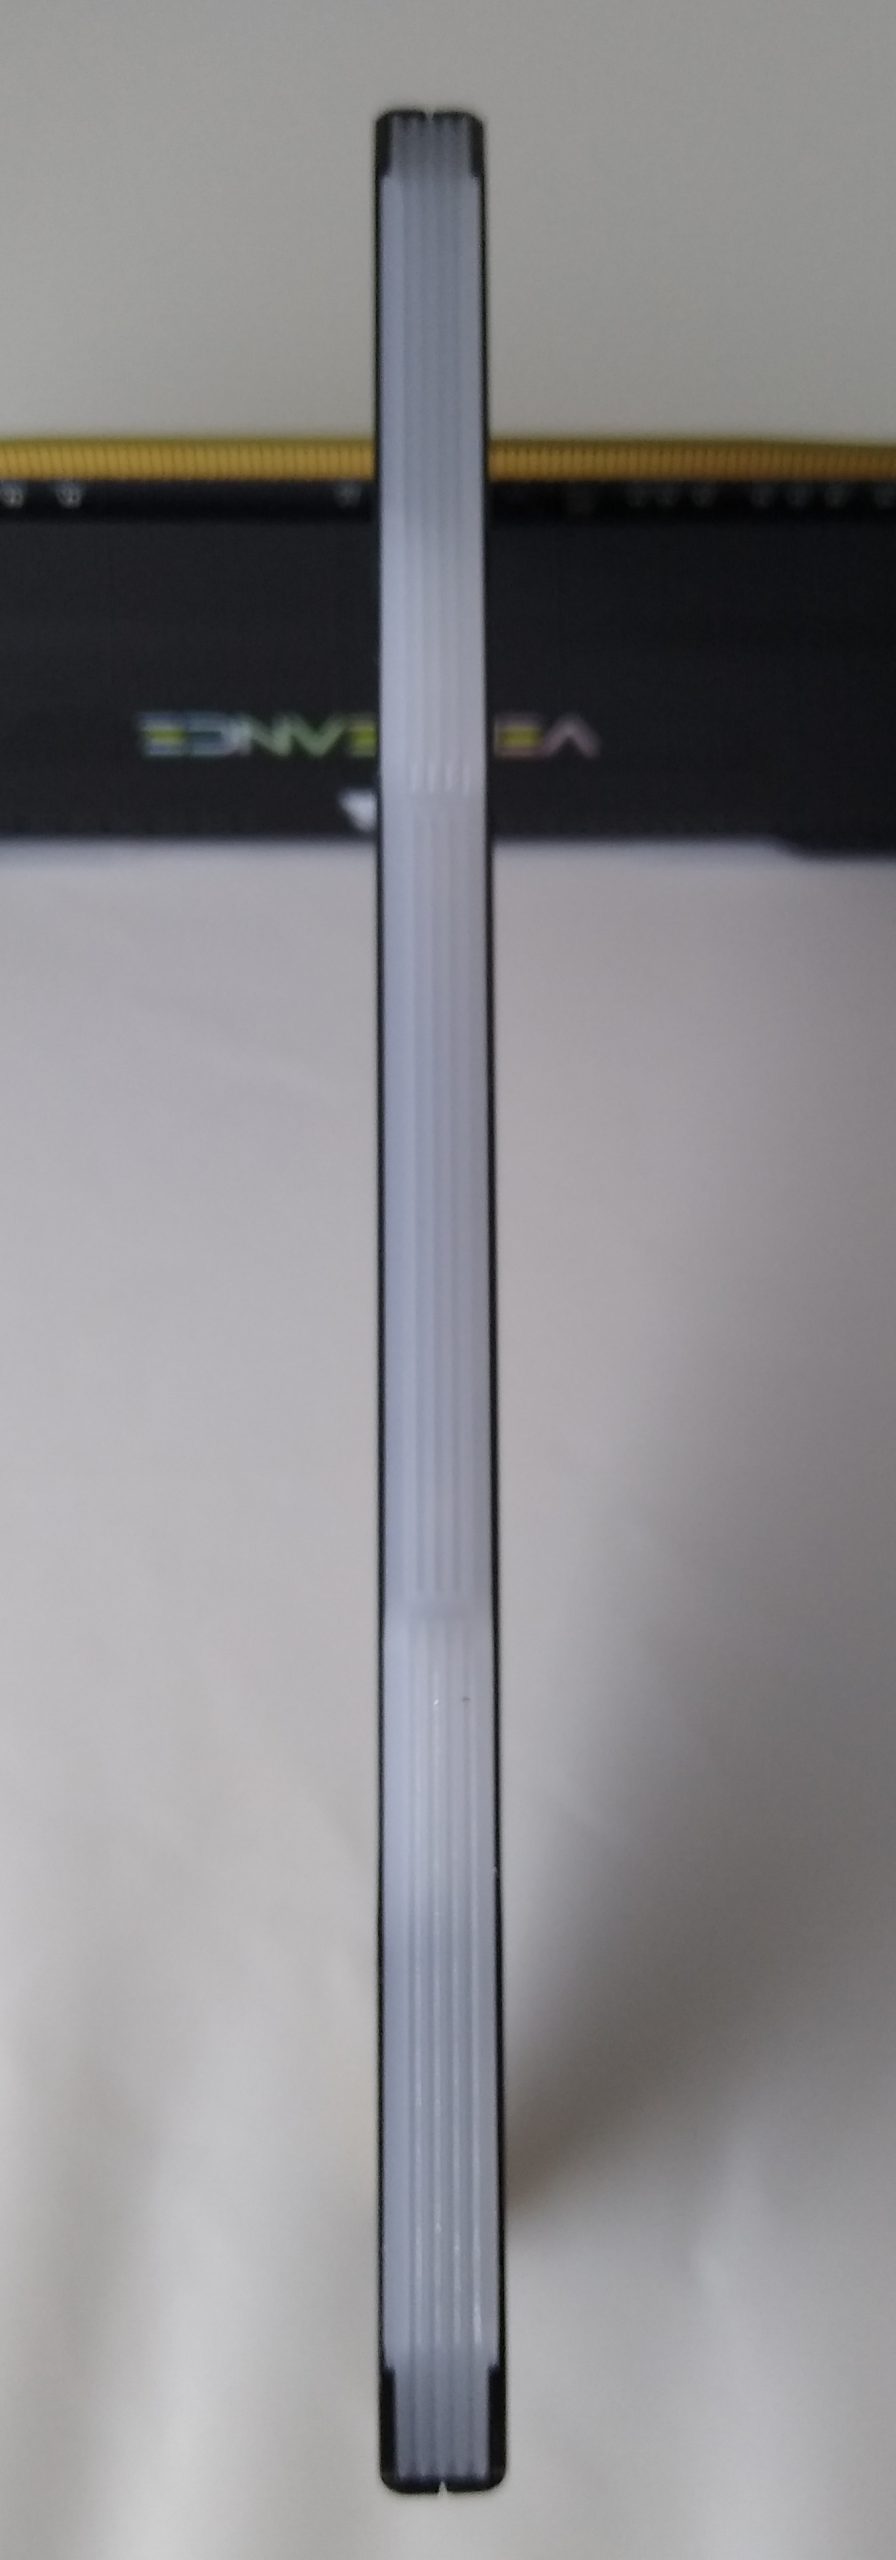
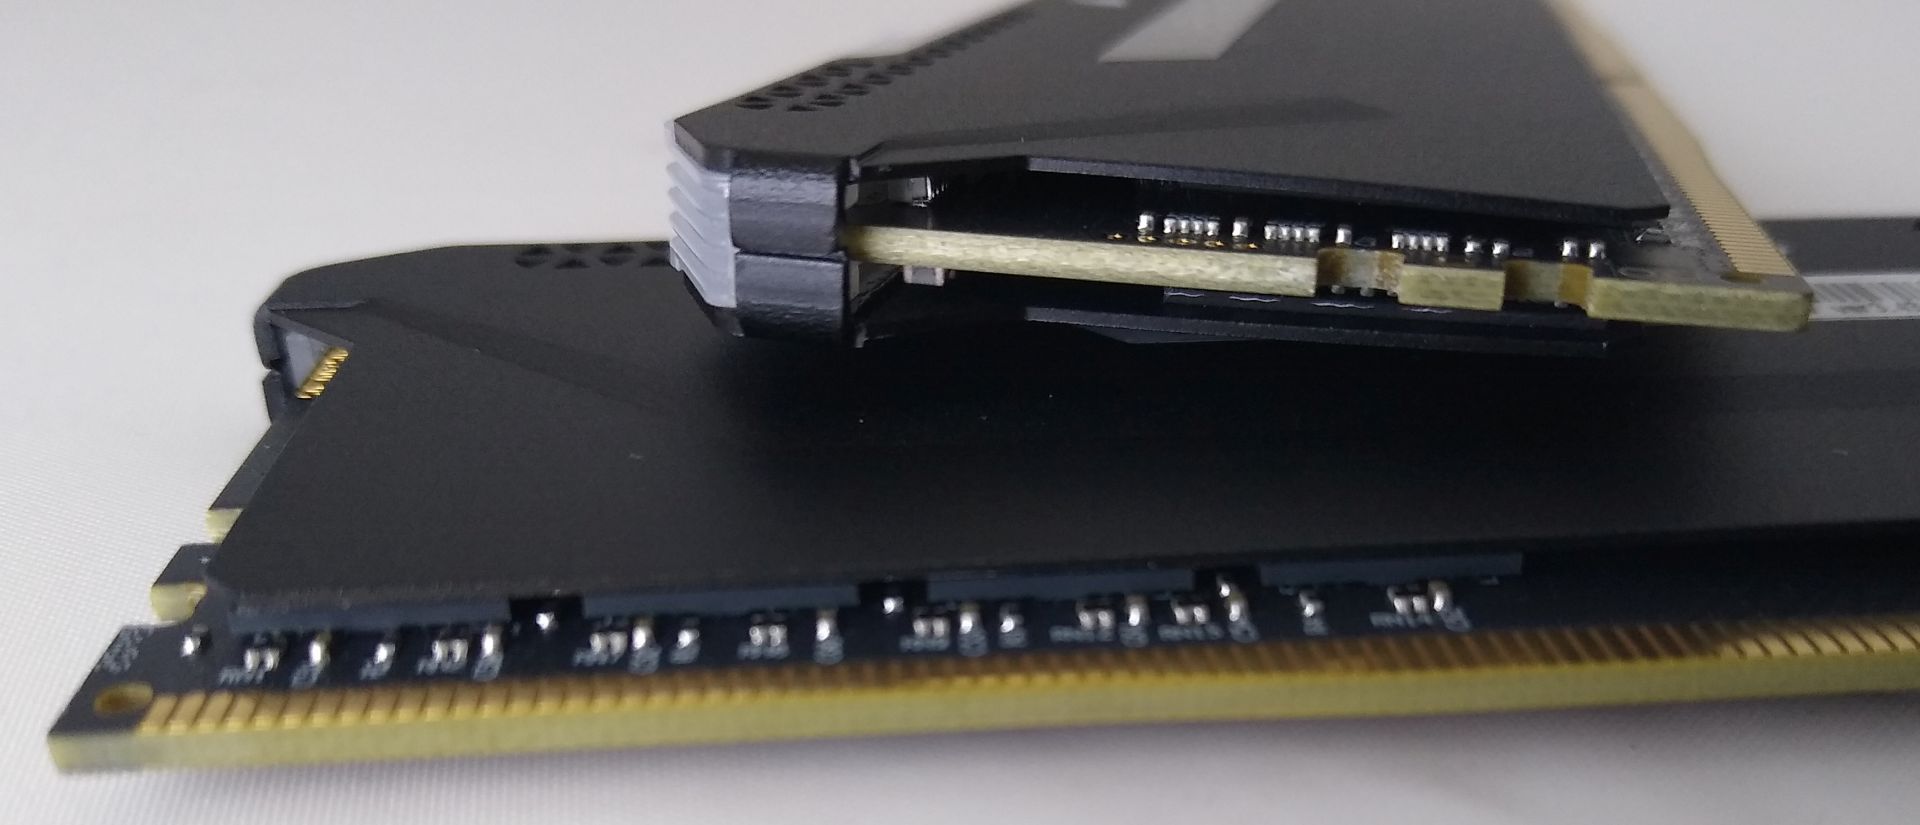
So the popular Vengeance RGB Pro got a makeover, what exactly did they do to the memory? The biggest and most important change they made was to lower the total height from 51 mm down to 44 mm. This enables the kit to be used with a wider range of coolers, however, it’s still tall enough to be a factor when purchasing a cooler. Other memory modules such as the G.Skill Trident Z series also feature a maximum height of 44 mm, so the Vengeance RGB Pro SL is a direct competitor now.
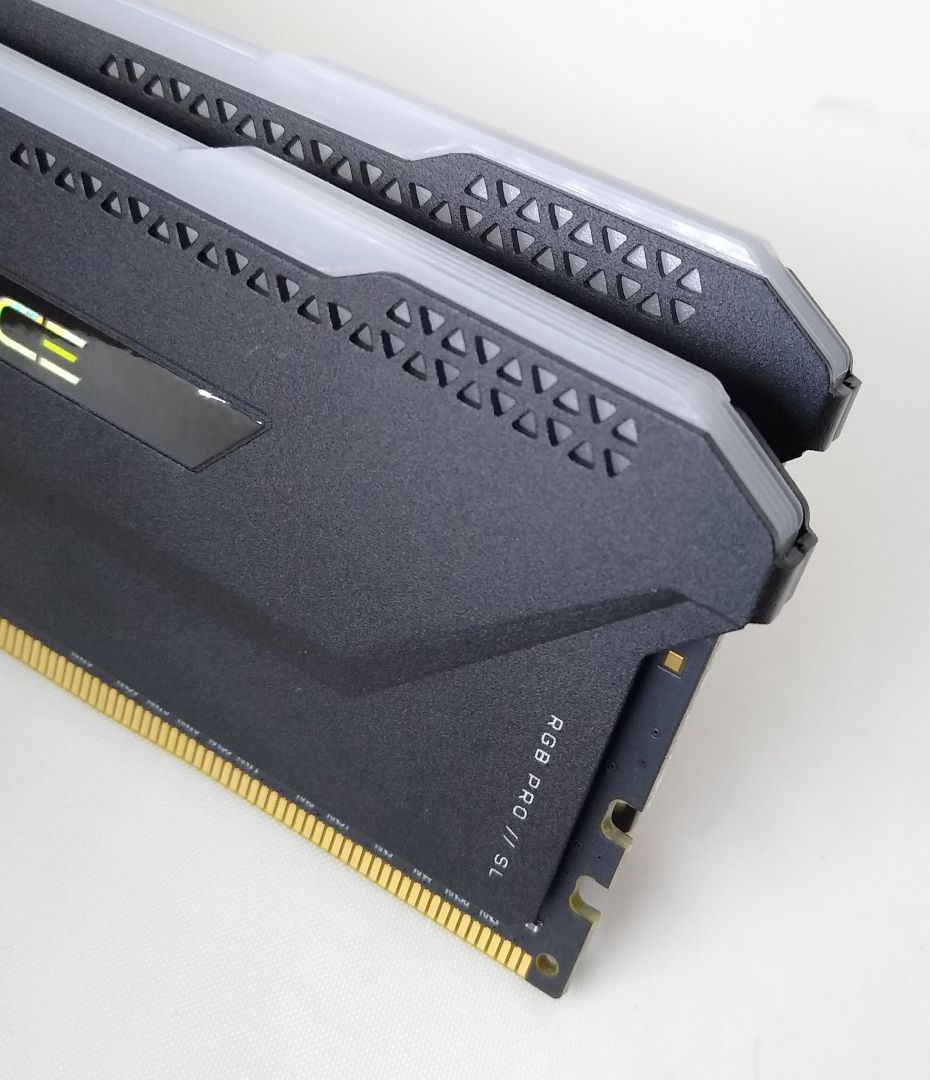
Other than the height difference, they made some minor changes to the heat sink design but otherwise, it’s very similar to the older model. They implemented the Vengeance RGB Pro SL with 10 super-bright, individually addressable RGB LEDs. There’s a classic looking white light diffuser running unobstructed along the entire top of the module so you get maximum light output from the 10 LEDs. The heat spreader is anodized aluminium and just over 1 mm thick, which is rather thin. However, as we’ll see later the type of IC they built the stick with means the heat sink thickness won’t be an issue.
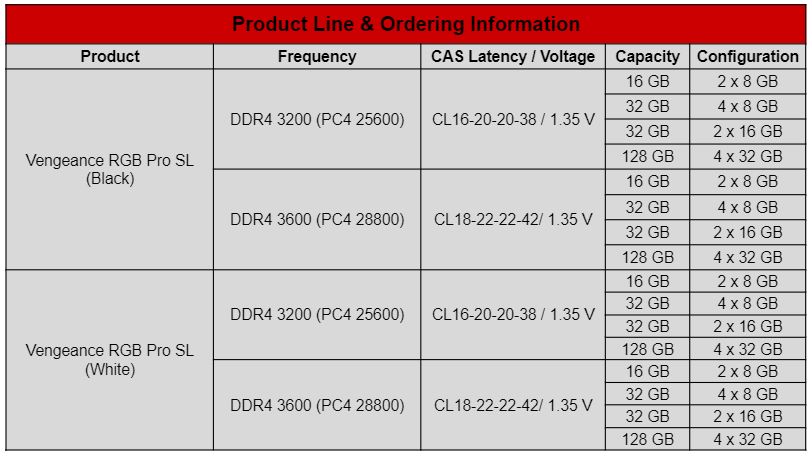
The product line consists of only two different speed ratings at the time of launch. Please refer to the table below for a full listing of the product line:
Quick Features
- OPTIMIZED FOR INTEL® & AMD® CORSAIR VENGEANCE RGB PRO SL DDR4 memory lights up your PC with dynamic, individually addressable RGB lighting while delivering peak performance in a compact form factor.
- INTELLIGENT CONTROL, UNLIMITED POSSIBILITIES Take control with CORSAIR iCUE software and synchronize lighting with other CORSAIR RGB products, including coolers, keyboards and fans.
- PERFORMANCE HERITAGE Each Vengeance RGB PRO SL module starts with our custom performance PCB and tightly screened memory chips to provide incredible frequencies, for maximum bandwidth and tight response times on all platforms.
- COMPACT FORM FACTOR Standing at just 44mm tall for wider compatibility with air coolers and smaller form factor chassis, each module looks great from any angle.
- ONE STEP OVERCLOCKING With Intel® XMP 2.0 support, a single BIOS setting is all that’s required to set your memory to its ideal performance settings.
- LIMITED LIFETIME WARRANTY FOR COMPLETE PEACE OF MIND AND YEARS OF WORRY-FREE PERFORMANCE
- Source: Corsair
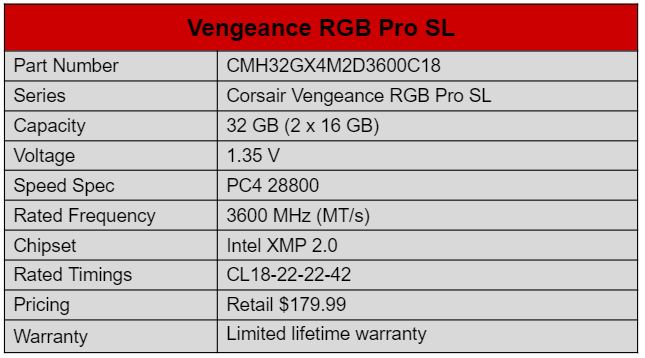
Today we are reviewing the 3600 MHz CL18-22-22-42 option in a 2×16 GB module capacity density, which is priced at $179.99 on Newegg.
PCB Layout and DDR4 IC
As the Thaiphoon Burner screenshot shows, this specific kit of memory is comprised of Micron ICs. This IC is known for low heat output, low voltage tolerance when overclocking, and incredibly high frequency overclocking possibilities. However, the big downside to this IC is that the timings will need to be ‘loose’ compared to Samsung B-Die, even a low frequencies
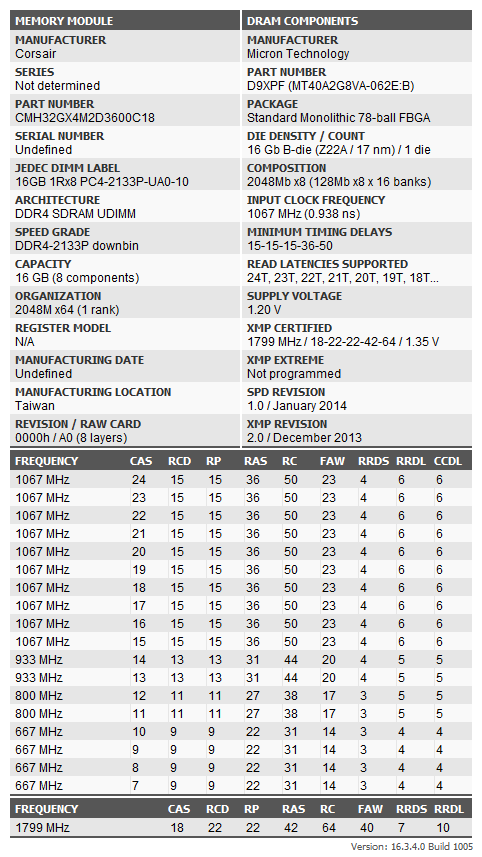
The configuration is 16 GB per module and single rank, which means less overclocking headroom due to the higher IC density. This memory uses a total of 8 ICs, which are located on one side. The Thaiphoon Burner screenshot lists the PCB as A2 style and 8-layers, we have visually verified that the PCB design does follow the A2 style. The PCB layout refers to where the IC’s are located on the PCB, and it can have a huge impact on overclocking performance, so we’re glad to see A2 style for this configuration.
Packaging and Product Overview
Corsair gives you exactly what you want for the retail packaging. This is intended to be a lower-cost option compared to the Dominator series, so this type of retail package is perfect. On the front, we are greeted with a nice picture of the memory, and on the back, we spot some helpful information such as the 44 mm module height.
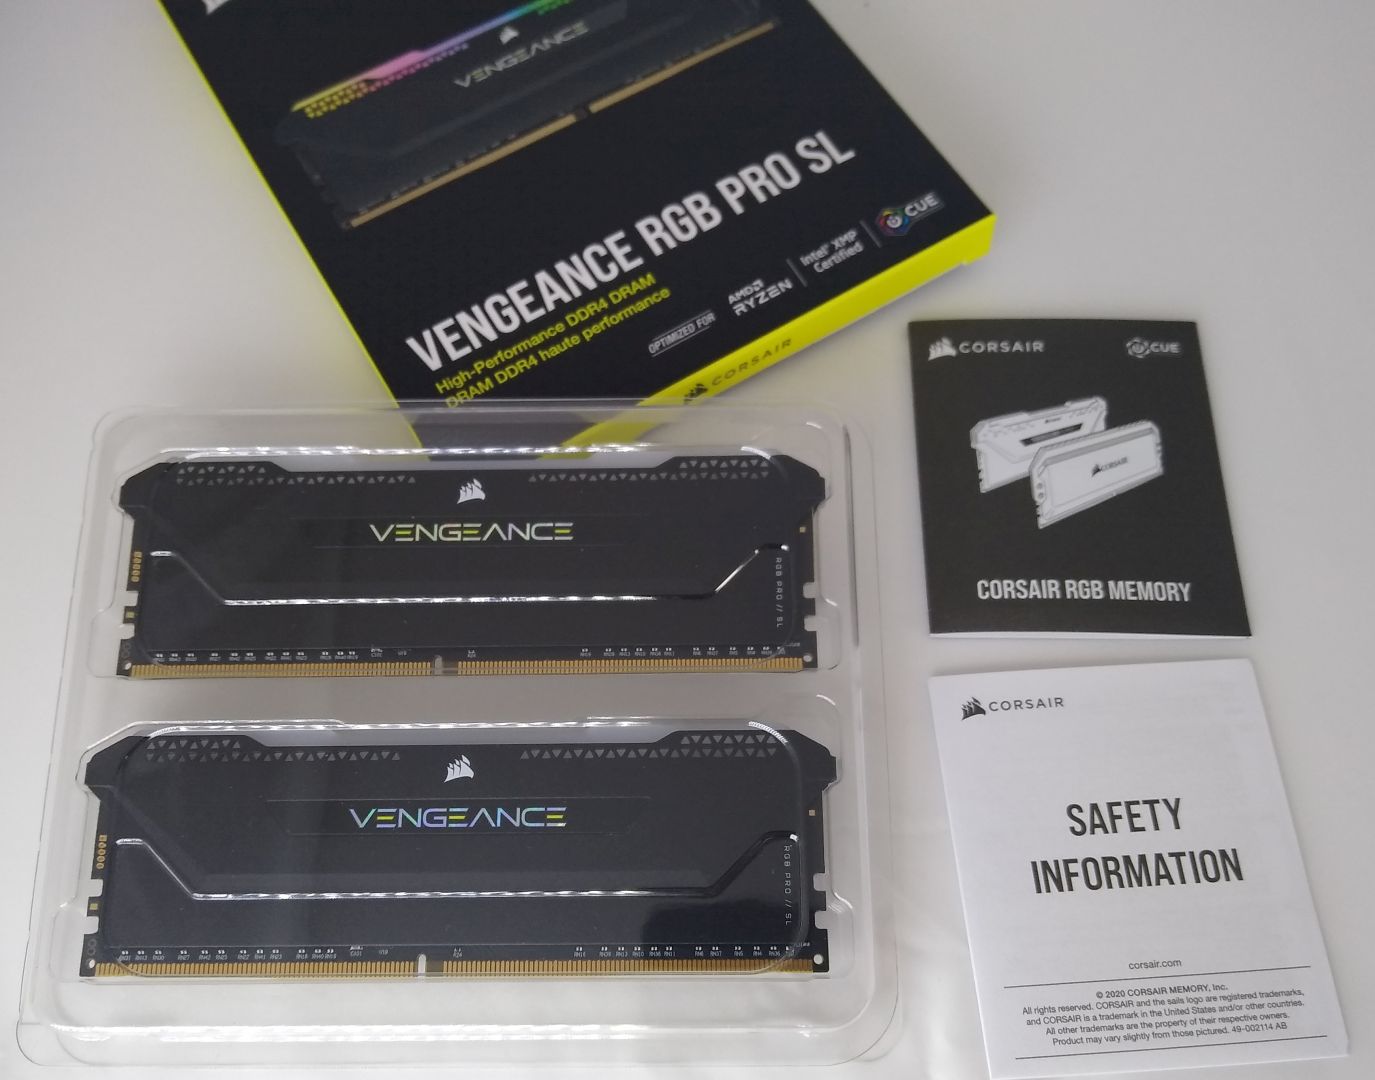
Inside the box, you will find the memory and two small printed information pamphlets. We didn’t find the included paperwork very useful in this case, it’s just too small to contain much information. The more modern approach to documentation is to include a QR code on the box which leads to all the official documentation. While we didn’t see any QR codes to scan, the manuals and information can be found easily enough on Corsair’s website.
A closer look
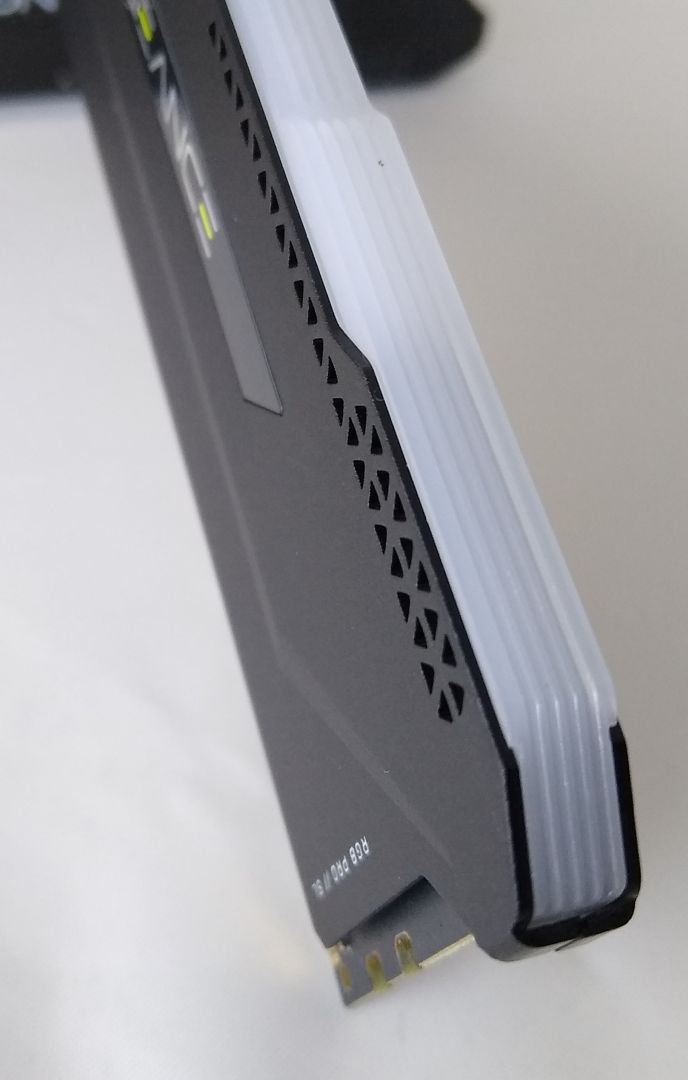
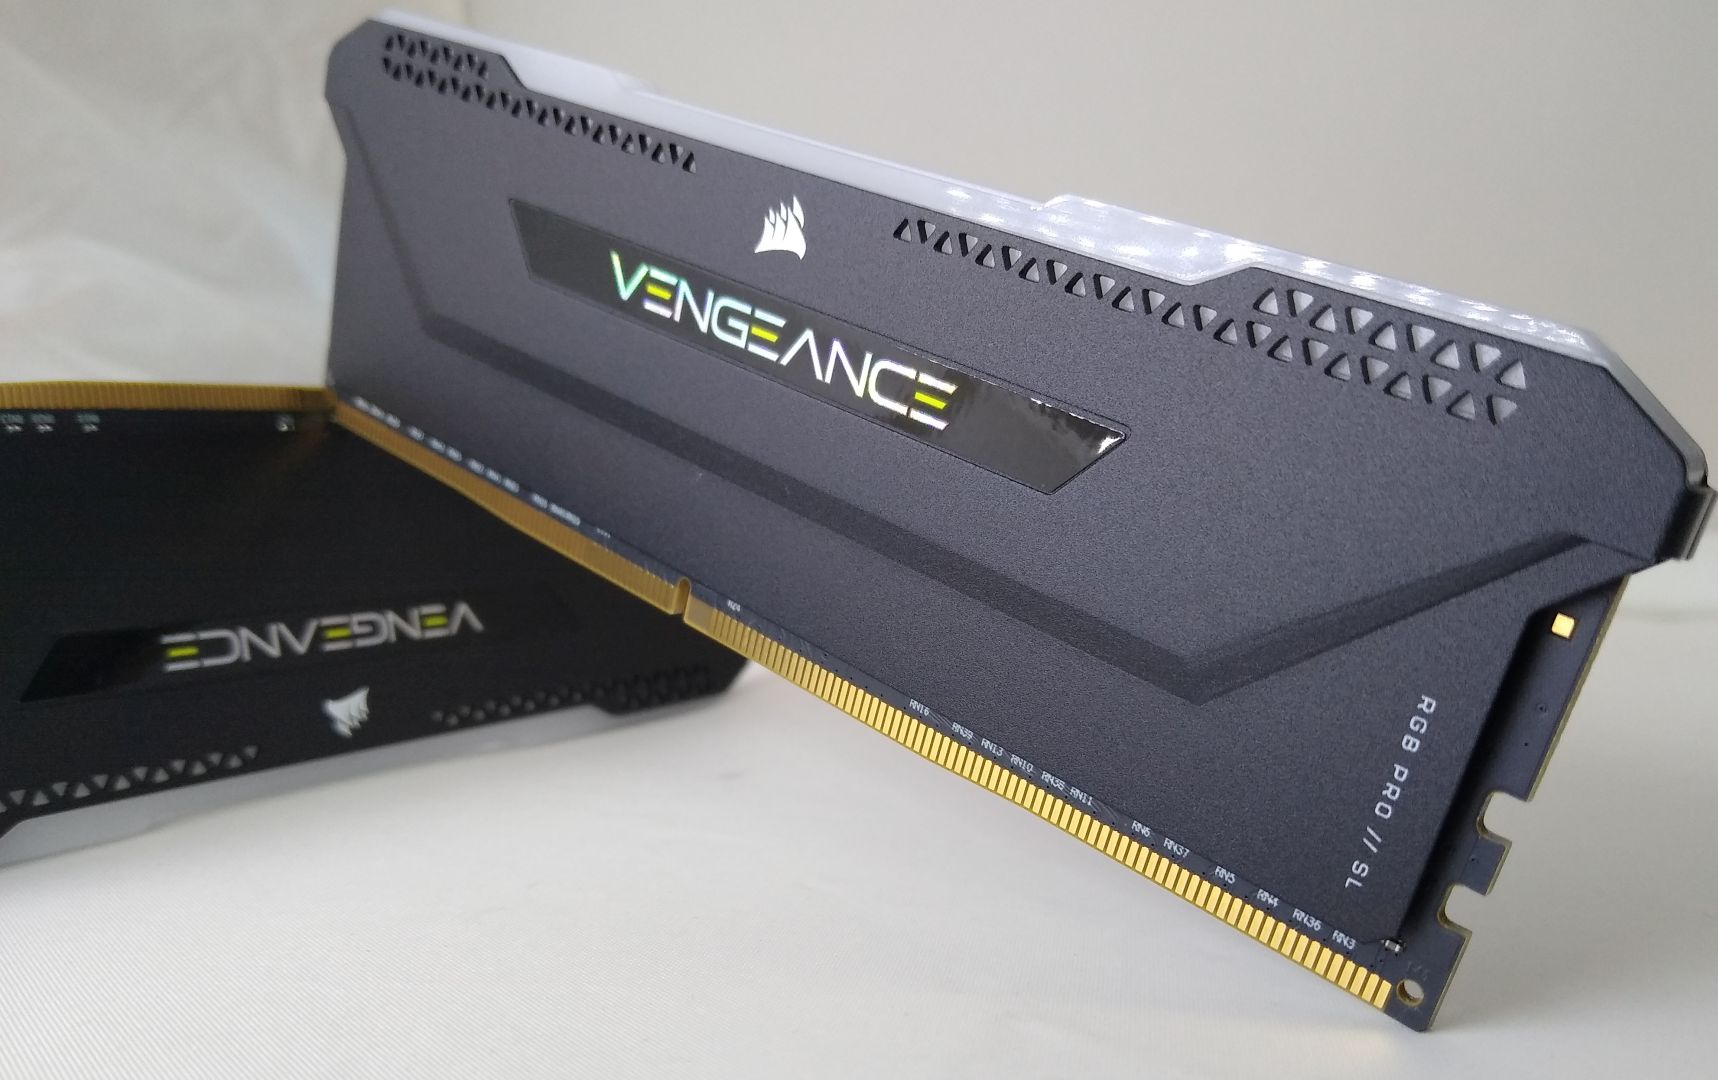
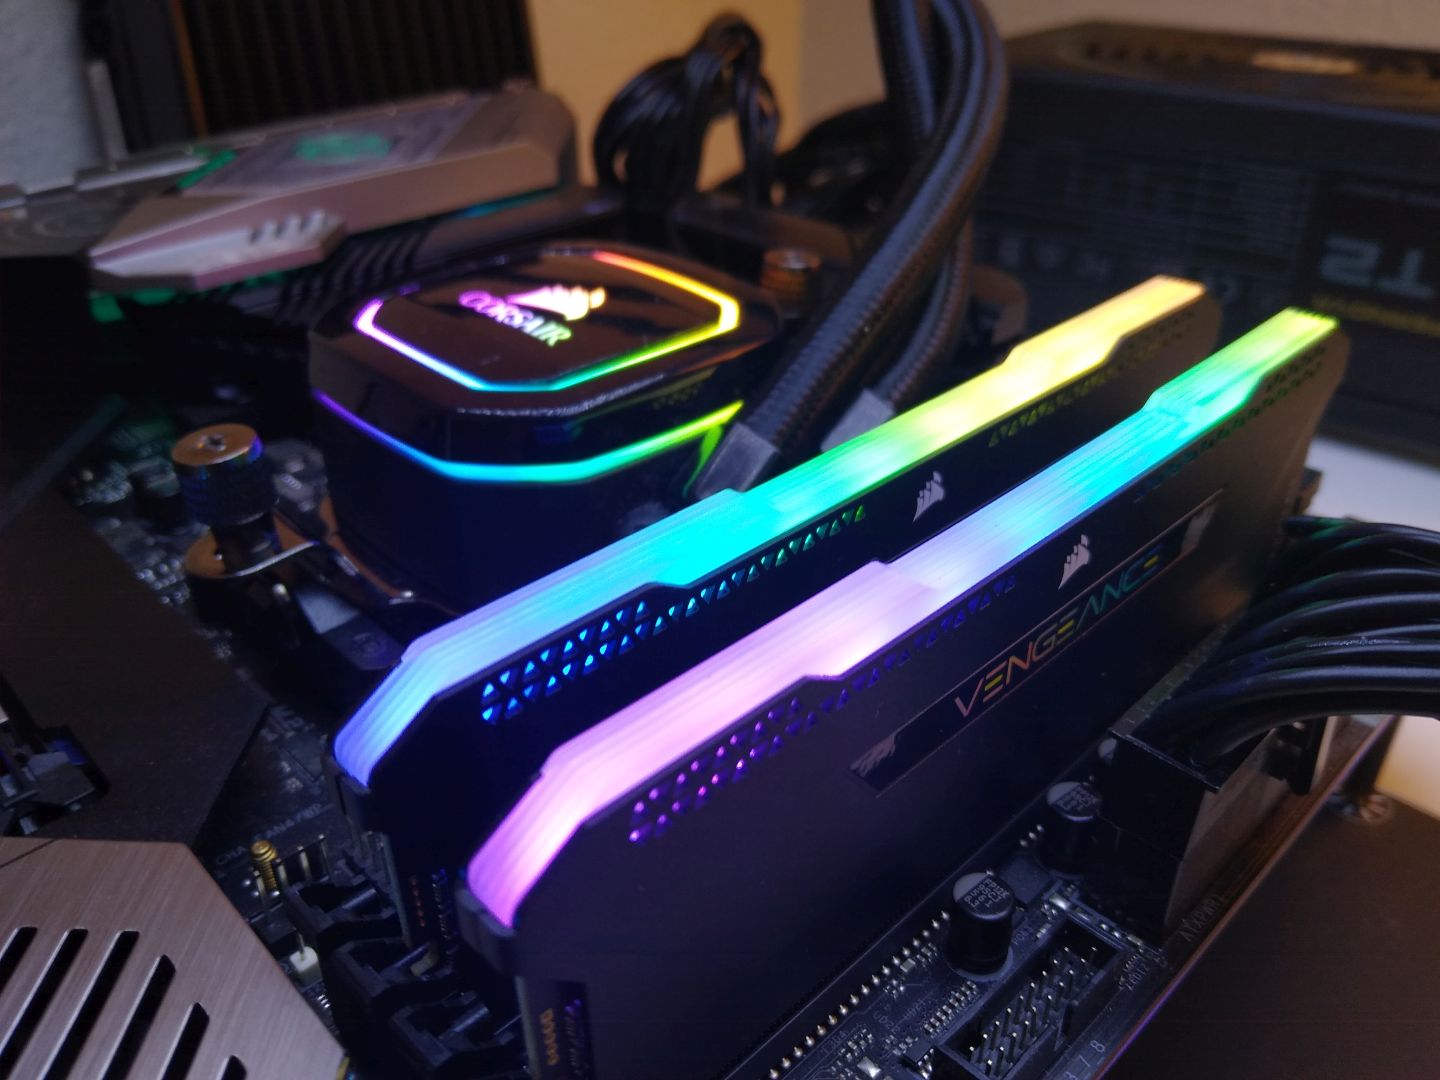
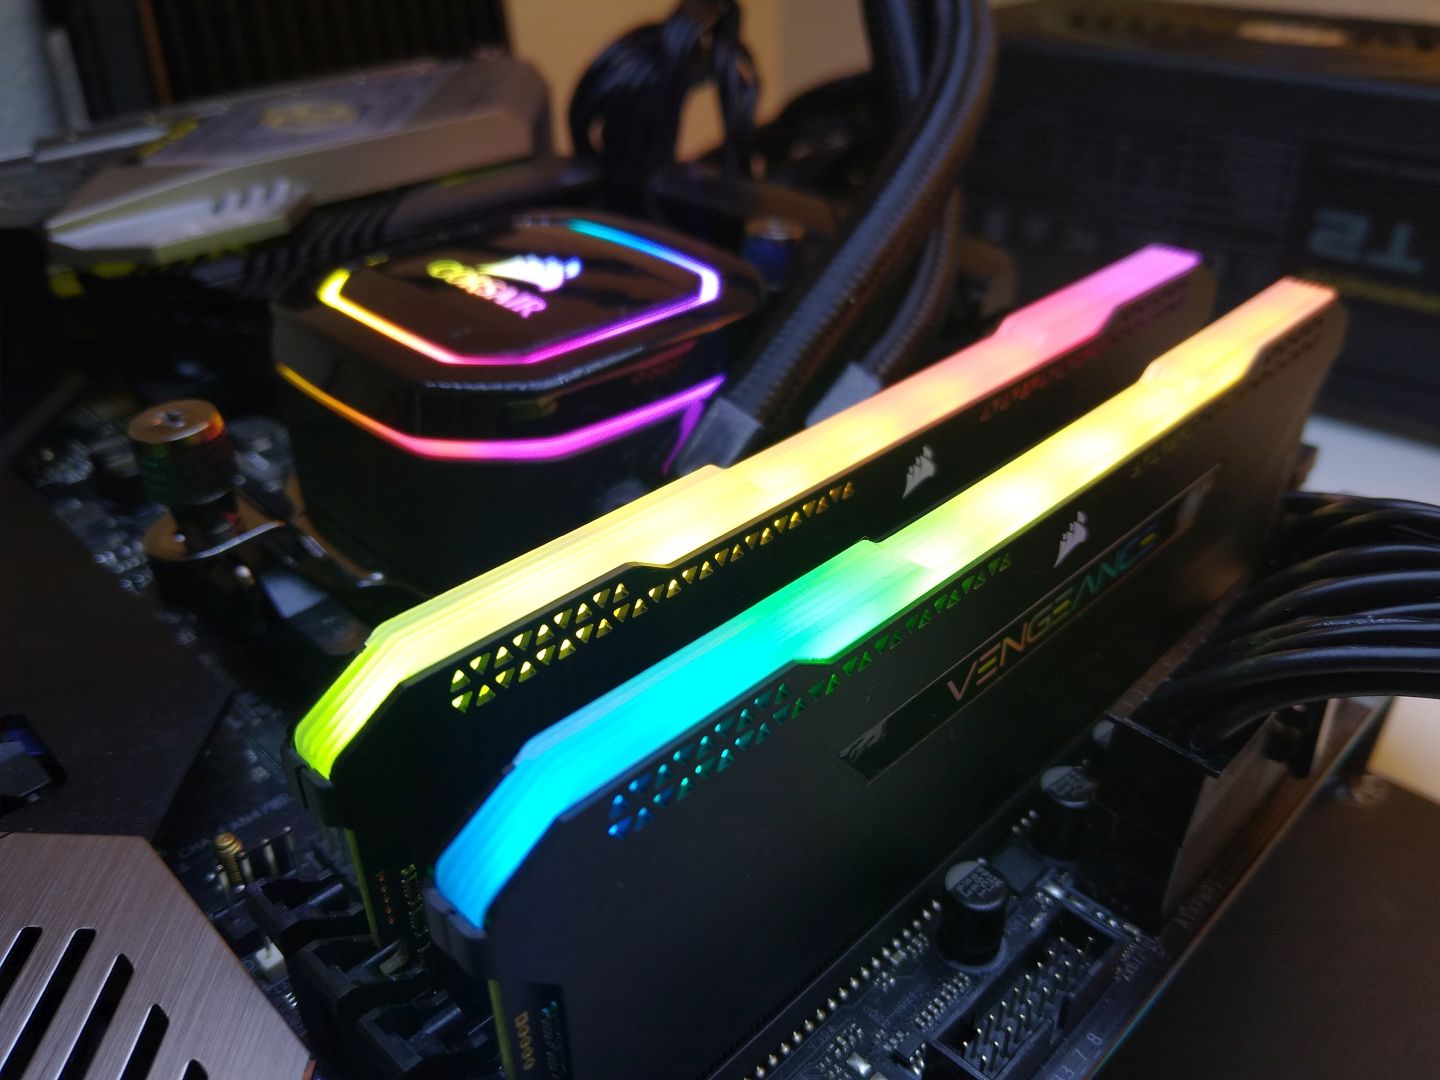
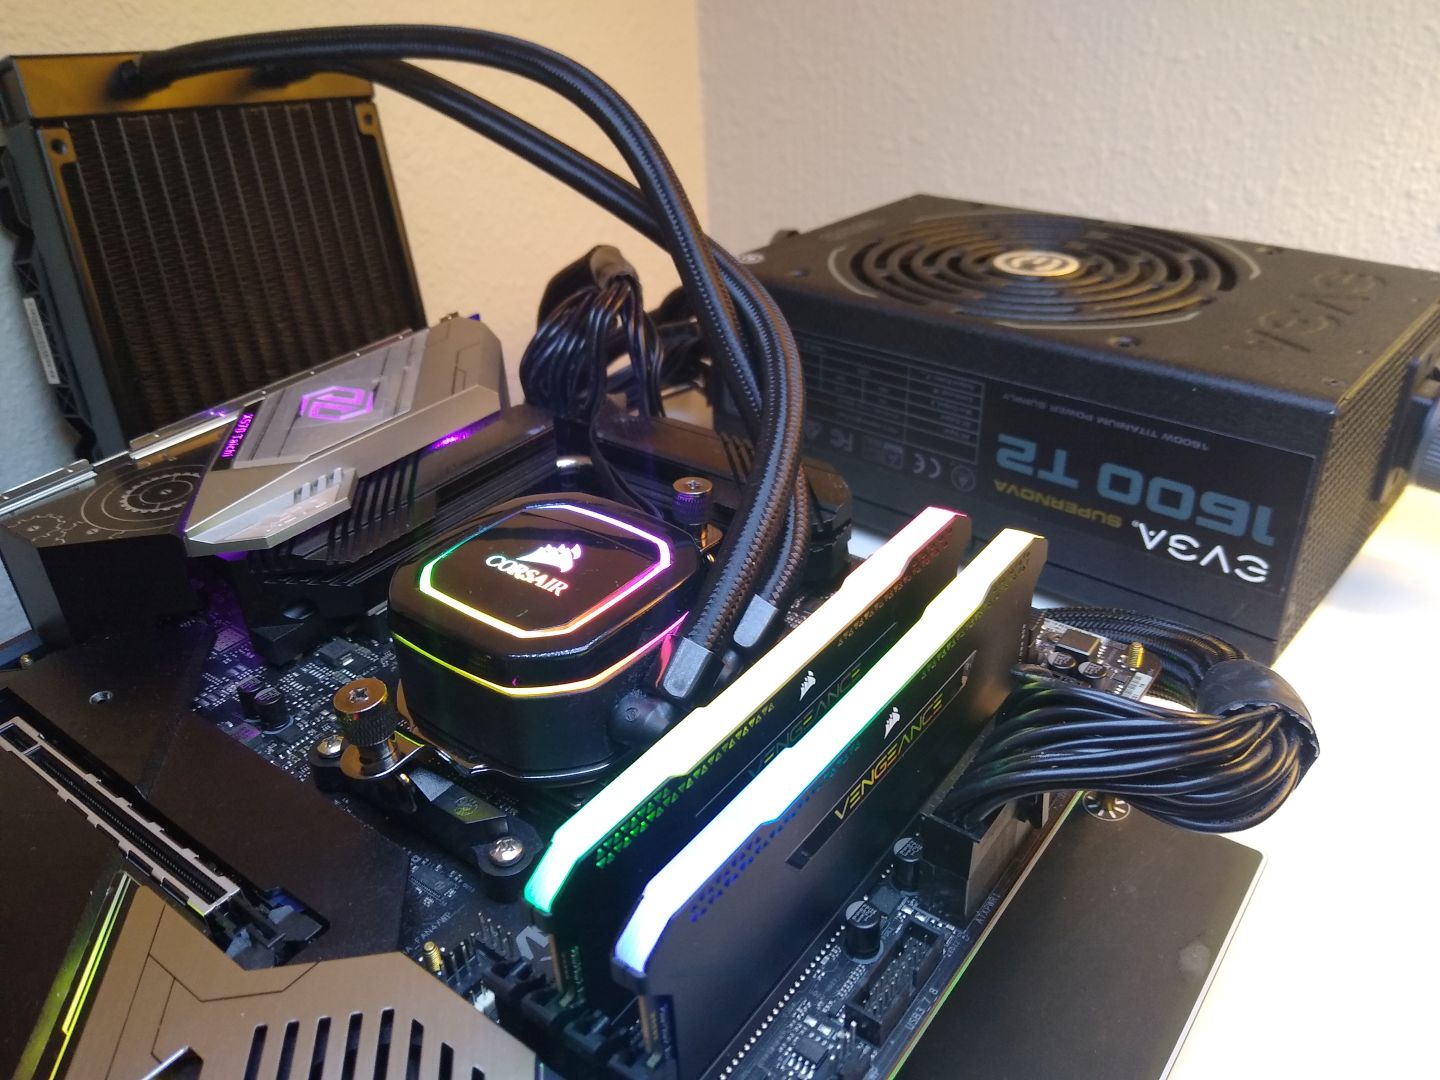
Out of the box, we are greeted with a beautiful matte-black memory module. The heat sink has been stamped to give it some curves and then anodized matte black to give it a clean look and also wide appeal when matching other components in your build. As we mentioned earlier, the aluminium is a bit thin, and that is reflected with the feel in hand. The module is surprisingly lightweight, but it doesn’t feel inexpensive or cheap.
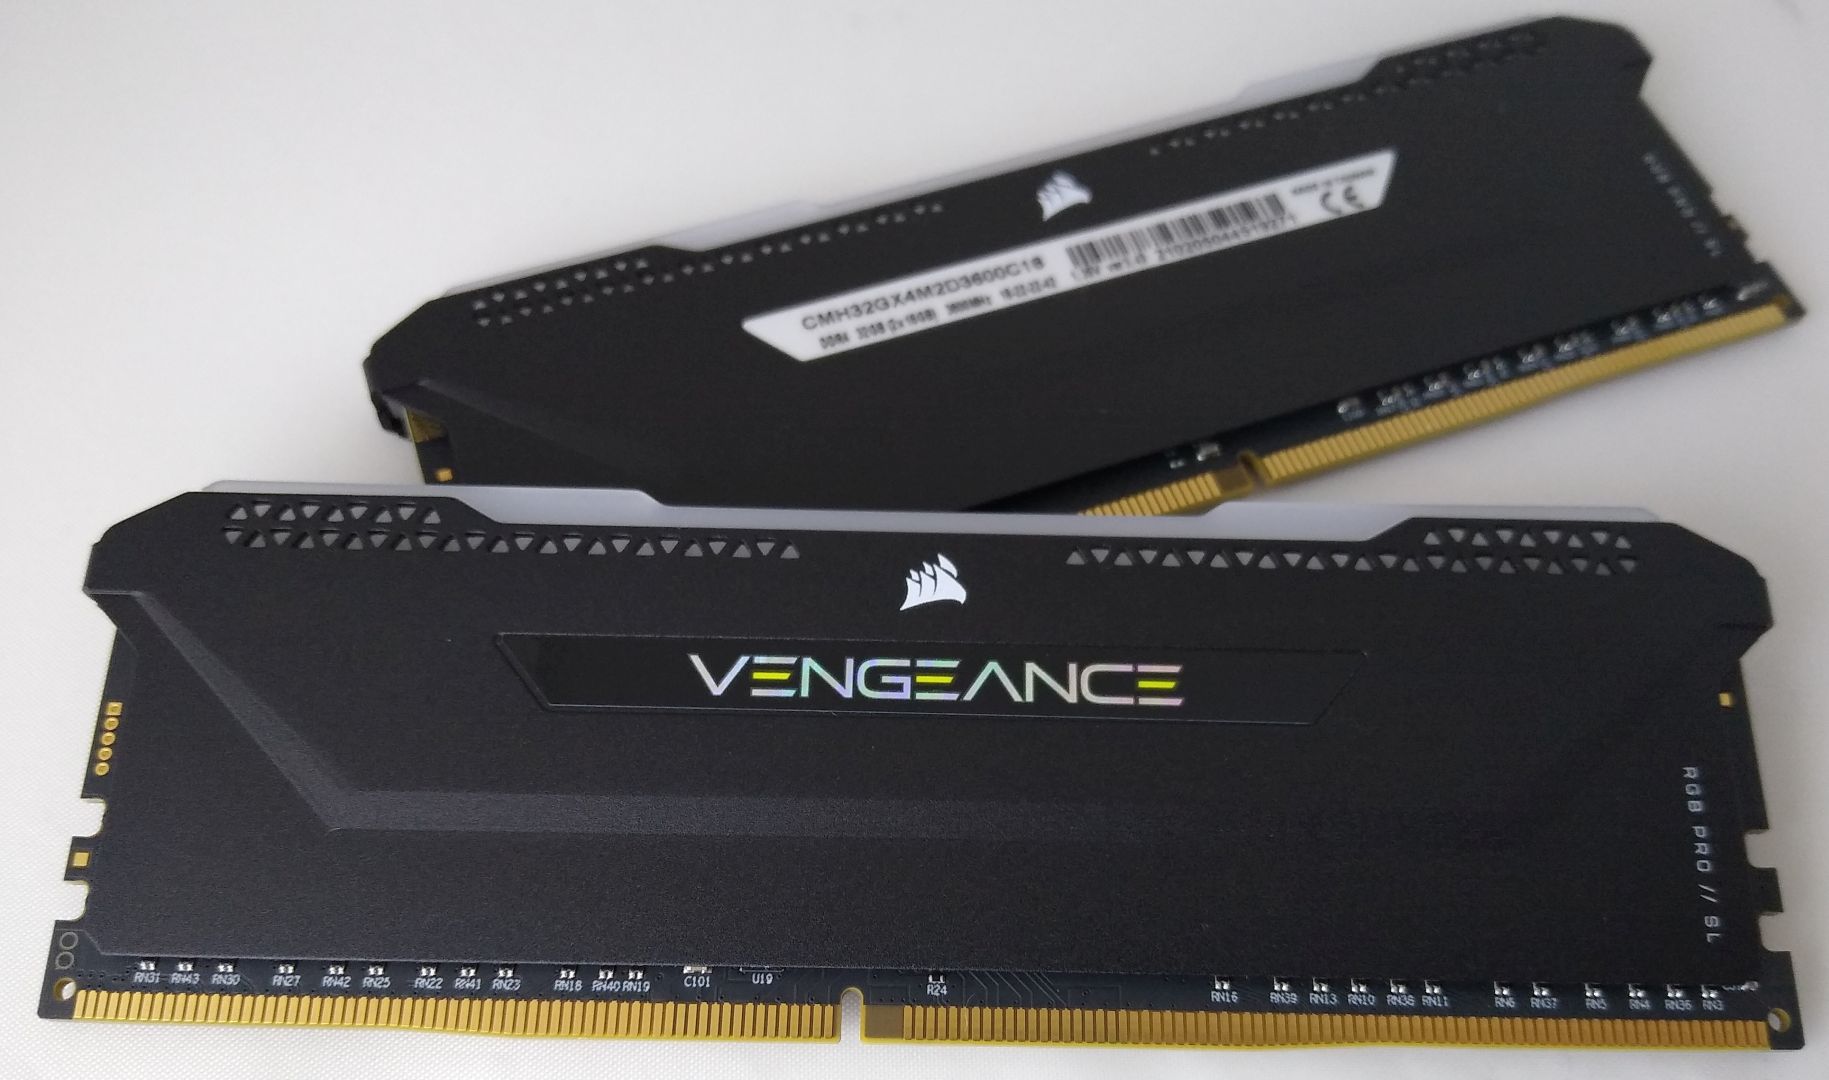
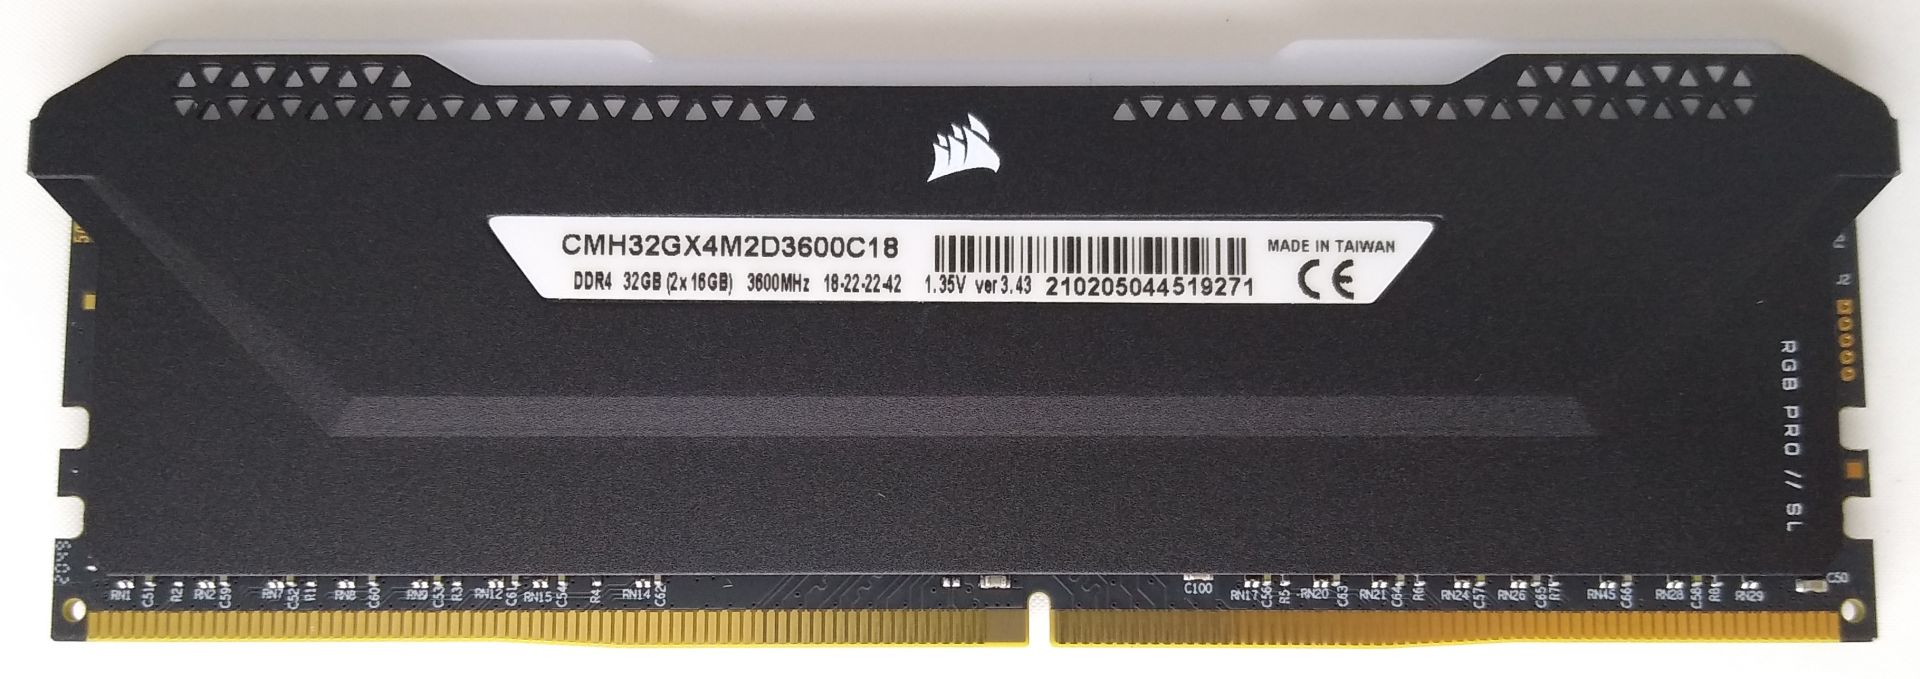
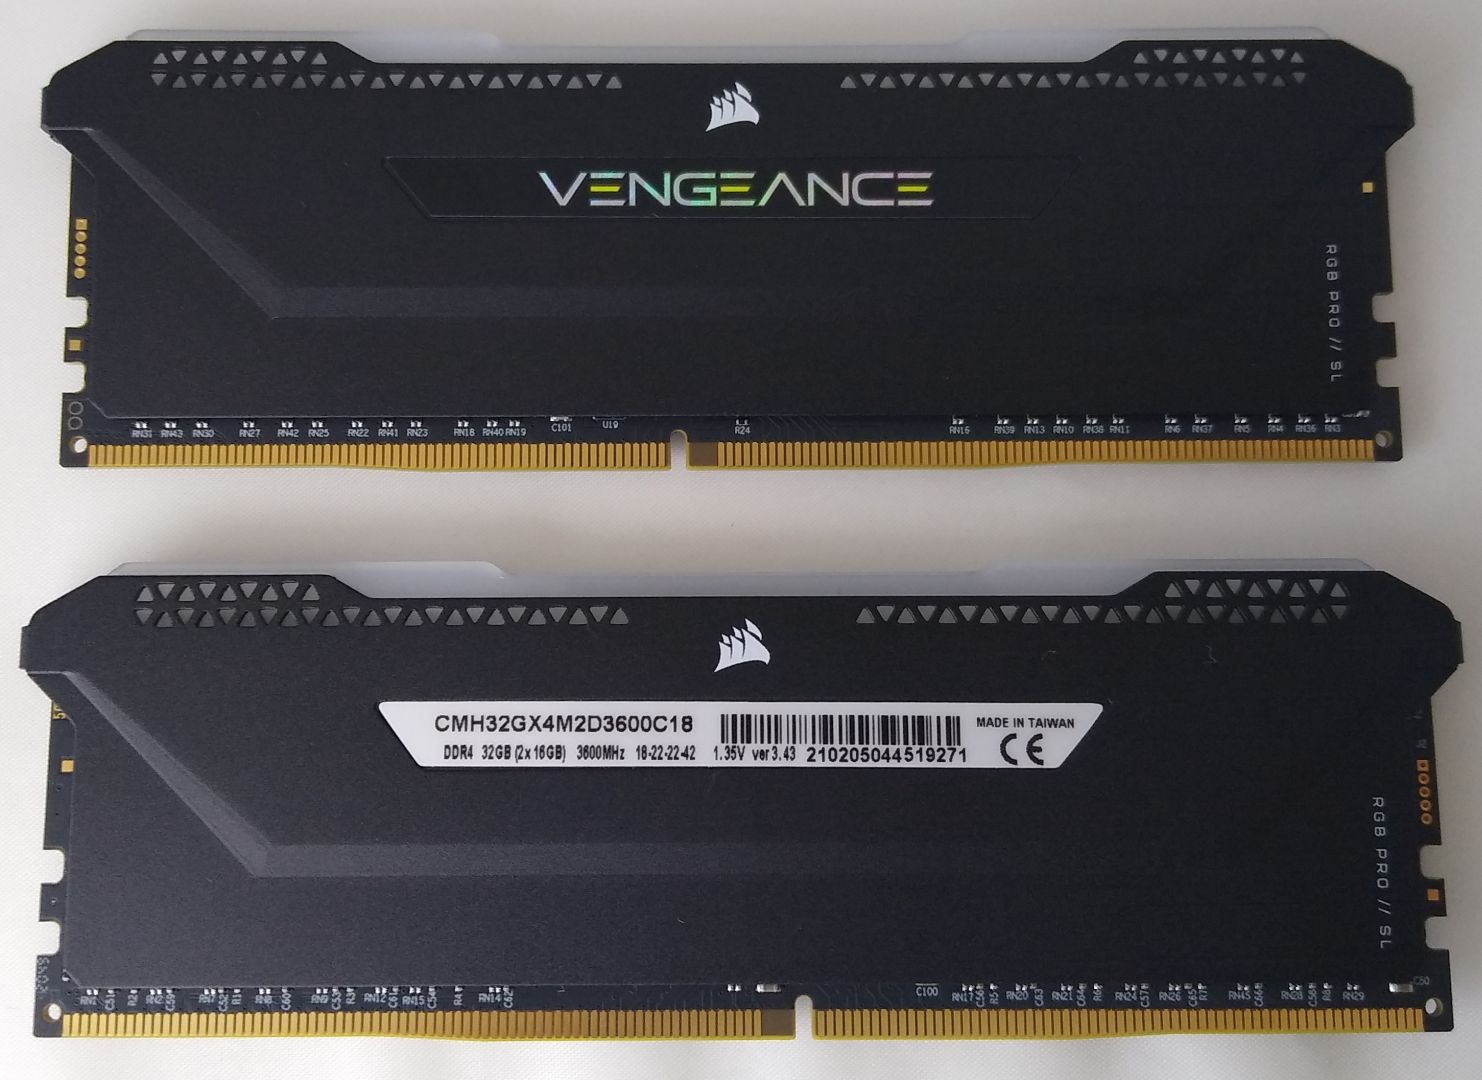
Both sides of the module contain stickers in the center. The Vengeance branding sticker is located on the outside of the stick, or the side facing the 24-pin connector on a typical ATX motherboard. On the inside there’s a prototypical information sticker that shows the part number as well as the specific details of the kit like frequency and timings.
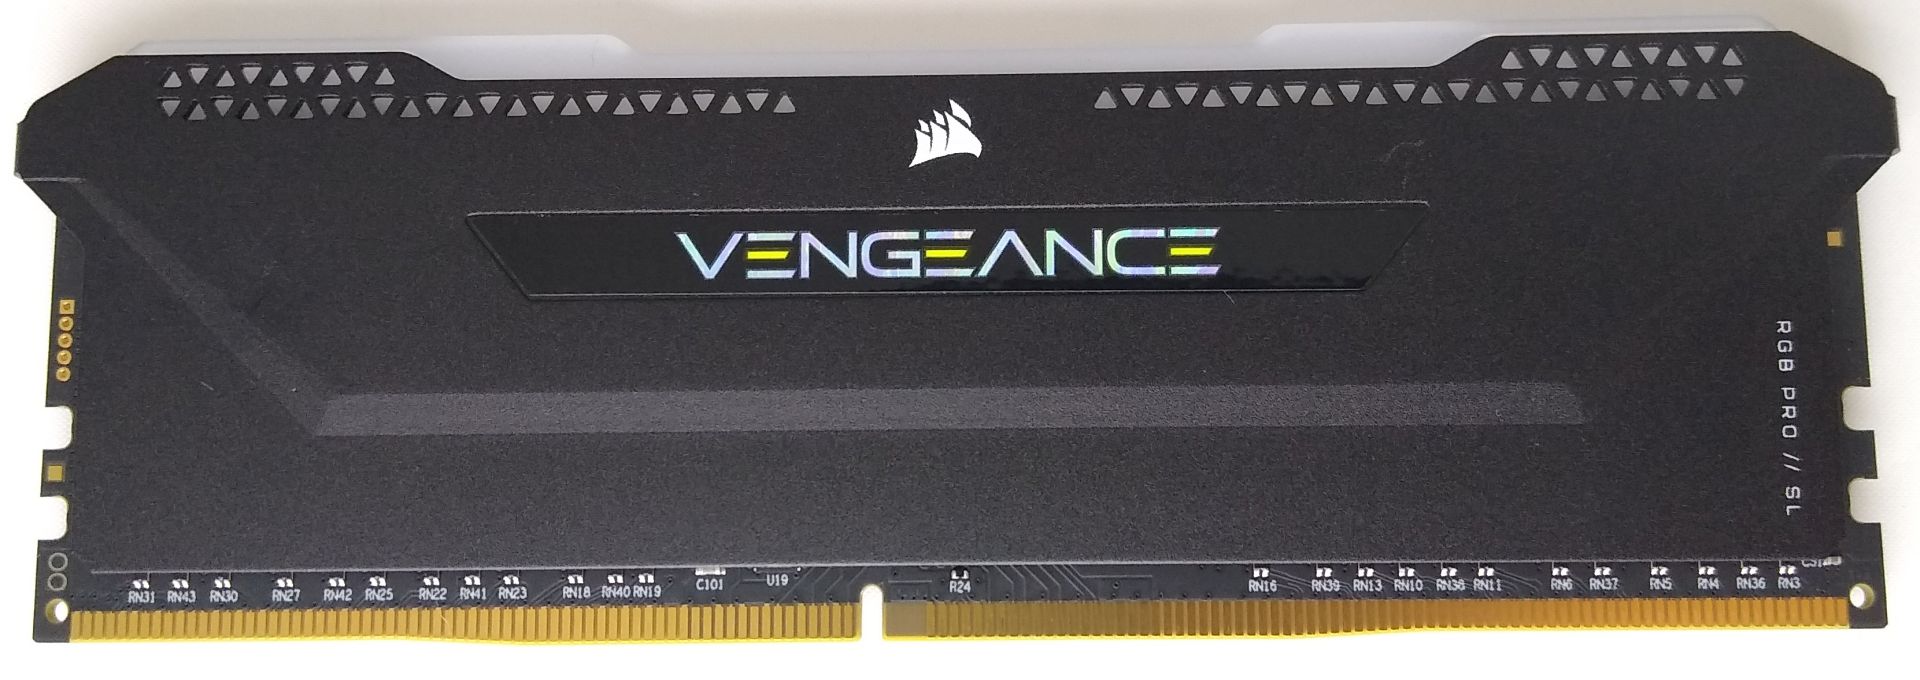
The RGB light diffuser on top hides the 10 LEDs and is all-white with a frosted finish on the top-side. Furthermore, the top is profiled with small ridges to help scatter the light and give it some depth. Looking from the side we note a dip in the center of about 3 mm.
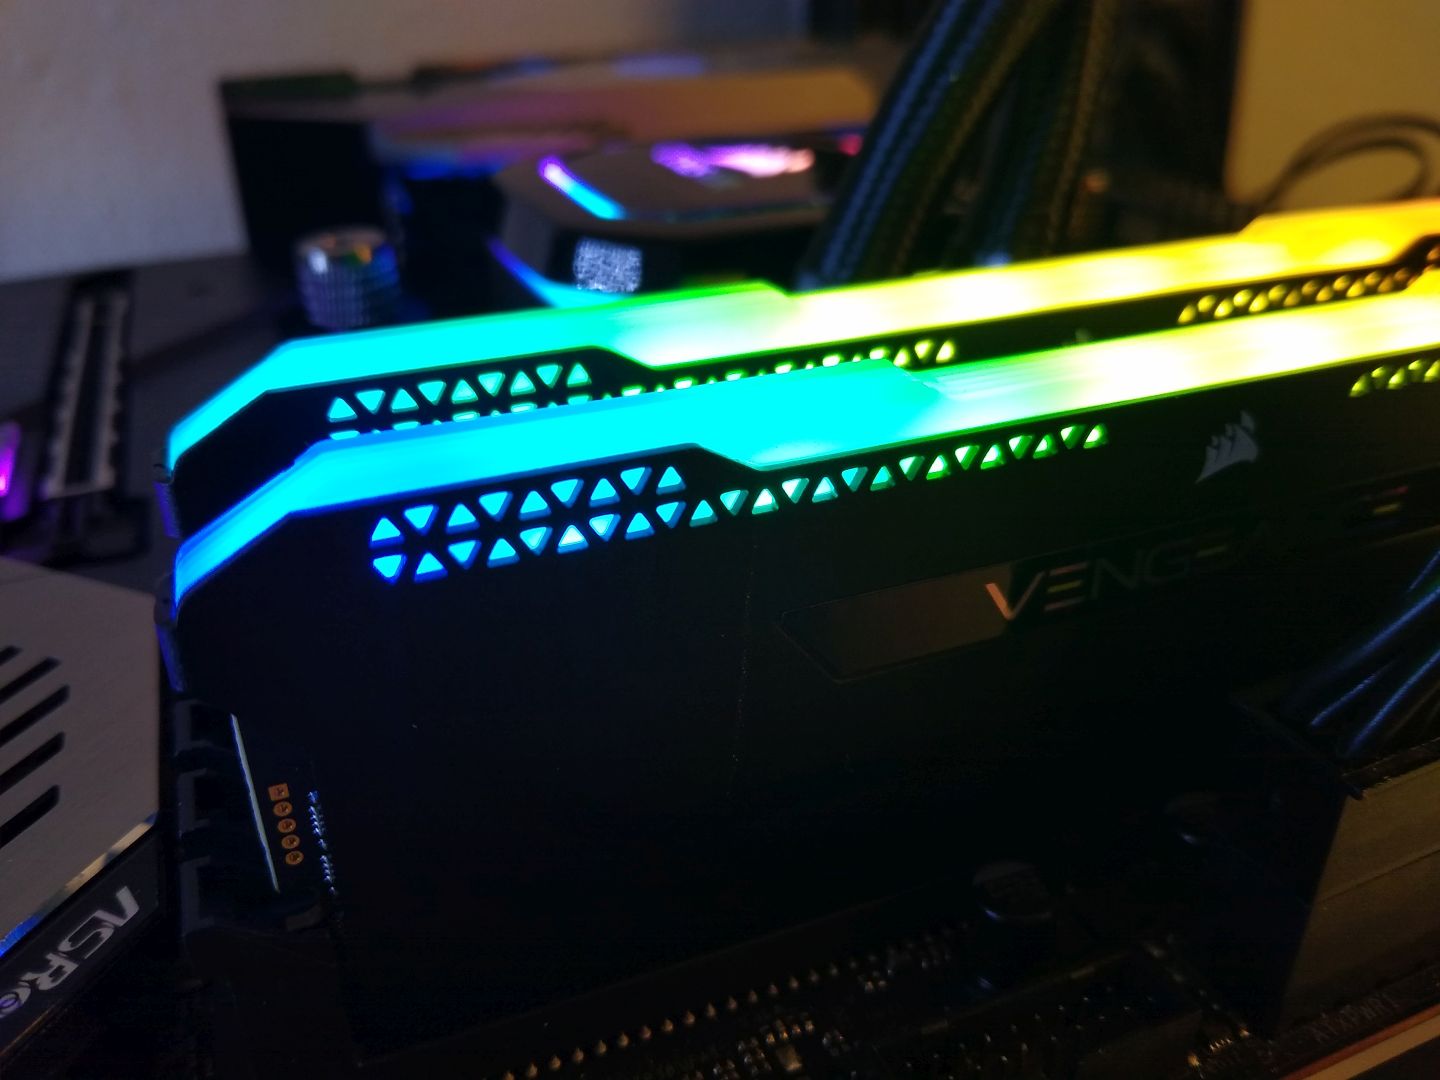
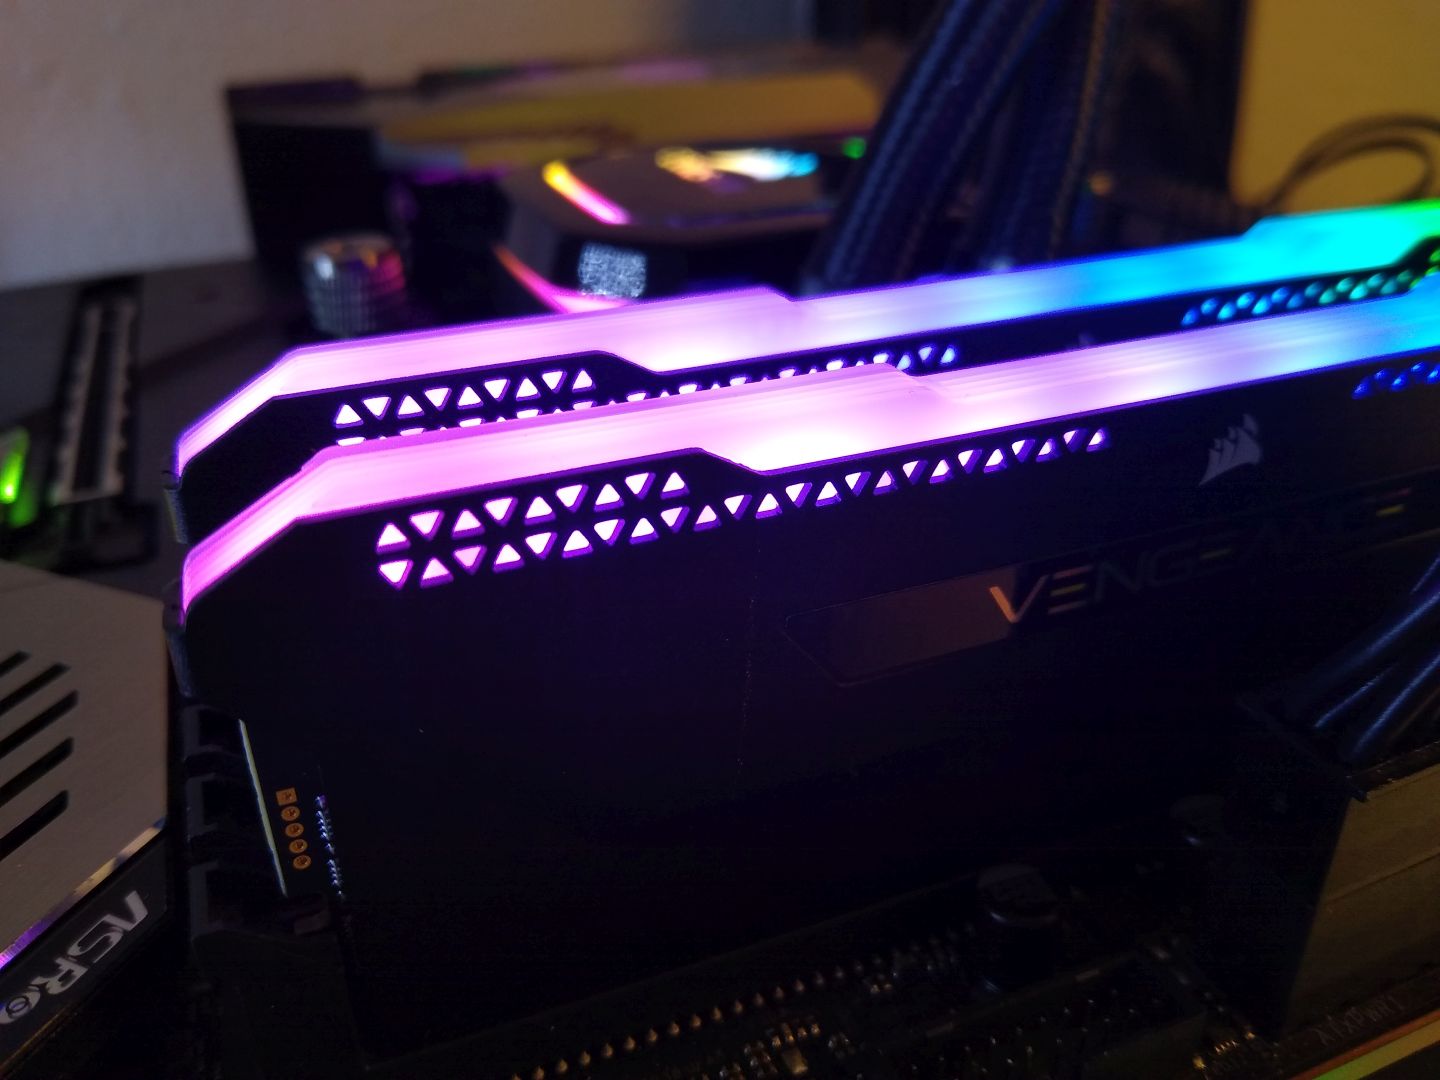

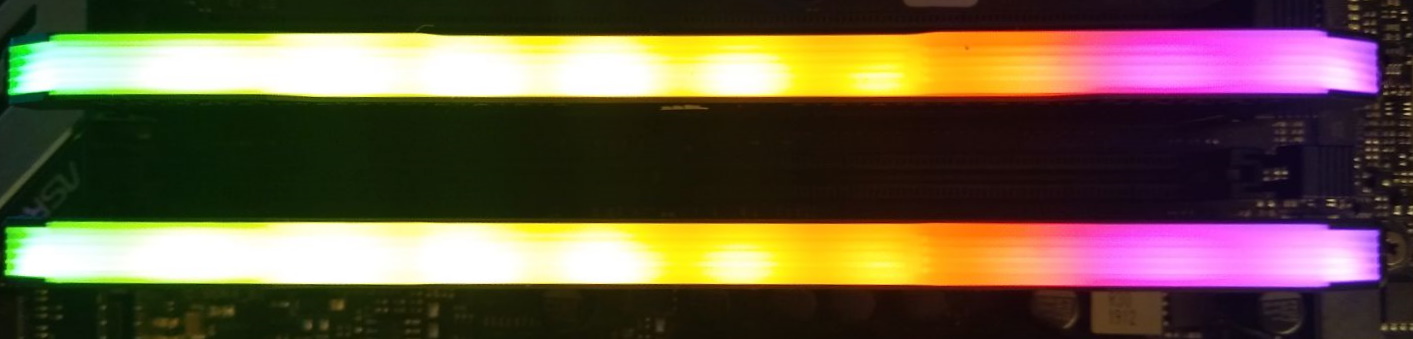
While it’s not the absolute best RGB light experience we’ve seen, it’s certainly at the top of the list for us. Considering this is a budget-oriented kit, we are really happy to see great attention given to the RGB shine here.

Software Control
In terms of software control, we’ve seen Corsair’s method before and it has always been excellent. Their iCUE worked flawlessly for us today and allowed for full control of the 10 individually addressable LEDs. It includes auto-update features and has the ability to control all of your Corsair devices. The one downside is that it’s quite large and consumes more than it’s fair share system resources.
Command your entire setup through a single interface, personalizing your system’s performance and visuals to your exacting preferences. Orchestrate your own dazzling light shows across all your compatible CORSAIR devices, right down to the smallest detail, with intricate multi-layer lighting patterns and effects. –Corsair
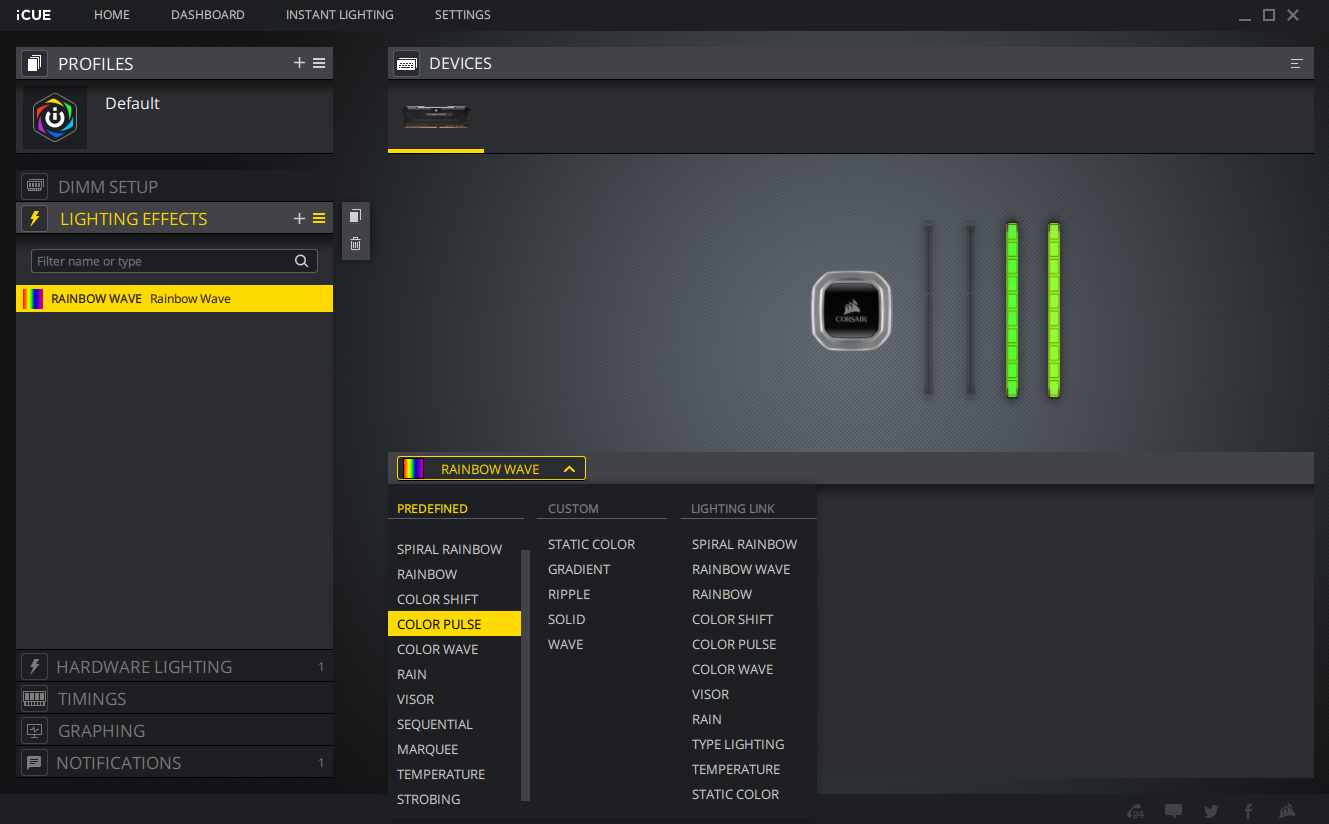
Software Download: Corsair iCUE v3.37.140
Testing and Overclocking
The overall objective is to test the memory from the perspective of daily usage. We want to know how the memory performs, and how it overclocks without getting into crazy voltage levels. This is to say that we will stay under the maximum allowable voltage of 1.50 V, as indicated in the XMP 2.0 official specification.
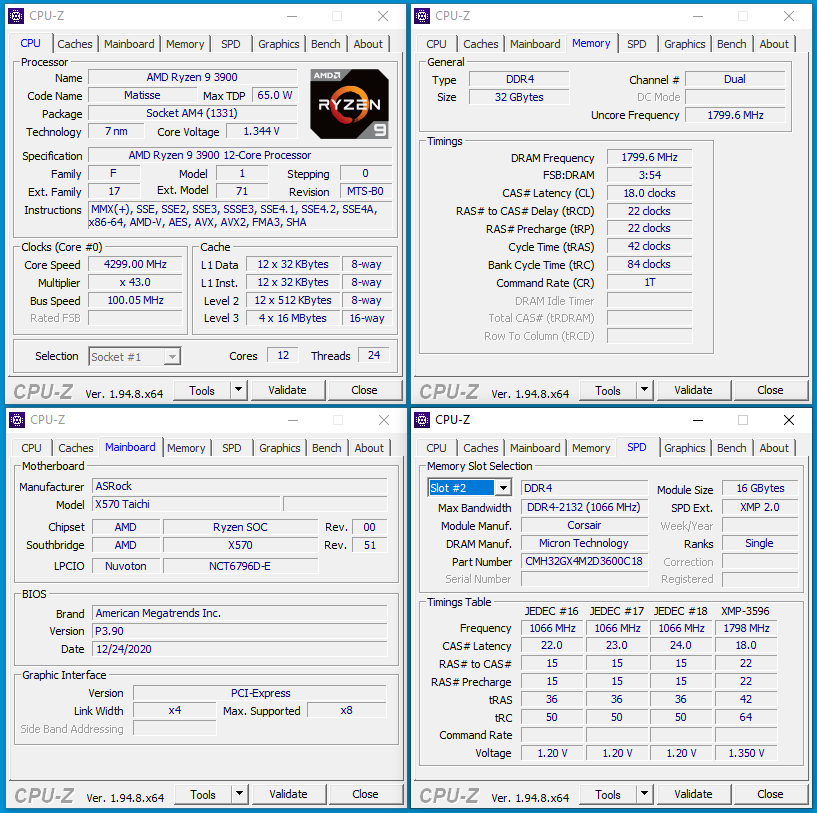
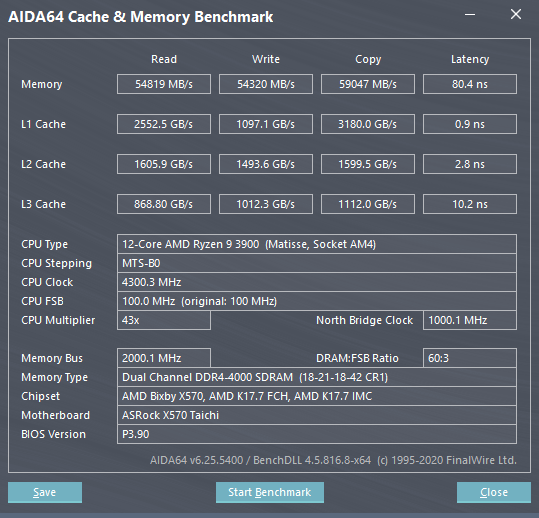
Today we will be using the AMD X570 platform for testing.
As is the case with all overclocking adventures, your results may vary, so proceed only if you assume all risk. The beating heart of our test system is the EVGA 1600 T2 PSU and ASRock X570 Taichi Motherboard.
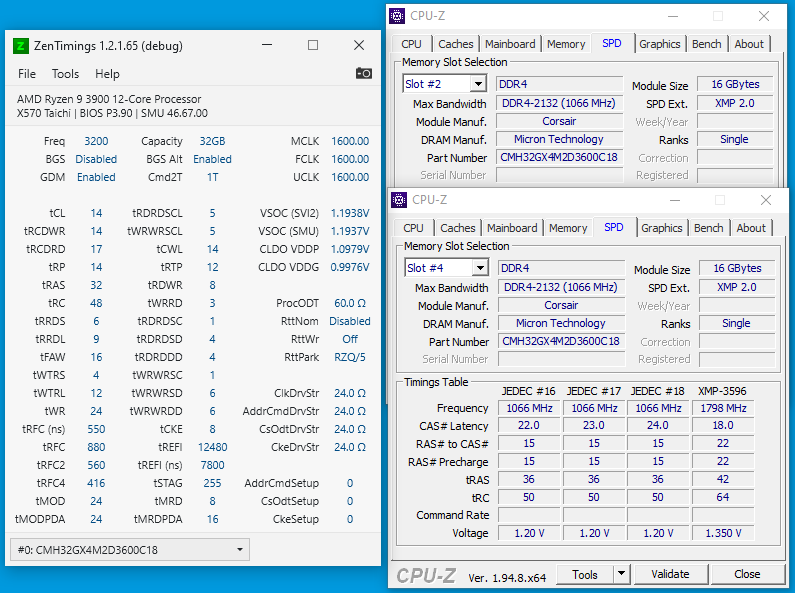
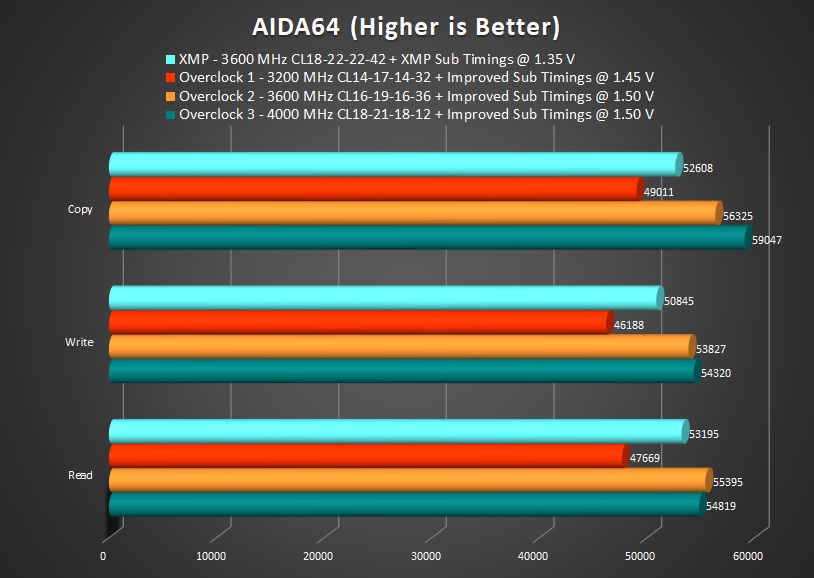
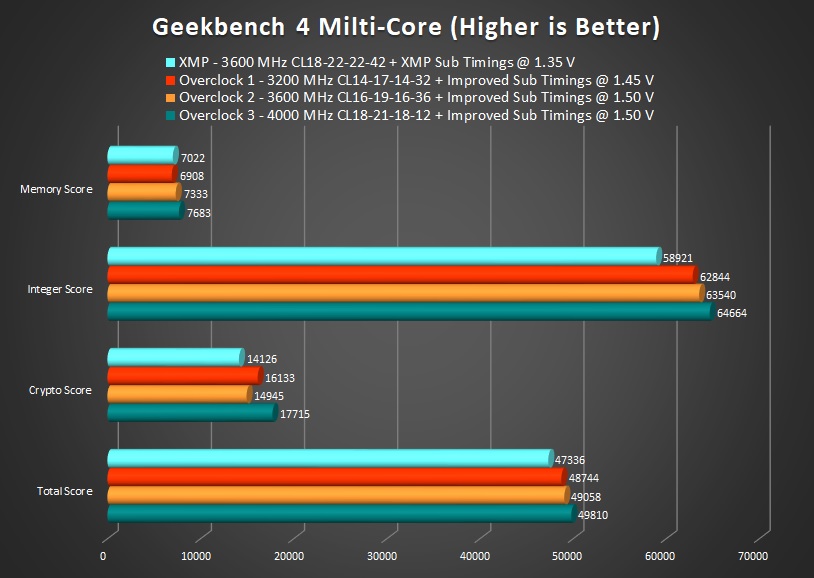
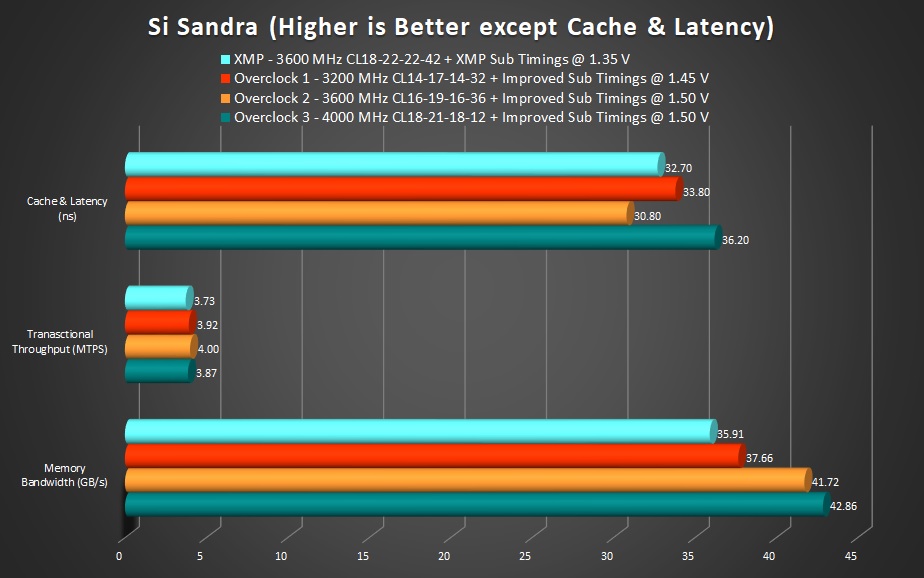
XMP – 3600 MHz CL18-22-22-42 + XMP Sub Timings @ 1.35 V
It’s not always a foregone conclusion that the XMP rating will work out of the box. However, in the case of our test setup and memory configuration, we had no problem setting the XMP specifications. Furthermore, it was completely stable in all benchmarks.


Overclock 1 – 3200 MHz CL14-17-14-32 + Improved Sub Timings @ 1.45 V
For the first overclocking test, we wanted to see how low the timings could go. To do this we lowered the frequency down to 3200 MHz, which gave us quite a bit more headroom. Considering that it’s a Micron IC, we are happy to end up at CL14, even if tRCRD needed to be at 17 to make it happen. All told, we feel it’s an impressive result. Check out the graphs below to see how this profile compared.

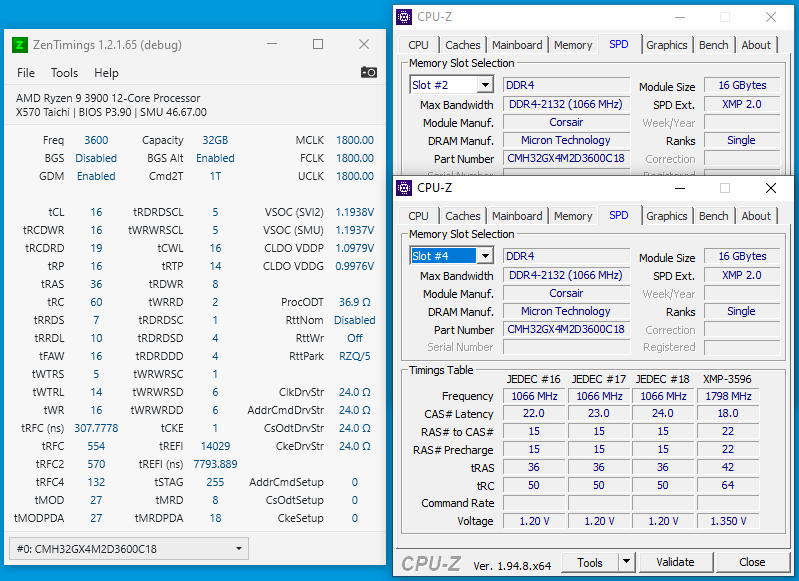
Overclock 2 – 3600 MHz CL16-19-16-36 + Improved Sub Timings @ 1.50 V
Due to the relationship of DRAM, UCLK, and FCLK of the X570 platform, it’s often best to run everything at a one-to-one ratio. This means keeping the DRAM frequency locked at 3600 MHz. With the frequency set to the same as XMP, we wanted to see what improvements we could make with timings. Again, we were able to manage an impressive CL16 and tighter timings everywhere else too.

Overclock 3 – 4000 MHz CL18-21-18-12 + Improved Sub Timings @ 1.50 V
For the final overclocking endeavour we wanted to go for an all-out frequency clock. Unfortunately out kit was not able to train anything above 4000 MHz, even with extremely loose timings everywhere. We had expected to reach 4600-4800 MHz, but that didn’t happen. In light of that, we stuck with 4000 MHz and working on timings to create a fast and efficient profile.

Benchmark Results
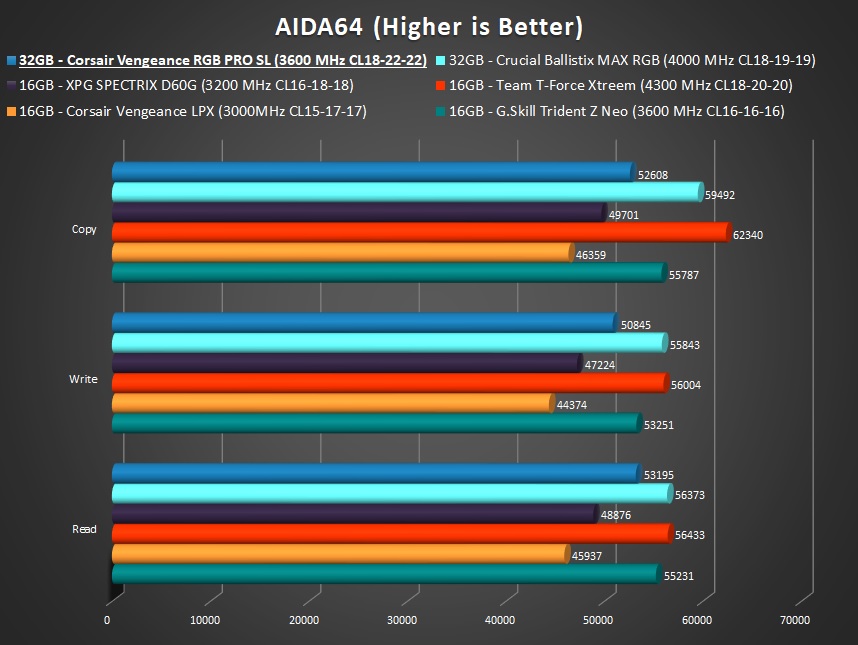
AIDA64
We know from experience that AIDA64 typically shows the best results with high frequency overclocking rather than tight timings. The trend toward frequency is somewhat lessened on the X570 platform, however, it still holds true. Our best results across the board came from the 4000 CL18 overclocked profile with 3600 CL16 being a close second.
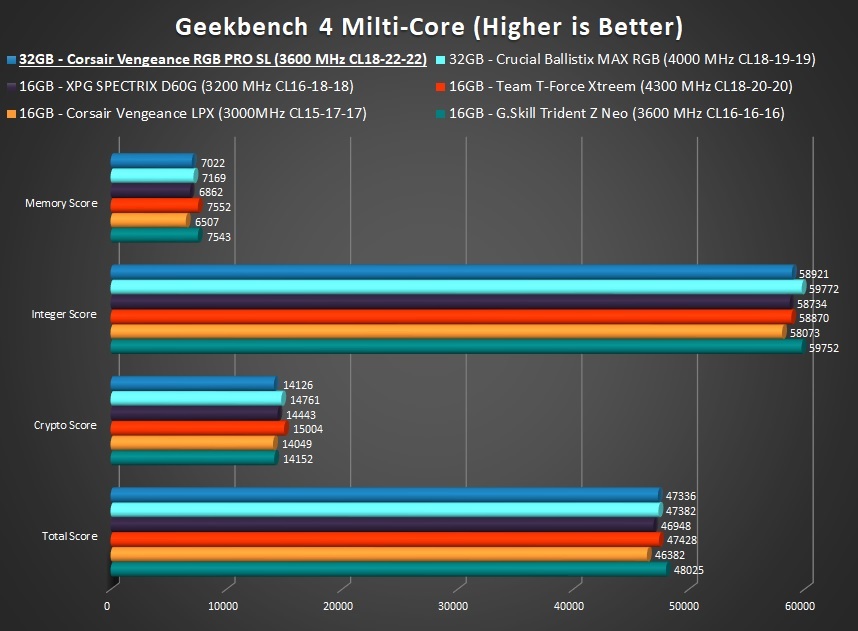
Geekbench 4 Multi-Core
We appreciate Geekbench 4 because it trends in the completely opposite way from AIDA64. Here it’s often the tightest timings that produce the best scores. Geekbench 4 does scale with both frequency and timings, but it favors tight timings. The scaling ended up being pretty linear and our 3200 MHz tight profile did in fact beat the 3600 MHz XMP in almost every test. However, in the end, our best results across the board came from the 4000 CL18 overclocked profile.
Si Sandra
Both of our overclocking endeavours showed a noteworthy performance increase in SI Sandra. Clearly, our 4000 CL18 overclocked profile was the champion here.
XMP Comparison Results
We’ve seen how the memory compares against itself for overclocking, but now we’d like to show you how the Vengeance RGB Pro SL performs against other memory modules. All of the results below were generated with the XMP profile enabled and overclocking profiles were not included.
There has been a lot of talk in the computer world recently about the performance gains from 32 GB of memory. While this is true in some cases, it only applies to dual-rank kits. You may recall that in the beginning, we told you this is a single-rank kit, so we cannot expect any performance gain from 32 GB of system memory compared to 16 GB.
Our test memory didn’t perform as well as we would have liked. In the results below you will see that the XMP 3600 CL18-22-22 is just a bit too weak to stand up against faster kits and also those based on Samsung B-Die memory. As we showed above, there’s some headroom to increase the score with overclocking. However, if you are looking for superior out-of-the-box performance with no overclocking required, then perhaps there are better options for you.
AIDA64 XMP Comparison
Geedbench 4 XMP Comparison
Conclusion
Overall we are very happy with the Corsair Vengeance RGB Pro SL. From the flat black anodized heat sinks to the impressive RGB light show, this memory is stunning to look at. You may recall that this is an updated version of the Vengeance RGB Pro, where the main difference is a 7 mm reduction in height and an extremely subtle heat sink style change. We loved the RGB light show. It’s incredibly bright and delivers an impressive subtle glow to your system. Corsair has figured out the magic recipe for RGB lighting, and we applaud them for that.
When it comes to performance, we felt there was a little room for improvement with the XMP profile. In our comparison testing, it didn’t fare too well against the B-Die based memory. However, we did see moderate overclocking headroom with regards to frequency. When it came down to lowering the timings, we were simply amazed at what could be accomplished and how low was able to get some of the timings. The simple fact that we were able to run 3600 CL16 with 1.50 V with a memory IC other than Samsung B-Die, that’s a very impressive feat.
Lastly, we’d like to talk about retail pricing and the overall value. Recalling that this kit is priced at $179.99 on Newegg, how does it compare? Looking at retail sites, and narrowing the search down to 2 x 16GB kits with RGB lighting, we find the price ranges from $149.99 all the way up to $349.99. The kit’s at the upper end of the price spectrum are high-binned Samsung B-Die and designed for serious enthusiasts, so those are out of the conversation. Therefore, we conclude that the realistic price range is $149.99 – $209.99 for normal gamers and enthusiasts. Corsair offers quite a lot with the Vengeance RGB Pro SL line and the pricing is right about in the middle, we feel it’s a strong value when taking everything into consideration.
[table id=16 /]
Lastly, we want to express our thanks to Corsair for providing us with this review sample and the opportunity to review it for our shared audience.

Want to discuss this product or give your views and feedback from your own usage? Discuss on the ExtremeHW Forums
Like our content? Please consider Donating to help us to continue our writing.
Related Posts

This Post Has 2 Comments
Leave a Reply
You must be logged in to post a comment.
I have the b-die 4 dimm 32 GB kit, and I hit cas 16 at 3800 and 1.45v. It’s a very similar benchmark etc. https://www.newegg.com/corsair-32gb-288-pin-ddr4-sdram/p/N82E16820236446?item=N82E16820236446
Overclock 3 – 4000 MHz CL18-21-18-12
Please change -> 42