
The discussion around All-In-One (AIO) CPU coolers versus custom loops will always be ongoing. However, recently there has been a lot of innovation in the AIO market by manufacturers to try to match the performance and customizability of custom loops. Corsair, not to be outdone by its competitors, is launching its next-generation AIO CPU cooler, the iCUE LINK Titan RX RGB. The Titan combines Corsair's latest advancements in cooling engine technology, replaceable pump caps, and iCUE LINK RX120 fans in hopes of being your next CPU cooler.
In addition to the Titan AIO, Corsair supplied me with three of its CapSwap modules. This review will examine the iCUE LINK LCD Screen, VRM Fan, and Pump Cap Groove modules. Is the Titan good enough to topple another AIO I've recently reviewed, the Cooler Master 360 Ion? Continue reading to find out.
![]()
Sound Blaster, a name that PC users and enthusiasts have grown up with for years. Creative, the creator of the Sound Blaster series of sound cards have been with us since 1981 and a worldwide leader in audio technologies. In 1989, they bought us the now famous and recognized name of Sound Blaster. Since this time Creative have released a swathe of different audio products for the PC market, most notably the dedicated sound card. It was an easy choice back in the day, if you wanted quality sound for both game play and music alike, you purchased a dedicated sound card as it was most of the time far better than your onboard sound hardware. However is this the case now all these years later now that onboard sound hardware has vastly improved ? Today I am looking at the Sound Blaster X AE-5 Plus, a dedicated sound card for the PC. Read on to see what I find.
Before I start, in order to avoid confusion, I am reviewing the AE-5 Plus. Not any of the other AE-5 variants. The differences between the models can be seen in the Wikipedia excerpt below
The Sound BlasterX AE-5 was announced in June 2017, the first discrete sound card made by Creative in five years since the introduction of the Z-series. The card is the first in the Sound Blaster series to use a 32-bit/384 kHz SABRE 32 Ultra DAC (ES9016K2M), along with a custom-designed discrete headphone amplifier (1W output power and low output impedance of 1 Ohm so it can provide high damping factor for virtually any dynamic headphone). The card has an additional RGB lighting courtesy of a MOLEX power connection and accompanying RGB LED strip.[32][33] In late 2017, a white colored model of the sound card called the Sound BlasterX AE-5 Pure Edition was released with 4 RGB LED strips instead of one with the standard black model.[34]
In 2020, the AE-5 Plus was released which is similar to the previous model, but the sound card comes with hardware Dolby Digital Live and DTS encoding.[35] There is a white colored Pure Edition released alongside the standard black model.[36]
Source: Wikipedia
Packaging
Front:
Here we can see that the outer packaging of the Sound Blaster AE-5 Plus has a premium aesthetic and does not hold any punches when it comes to listing all of the enticing features of this particular product. Who doesn’t like specification and certification logos.
Back:
Looking to the rear, we are once presented with a generous amount of information with respect to the AE-5 Plus features along with minimum system requirements. I hasten to add though that even the most moderate of modern PC’s will run this without a hitch. However as always, it is good policy to check.
Inside:
When you first open the box you are presented with an accessories container which houses the additional components and manuals for the product.


Removing the container, you are finally presented with the AE-5 Plus in all its glory. I enjoyed seeing that due attention and care had been put into the packaging to ensure the safety of the hardware during transit with a very snug and generous amount of foam.

Accessories Box:
Inside the accessories box you will find the following
- Welcome card
- Quick start leaflet
- Warranty leaflet
- 1x RGB lighting strip (30cm/10 LED’s)
- 1x RGB lighting strip connection/extension cable


I felt that the Welcome card included in the package is a nice touch, bringing you in to the “Premium Audio” fold.
It is worth noting that the included RGB strip allows the user to either adhere it to their PC case using the included adhesive strip, or via the integrated magnets. This was a very nice touch adding in the magnet fixing option as it is far more convenient should you change your mind and want to move the RGB strip elsewhere. The RGB strip also allows for further strips to be added on in a daisy chain affect.
The Hardware – Exterior
Inspecting the card I found it to be of a solid but lightweight build. I loved the included shroud. Putting aside its functionality for the RGB side of things (I cover this later on), it hides the PCB. With today’s PC build aesthetics, the majority if not all of the PCB is covered, it is nice to see Creative following suit. This sound card will blend in nicely with any build.
Looking to the audio ports of the card we find a generous collection:
1 x TOSLINK Optical Out
1 x 1/8″ (3.5mm) Mic In / Line In
1 x 1/8″ (3.5mm) Headphone / Headset Out
1 x 1/8″ Front Out, 1 x 1/8″ Rear Out
1 x 1/8″ Center / Sub Out
1 x Front Panel Header
This would cover the majority if not all the needs of your average and pro gamer as well as music lovers.

To the rear of the card you will find a Molex connector as well as a HD Audio connector. The HD Audio connector is what will connect your PC case front audio ports to the AE-5 Plus which is important if you make use of your front audio ports. The Molex connector is for the additional power the AE-5 Plus requires for its RGB functionality. It would seem that this sound card requires more that the 75Watt the PCI-e slot already provides.

A note on the Molex connector. I found the use of such an old standard of power connection a little puzzling. With the majority of PC hardware today utilizing the SATA power connector type, I found it odd that Creative would opt for an older standard. The SATA power connector has been around for a good while and the use of a Molex, for someone wanting to install this into their PC could be an inconvenience as some pre-builds do not come with a Molex connector at all, meaning the purchase of a converter cable is required, or for those with custom builds, this would possibly require digging out the Molex cable for their PSU. In our opinion the AE-5 Plus would have been better off using the SATA standard as it adds to convenience and overall less fuss.
To the side of the card, you can see the RGB strip connector for connecting the included RGB lighting strip. I find that it would have been better if the RGB connector had been located to the rear in order to hide the connector from direct view and would have allowed for better cable management.

Finally the top side of the card, while nothing hugely special to see here, it is nice to see a PCB with a graphic design, further adding to the premium feel.

The Hardware – Interior
After removing the shroud and the PCI Bracket (7 screws total)we are now left with the naked PCB.

The shroud is a simple aluminium cover that hides and protects the sensitive components on the PCB as well serving as part of the RGB aesthetic which is covered later in this article.

Taking a closer look at the PCB we can take note of the two main components that really make the AE-5 Plus shine.
First we have the ESS ES9016K2M DAC. This is the beauty that gives you the 122DB rated audio along with 32Bit / 384Khz lossless playback.

For those who want to study this IC more in depth, you can visit the ESS technology site for a full breakdown of this IC’s functionality as well as a diagram block.
The ES9016K2M SABRE32 Ultra DAC is a high-performance 32-bit, 2-channel audio D/A converter targeted for portable high-fidelity audio applications such as mobile phones and digital music players, consumer applications such as Blu-ray players, audio pre-amplifiers and A/V receivers, as well as professional applications such as recording systems, mixer consoles and digital audio workstations
Source: ESS Technology
I have seen some onboard sound solutions close to the 122DB rating but not with 32bit lossless playback. All in all what makes this sound card special is the combination of this DAC with other features I will detail below.
Next we focus on the Creative CA0132, also known as the Creative Core3D Quad-Core Audio Processor. This brings us to the brains of the operation as the main audio processor. The CA0132 is a well established audio processor for Creative as it has featured in several past products including motherboards featuring sound Blaster technologies, it goes without saying that this is a robust piece of technology.

As per what Creative succinctly states
The quad-core Sound Core3D audio DSP and the legendary Sound Blaster technologies provide fully customizable DSP-powered audio enhancements, crystal-clear vocal reproduction, in-game voice communication enhancements, 7.1 virtual surround sound and other advanced audio technologies.
Source: Creative
This combined with the ESS ES9016K2M DAC and the new XAMP headphone amp technology which allows for each individual audio channel its own dedicated amplifier, is really what makes the AE-5 Plus special. It is worth noting that the XAMP technology has a super low impedance of 1Ω. This allows for all the audiophiles out there the ability to use their studio grade headphone, no more compromising! For those using traditional earphones you have a tolerance between 16 – 600Ω.
For Dolby Digital Live & DTS Encoding needs, the AE-5 plus as part of its arsenal, features hardware acceleration for both the aforementioned audio standards which sets itself a part from the prior AE-5 products. These two features are a very useful components when it comes to creating an all encompassing audio solution for the PC. With many external amplifiers making using of both Dolby Digital Live & DTS technologies, it makes sense to have these at a hardware accelerated level on the AE-5 Plus.
I note that Creative, as per many sound card generations before the AE-5 Plus have carried on the tradition of using gold plated audio jacks which allows for better electrical conduction and also avoids oxidization which can and will kill an audio jack.

The last note on the internals is the 5 RGB light Diodes. This is what will power the Sound cards onboard RGB effects, something I cover later in this article.

The Software – Sound Blaster Command
The following focuses on the Sound Blaster Command software that you can download HERE
Creative’s Sound Blaster Command software is at the heart of it all. It is aptly named as it is the command center for your AE-5 Plus. Let’s give a rundown of the main points of Sound Blaster Command.
- SBX Profile: Allows you to apply pre-defined sound profile depending on the scenario. Music, Game, Cinema. Though you can of course create your own sound profile.
- SBX Profile: Features a list of pre-defined sound profile for a limited amount of games.
- Equalizer: Allows you to set the equalizer to your preference. Again you can tweak the pre-defined profiles, or you can go fully custom.
- Playback: Allows you to choose the correct audio setup depending upon your environment as well as the audio quality.
- Scout Mode: You can turn on the “Scout Mode”. This setting is for helping with environmental sounds in game such as “Footsteps, Speech & Weaponry Handling Acoustics Characteristics”.
- Encoders: You can select between No Encoder, Dolby Digital or DTS, depending on your audio setup.
- Mixer: Allows you to set your playback and recording volumes.
Below, in order (left to right) with the points above, lets take a look at the software.


With respects to the game sound profiles. I would have liked to see a larger list than what we have access to. It would be nice if further updates to Sound Blaster Command would bring us more pre-defined profiles to choose from. While this is not a huge issue as you can engineer your own settings, I feel that if you are going to go there, then be sure to be much more inclusive of other titles.
RGB
For those who love a little bit of RGB, you are in luck. There are two RGB elements to the AE-5 Plus.
Firstly you have the on card RGB. This as you would expect lights up the Sound Blaster X Pro Gaming Logo to the top of the card as well as the AE-5 Plus Logo to the side of the card. Secondly you have the included RGB Lighting strip that connects to the AE-5 Plus via the provided connectors. The RGB strip as stated before allows you to affix it to your PC case using either the included adhesive strip, or via the integrated magnets. The choice is yours !


All aspects of the RGB capabilities are controlled from the Sound Blaster Command software.
Upon opening the Sound Blaster Command software, you will want to go down to “Lighting” in the left hand menu. This will take you to all the RGB lighting controls. Something I quickly noted is that you can select which RGB element is enabled the top right of the software. You can choose from “Internal” & “External”. Internal relates to the cards own RGB and External relates to the RGB strip, you can independently switch these on or off via the toggle. This is a small but nice flexibility to have.
Within the drop down list for the pre-defined lighting effects we have a generous selection:
- Wave Rainbow
- Solo Orange
- Wave Ice Blue
- Pulsate Red
- Wave Fire
- Wave Green
- Wave Blue
- Mood Yellow

With each of these pre-defined effects, you can choose from a list of 6 lighting motion types: Solo, Aurora, Mood, Cycle, Wave & Pulsate.

Some of the pre-defined affects will allow you to choose the lighting speed as well as the direction of the lighting effect, but this depends on the lighting effect chosen. This leaves you with a lot of lighting profiles to choose from, or you can select a profile and tweak it to your needs and save it out as your own lighting effect. Sky is the limit.


Subjective Sound Testing
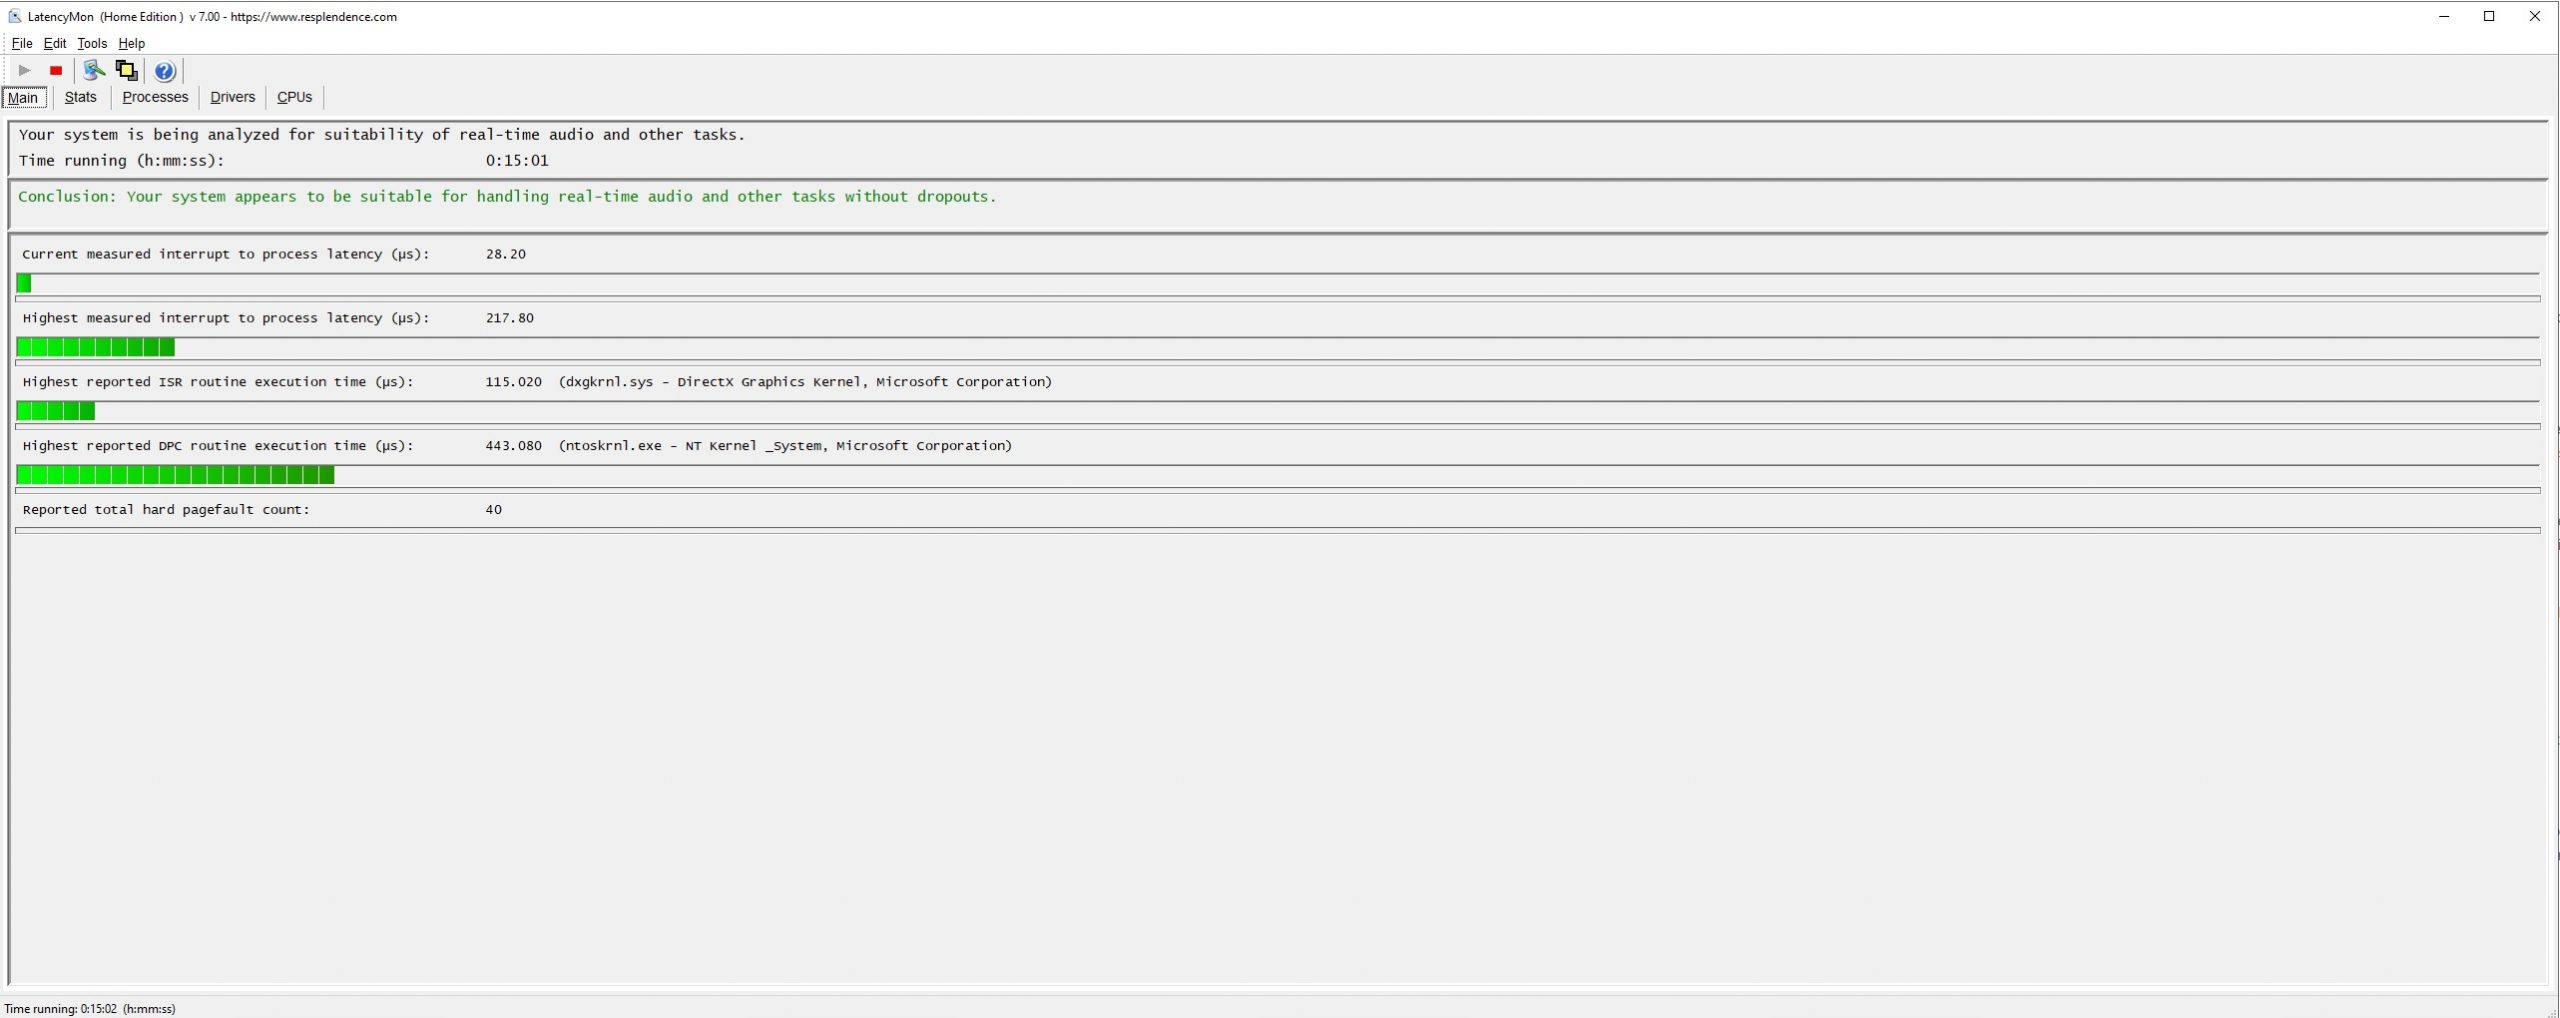
Before we get to the subjective sound testing comments, it is always worth noting the DPC latency on the test machine. Why is this important one may ask, well ultimately a PC that is suffering from high DPC latency can suffer from audio dropouts which would only serve to skew the overall sound testing. So if you ever have any issues with your audio or have dropouts, I would certainly recommend you use LatencyMon to make sure you do not have a latency problem, the great thing with LatencyMon is that if latency does prove to be an issue, you can see the culprit as to what on your PC is causing the issue which takes out the guess work. Below you can check the results of the PC used for this testing. We ran the test for 15 minutes.
For testing I am not using what is considered audiophile or studio rated gear. Today I will be using something more “general”, something more likely that the masses would have access to or already very likely to own (or something in the similar spec range). Today I will be testing with the Corsair HS70 Headset via the 3.5mm jack.
Audio Test – Music
So first of all being I am a music lover it was time to see what the AE-5 Plus is capable of. As audio files vary from low to high bit-rates, it is important to test from both viewpoints (or should it be called ear points ?). From a general use point we opted for listening to audio over YouTube as well as listening to local audio using a lossless format. Lossless being that of the higher quality as there is no information lost from the audio files which you typically get from a compressed format. YouTube will typically compress your audio in order to save on bandwidth for streaming reasons, but it can have a detrimental effect on the audio experience. Why have I chosen YouTube ? Well aside from other audio services, YouTube is a hugely used platform by the masses for listening to audio, why ? because it is free for one and secondly you can find virtually anything you need. So I believe YouTube is a relevant audience with respect to testing audio at the lower end.
You do not need the highest end headphones on the market in order to hear the clarity different between low end audio and audio on the lossless range as the difference can be startling. After checking the YouTube vs Lossless I was pleasantly surprised, while the lossless performed as expected and sounded fantastic, the YouTube low end audio also fairs surprisingly well. I put much of the low end audio improvement down to two things. The standard audio processing found on the AE-5 plus which is afforded by the Creative CA0132 processor but also the Creative Command Center. The Command Center gives you some more granular controls over the audio as covered further on up in this article, this certainly lends itself to improving the overall experience of lower end audio. With the ability to use the “Crystalizer” function, this can help improve clarity and un-muddy some of the lower end audio. This did especially help with vocals lost among the instrumentals.
I must stress however, while the YouTube audio was improved from my point of view with the use of the AE-5 Plus features, the audio format and bit-rate are the main players here when it comes to audio clarity and depth. A true lossless audio file in my humble opinion is always going to sound best. Regardless of how many enhancements you give to a low end audio file, the lossless will still win. Some of the reason for this is that artificial enhancements can sometimes over exaggerate elements of audio which can make them sound over the top or out of place.
As for the lossless file playback, I eluded already that it was “Fantastic” much of which can be attributed to the file itself, but it is worth mentioning that it sounded fantastic on the AE-5 Plus with both enhancements disabled as well as enabled. As we all know, audio is subjective, so there may be things about the lossless audio you wish to tweak, the Creative Command Center is certainly the place to do this. I for one really enjoy bass, so I do tend to tweak a little extra bass into my audio tracks irrespective of low or high end formats.
Audio Test – Gaming
Much like what I found in the Music testing, the clarity of the audio was improved while gaming. What I found was that the overall depth of sound was improved with greater emphasis placed on the sound affects, explosions, gun reloads and footsteps. With respects to gaming, there is a “Scout Mode” which you can enable on the Creative Command Center. This feature is supposed to amplify “Footsteps, Speech & Weaponry Handling Acoustics Characteristics” I did test this to see if I could detect a discernible difference between it being disabled and enabled and in all honesty I could not see what was different with Scout Mode being enabled vs disabled when playing Call of Duty Warzone or Call Of Duty Black Ops – Cold War. I think that this could be worked on some more before I would call it a game changing feature, in my testing it did not offer anything.
Creative Command Center also allows you to select pre-define sound profiles for select games titles. If you are a “Set and leave it” type of person, then this is certainly for you. The only issue I found was that the list of available game profiles was limited and it would be more than likely you will not find your game in the list of the pre-defined profiles. I think this could be a missed trick. This is one of those all or nothing features in my mind. You either don’t offer it at all, or if you do offer it then you keep the list updated as games are released or at the very least give a more extensive list to choose from from the get go. A little like what Nvidia does with “Game Ready” drivers, it would be excellent to see this adopted…but with sound profiles.
That being said, you of course can still create your own sound profiles for your game library as you see fit via the Creative Command Center.
Conclusion
The AE-5 Plus is a feature packed product. It offers superior sound clarity compared to older dedicated sound card products and most onboard solutions found on motherboards that do not employ Sound Blaster technologies. If you are wanting a solution that allows you to make use of your studio grade equipment & headphones, then this is definitely for you with its ultra low impedance rating of 1Ω, combined with its XAMP technologies allowing for each audio channel to be amplified, this makes a great companion for the audiophiles among us. The clarity of audio, vocals as well as accurate depth of bass make this a winner for music lovers. We were especially impressed with the vocals with these being laser focused and not convoluted with instrumental elements, thanks to Creatives “CrystalVoice” technology.
For Gamers specifically. The Sound Blaster Command application allows you to set pre-defined audio settings for certain games. However I did find the list of pre-defined settings a little limited, so you will likely have to enter in your own presets. That being said Sound Blaster Command does give you a great array for adjustment, much more than most of your standard onboard solutions, so you may very well be able to get a better experience via manual adjustment than you would get via the pre-defined profiles. If you are looking for more immersive sound in game, the AE-5 does a great job with respects to environmental sound affects and could be especially helpful if you are a competitive online player. Though I did notice that the “Scout Mode” did not make any difference to our in game sound experiences to any noticeable degree on Call Of Duty Warzone or Call Of Duty Black Ops: Cold War. That being said, results may vary depending on the title you are playing and headphones used.
The Creative Sound Blaster X AE-5 Plus comes in at a retail price of £139.99.
All things considered, if you are wanting to step up your audio game, take advantage of higher end audio gear and enjoy better clarity of sound in game or when blasting your favorite music then we would recommend the Sound Blaster X AE-5 Plus.

We wish to extend our thanks to Creative for supplying us this review sample.

Want to discuss this product or give your views and feedback from your own usage? Discuss on the ExtremeHW Forums
Like our content? Please consider Donating to help us to continue our writing.
Related Posts
This Post Has 2 Comments
Leave a Reply
You must be logged in to post a comment.
Great article!
I tested this sound card and i could not make a difference in gaming between this and Creative Audigy Rx. At least in terms of quality of sound.