
The discussion around All-In-One (AIO) CPU coolers versus custom loops will always be ongoing. However, recently there has been a lot of innovation in the AIO market by manufacturers to try to match the performance and customizability of custom loops. Corsair, not to be outdone by its competitors, is launching its next-generation AIO CPU cooler, the iCUE LINK Titan RX RGB. The Titan combines Corsair's latest advancements in cooling engine technology, replaceable pump caps, and iCUE LINK RX120 fans in hopes of being your next CPU cooler.
In addition to the Titan AIO, Corsair supplied me with three of its CapSwap modules. This review will examine the iCUE LINK LCD Screen, VRM Fan, and Pump Cap Groove modules. Is the Titan good enough to topple another AIO I've recently reviewed, the Cooler Master 360 Ion? Continue reading to find out.
![]()
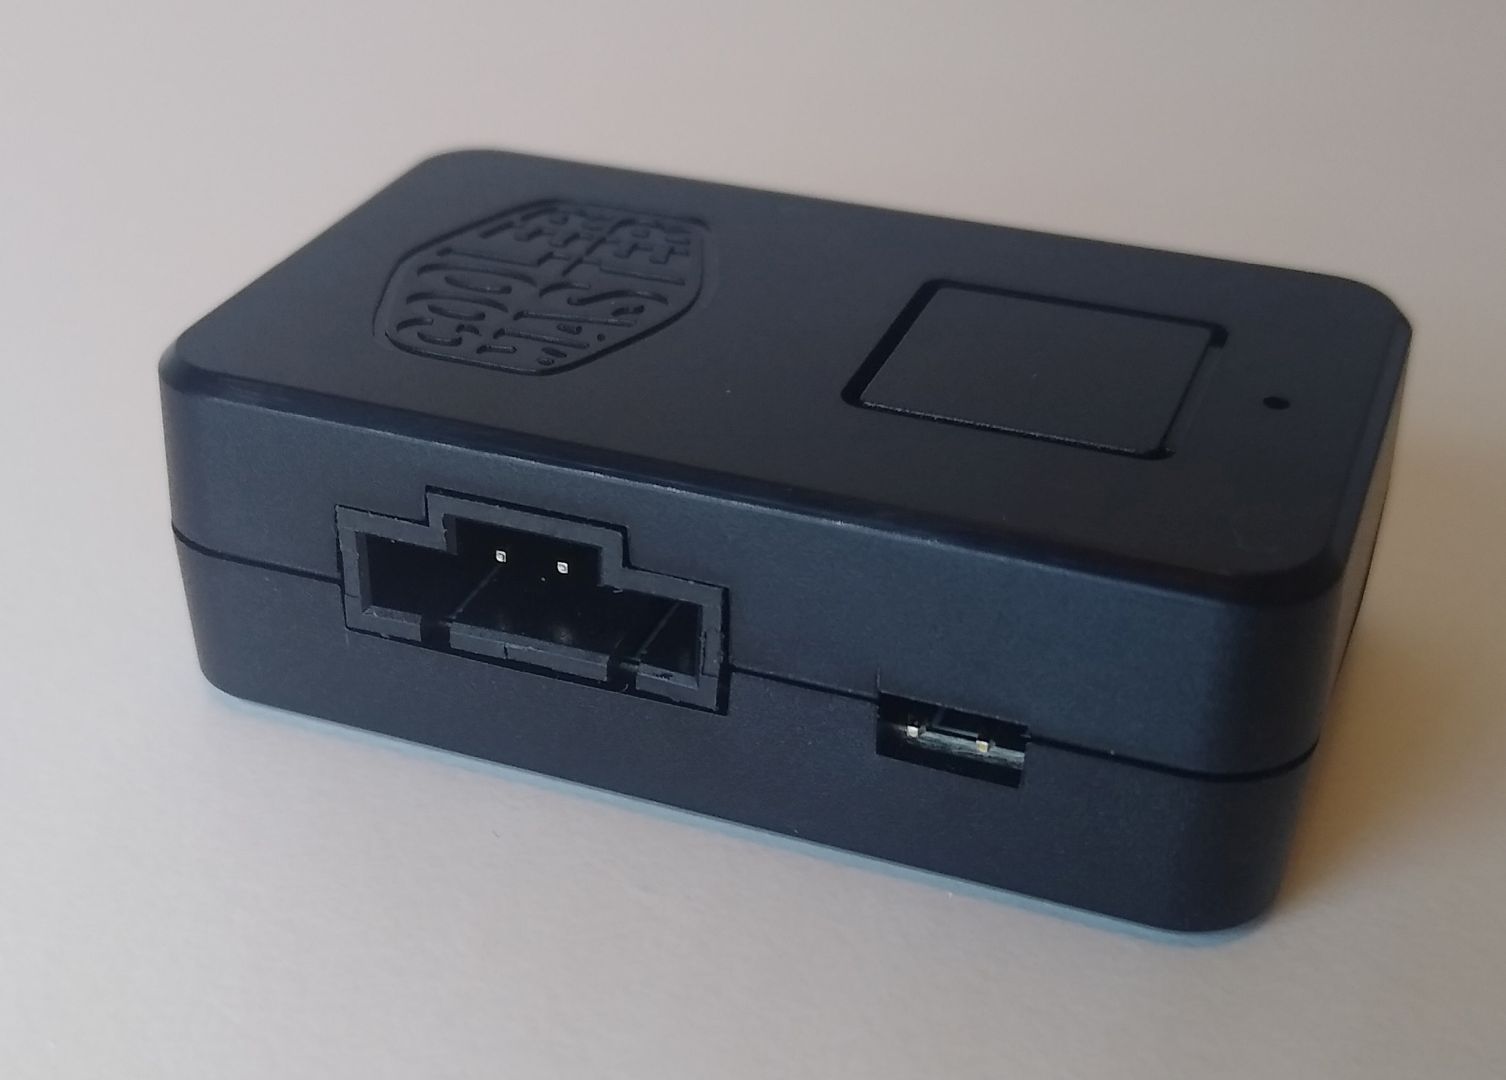
We know and appreciate Cooler Master for making obsession-worthy cases and powerful coolers, so when they approached us about a new product release, we were excited, to say the least. Released back in 2016, the Iconic MasterAir Maker 8 became an instant success with its powerful cooling capabilities and also an integrated cover plate to hide the cooling hardware. Cooler Master is always pushing the limits and they’ve released several new coolers since the Maker 8. Today we have the pleasure of testing the newest iteration from that classic platform, the MasterAir MA610P ARGB. It promises to have the foundation cooling capabilities of the Maker 8, but it’s updated and modernized for current demands. Join us as we check out this cooler and put it to the test on our Z490 test bench.
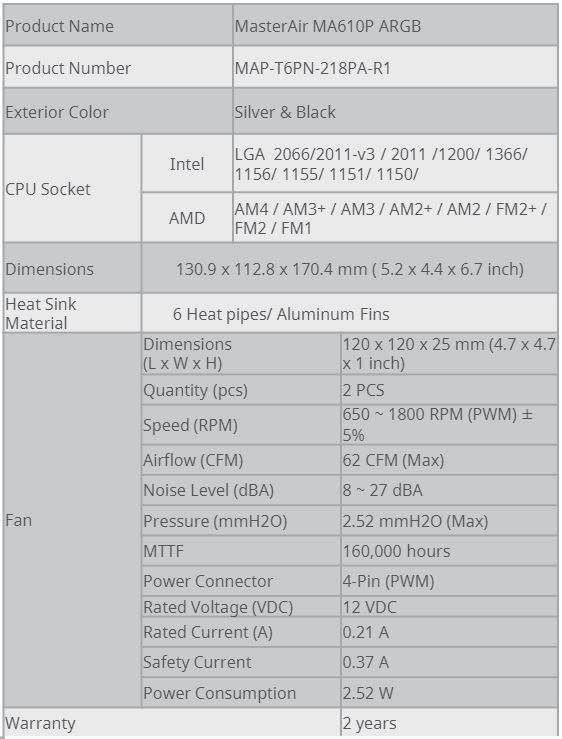
Specifications & Features
PC enthusiasts often turn to AIO liquid coolers for high-performance cooling power, but new air coolers offer features that might make enthusiasts excited. The MasterAir MA610P features an impressive 6-heat-pipe configuration that promises to deliver exceptional cooling power. We’ve seen impressive heat pipe coolers for many years now, but modern enthusiasts need more than just exceptional cooling power. To answer the call for more bling, Cooler Master designed the MA610P with a sleek plastic shroud system and also packed it with plenty of addressable LEDs.
While the cooler is designed to plug directly into your motherboard’s ARGB 3-pin connector and infinitely control the colours, it’s actually not required for operation. Included in the box is a separate remote control that will allow you to control the lighting with a few pre-set modes and colours. So those of you out there keeping socket 775 alive will still be able to add that RGB bling to your system without the use of an addressable RGB connector.
With a price point of just $79.99 on Amazon, it’s obvious why this would be an interesting choice for PC builders and enthusiasts. We’ve seen AIOs that sell for double what the MA610P does, so if it can keep up with cooling power then it would be an attractive option.
Key Features
- Continuous Direct Contact 2.0 (CDC 2.0) Excellent heat dissipation with 6 heatpipes and Continuous Direct Contact 2.0 technology.
- Dual SickleFlow ARGB Push and pull dual SickleFlow 120 ARGB fans to maximize CPU cooling with plenty of colors while doing it.
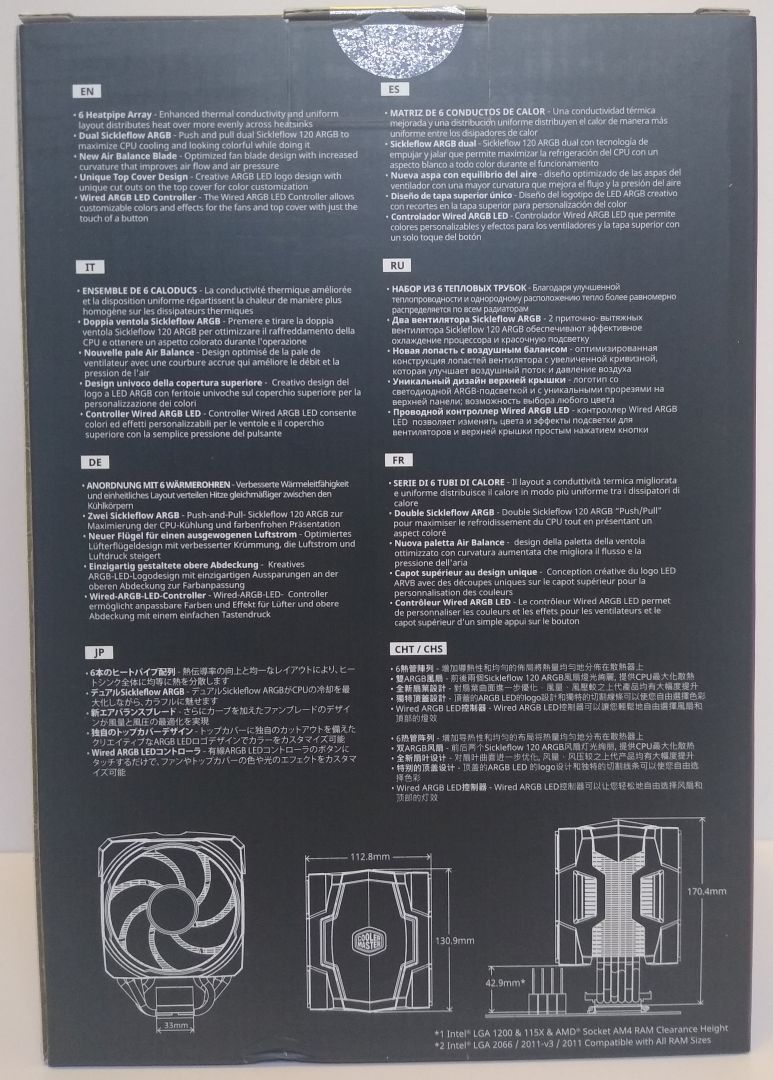
- Unique Top Cover Design Creative ARGB LED logo design with additional light strips on the top cover for aesthetic customization.
- Wired Mini Addressable RGB LED Controller The Controller allows customizable colours and effects for the fans and top cover with just the touch of a button. The single button allows you to easily switch between six lighting modes with the touch of a button.
- Wide Range of Socket Support As seen in the treble below, MasterAir MA610P ARGB is compatible with most mainstream sockets for both Intel and AMD.
Download: Manual – MasterAir MA610P ARGB
Download: Product Sheet – MasterAir MA610P ARGB
Packaging & Product Tour
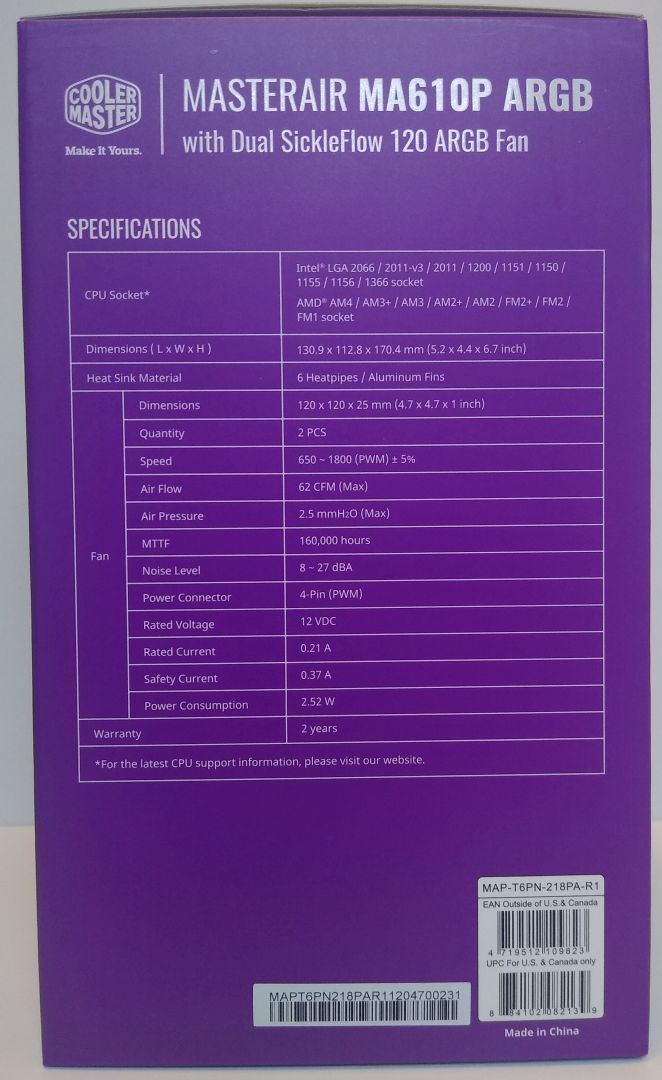
Cooler Master ships the MasterAir MA610P ARGB in an excellent package. They’ve given us exactly what we wanted to see for a product of this nature. The box is sturdy and includes helpful information on both the front and the back. They even went the extra mile with high-resolution image printing for the cooler itself.

The cooler itself ships completely encased in packaging foam. This packaging solution is sturdy enough for international shipping by the most brutal of carriers, well done Cooler Master for this robust packaging.


A Closer Look
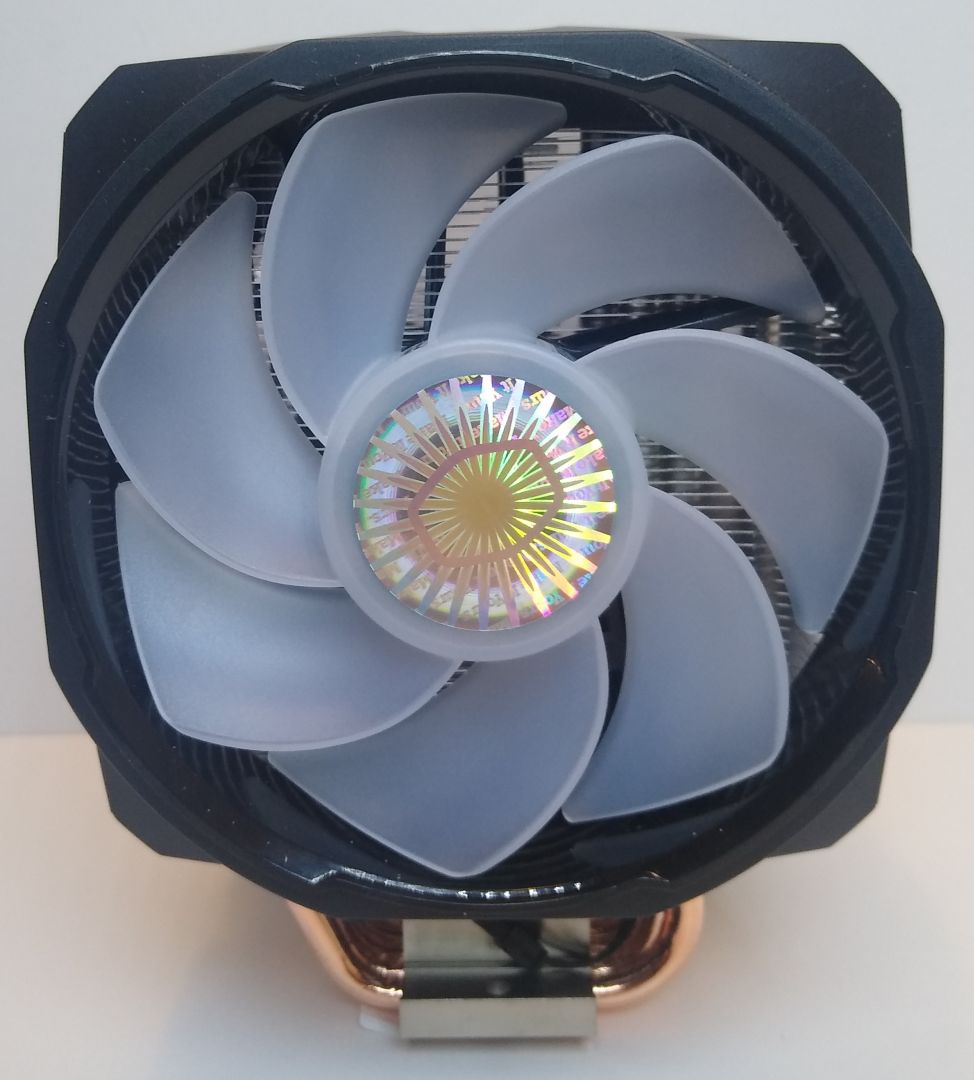
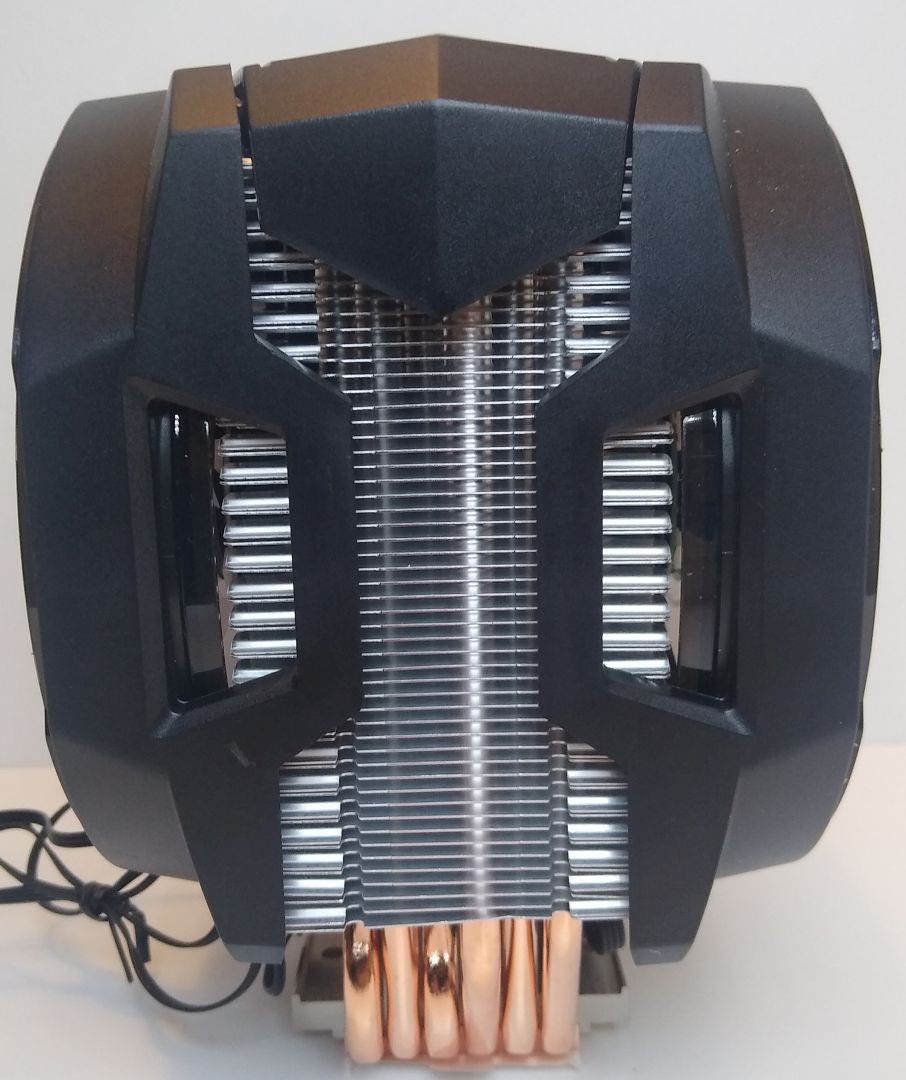
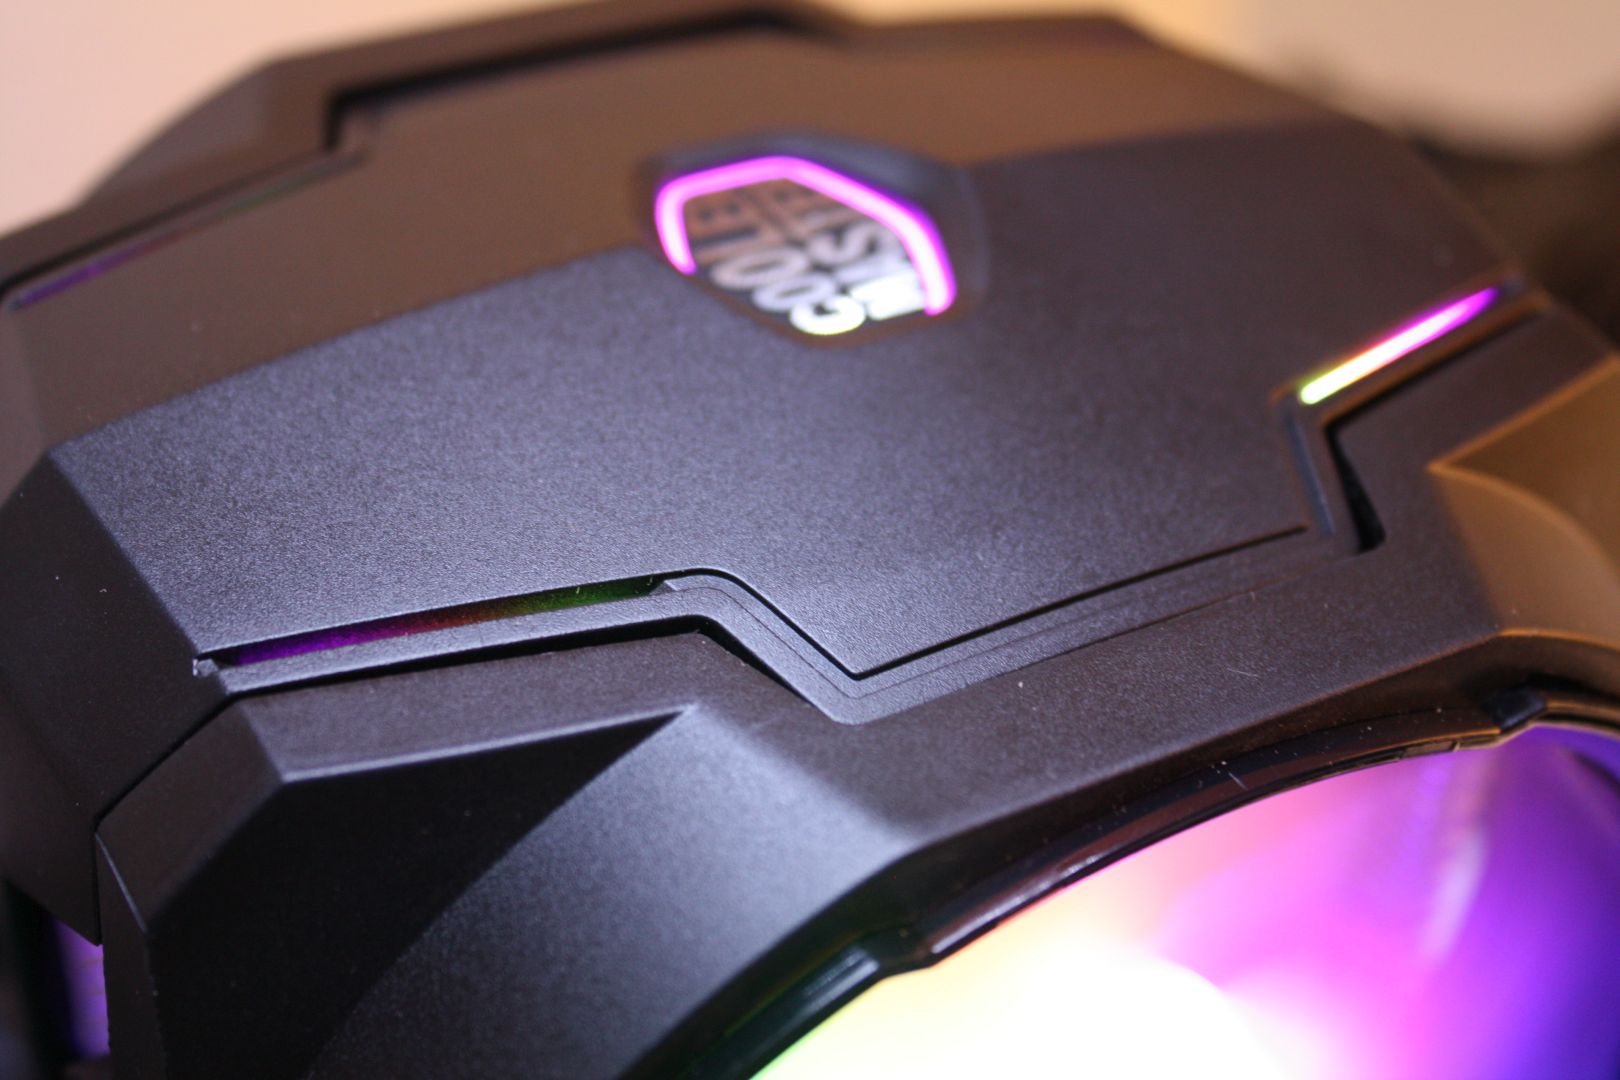
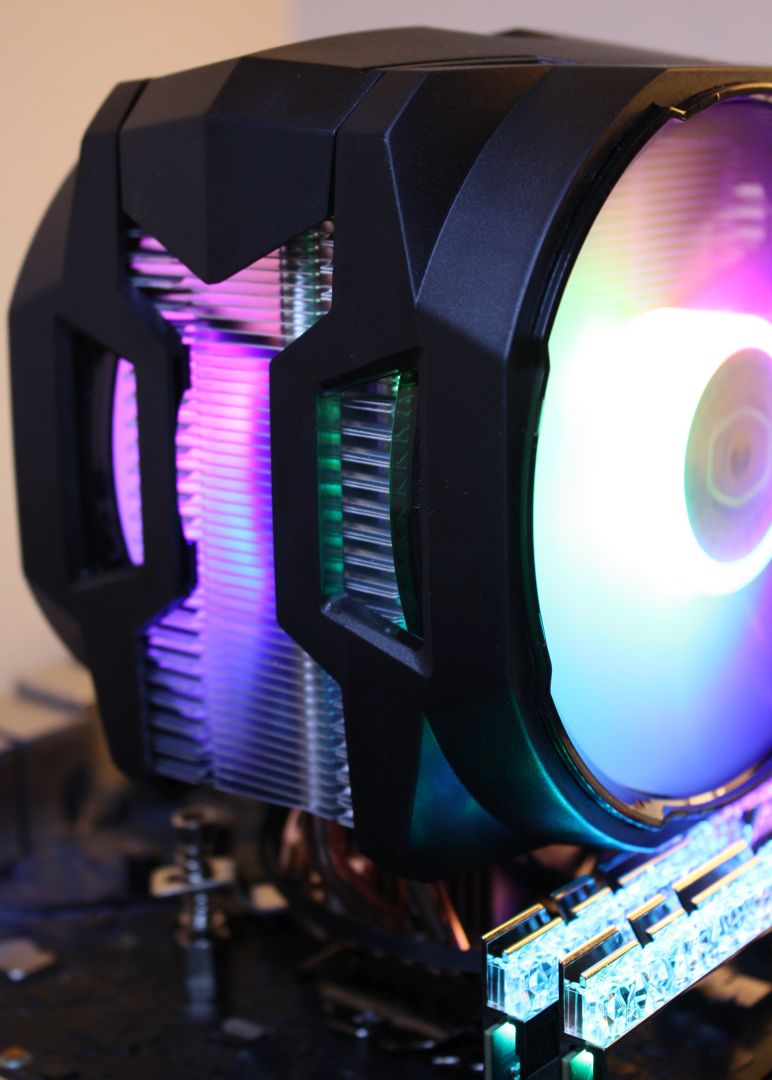
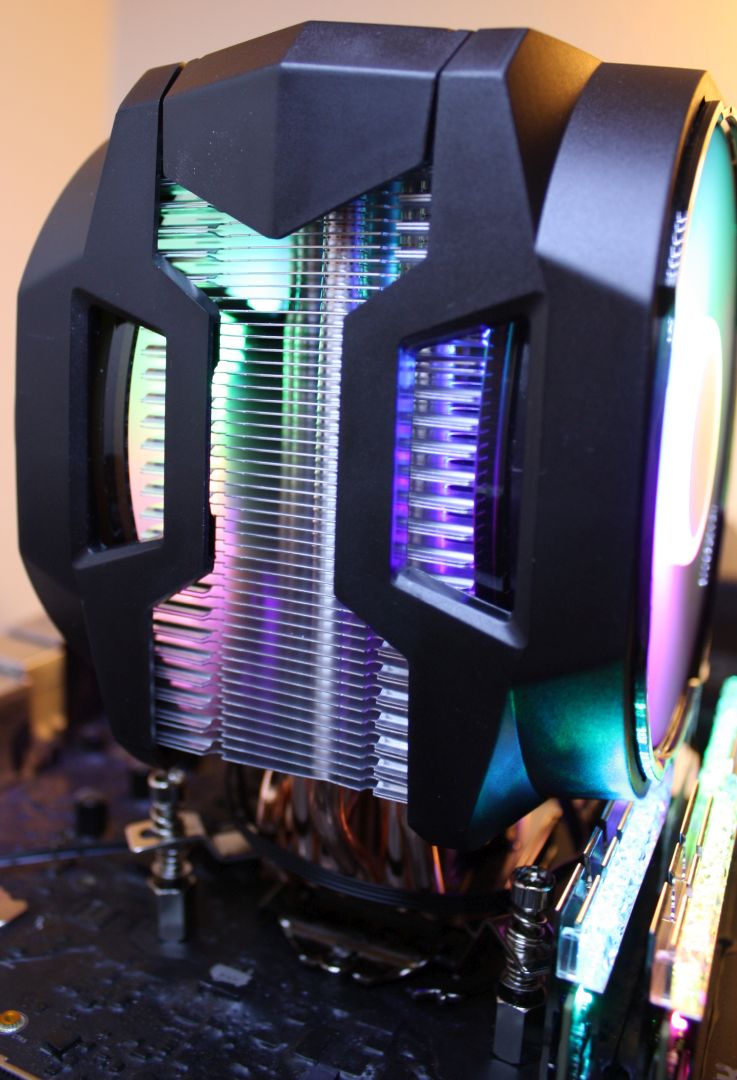
Out of the packaging, our initial impression is that it’s a lot of plastic. You may not be accustomed to seeing an air cooler nearly fully encased in a plastic shroud, but that’s literally one of the main attractions of this cooler design. For those enthusiasts looking for an aesthetically pleasing air cooler, this just might be it. In the isometric profile below, you can see that the sides don’t completely cover the cooling fins, but otherwise, the cooling hardware is fully covered in plastic.

The fans are oriented in a push/pull design and it’s impossible to put them on incorrectly. The two fans are interchangeable so you can switch the fans from intake to exhaust without removing the actual cooler.
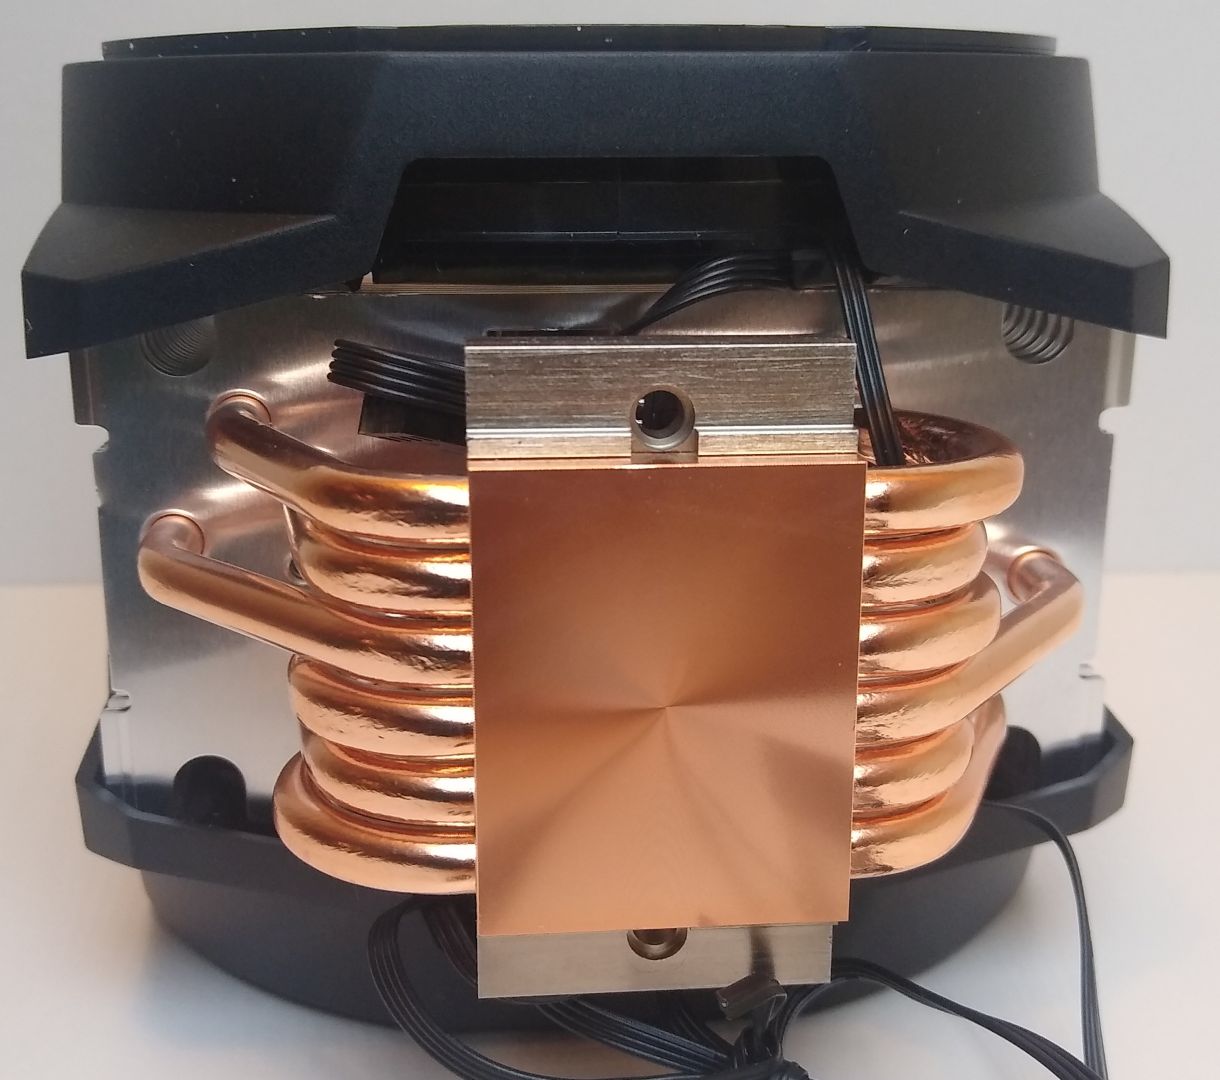
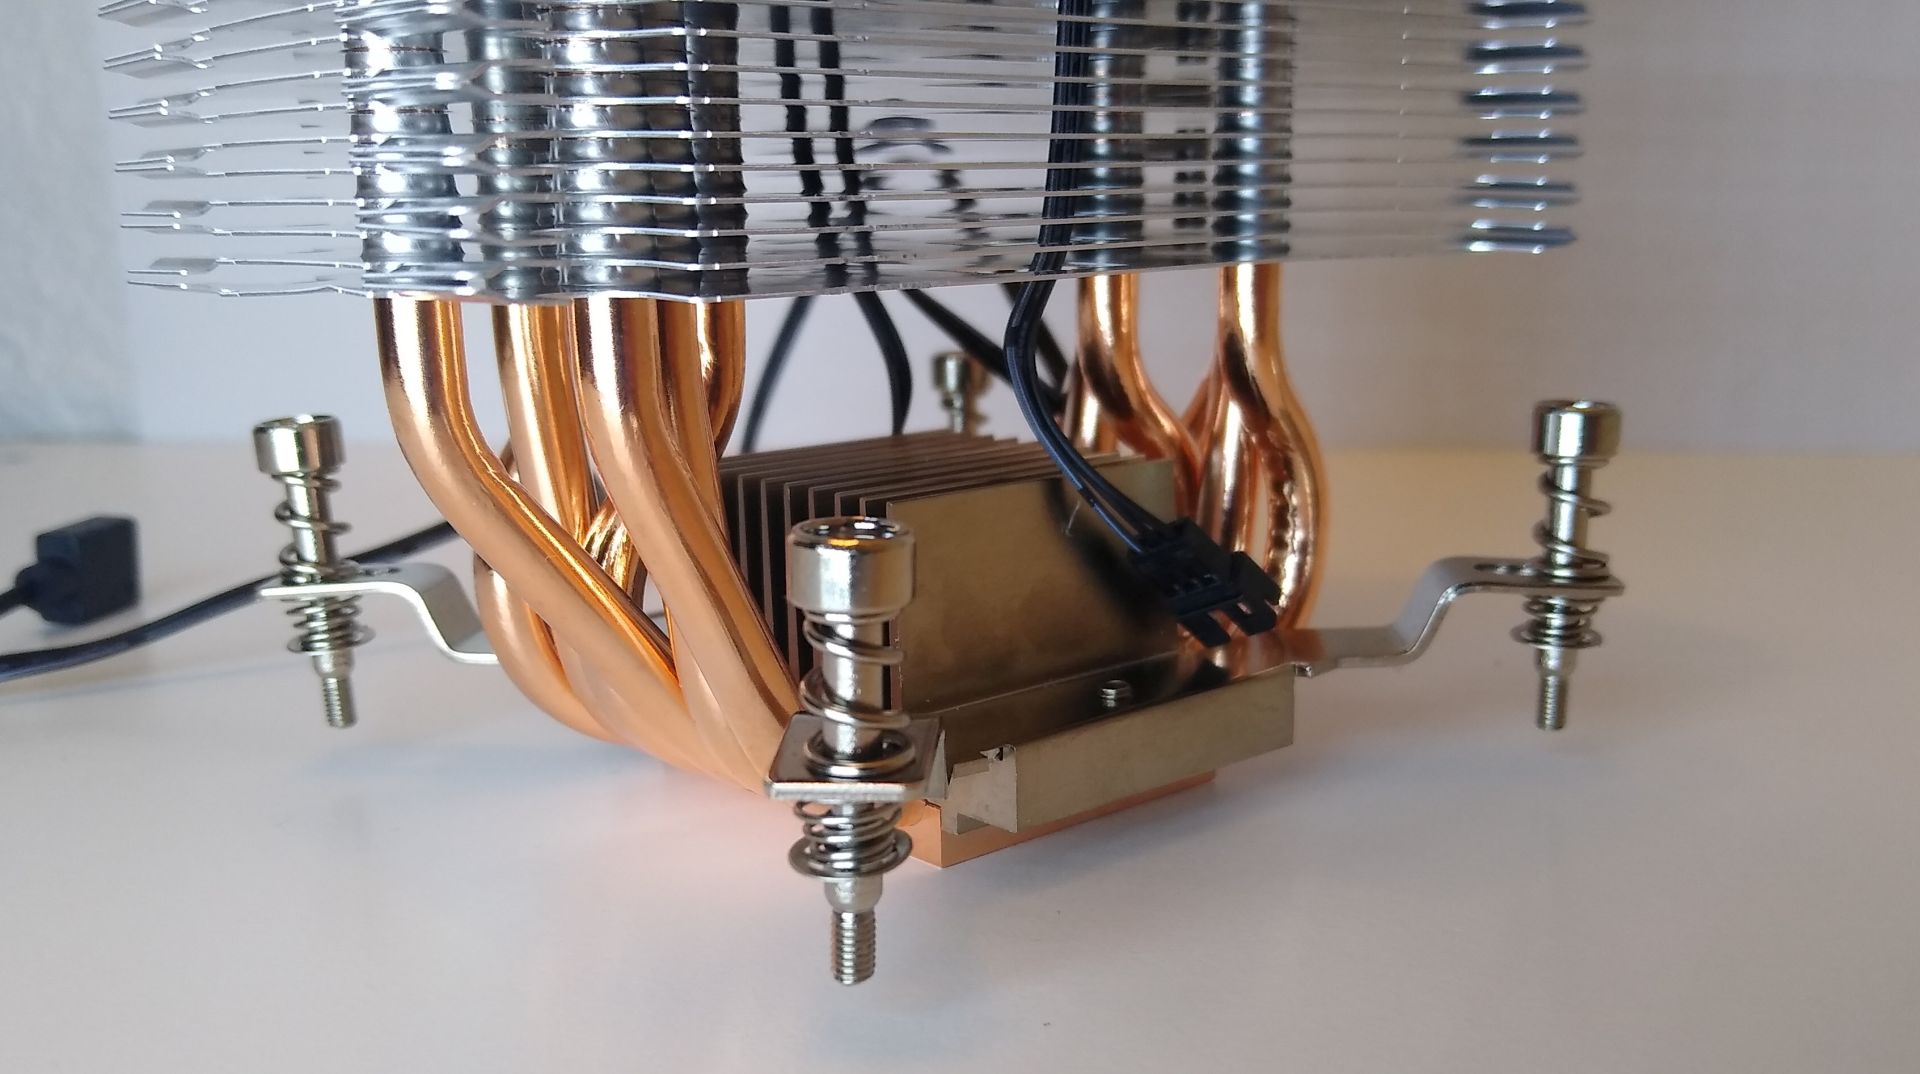
There are a total of 6 heat pipes that carry the heat up the cooling fin stack. To disperse the heat equally across all heat pipes, they’ve implemented a large piece of copper. We’ve seen other approaches in the past wherein flattened and exposed heat pipes contact the CPU directly. Those types of designs do a good job of transferring the heat to a few hew pipes. However, this type of thermal-mass design is better suited for high heat loads because it evenly disperses the heat from the CPU instead of focusing the heat only on the centre heat pipes.

With the fans removed we get a peek at the core cooling fin design. As air coolers go, this design appears to be optimized for high airflow and low drag.


Fans, Connectivity, & Accessories
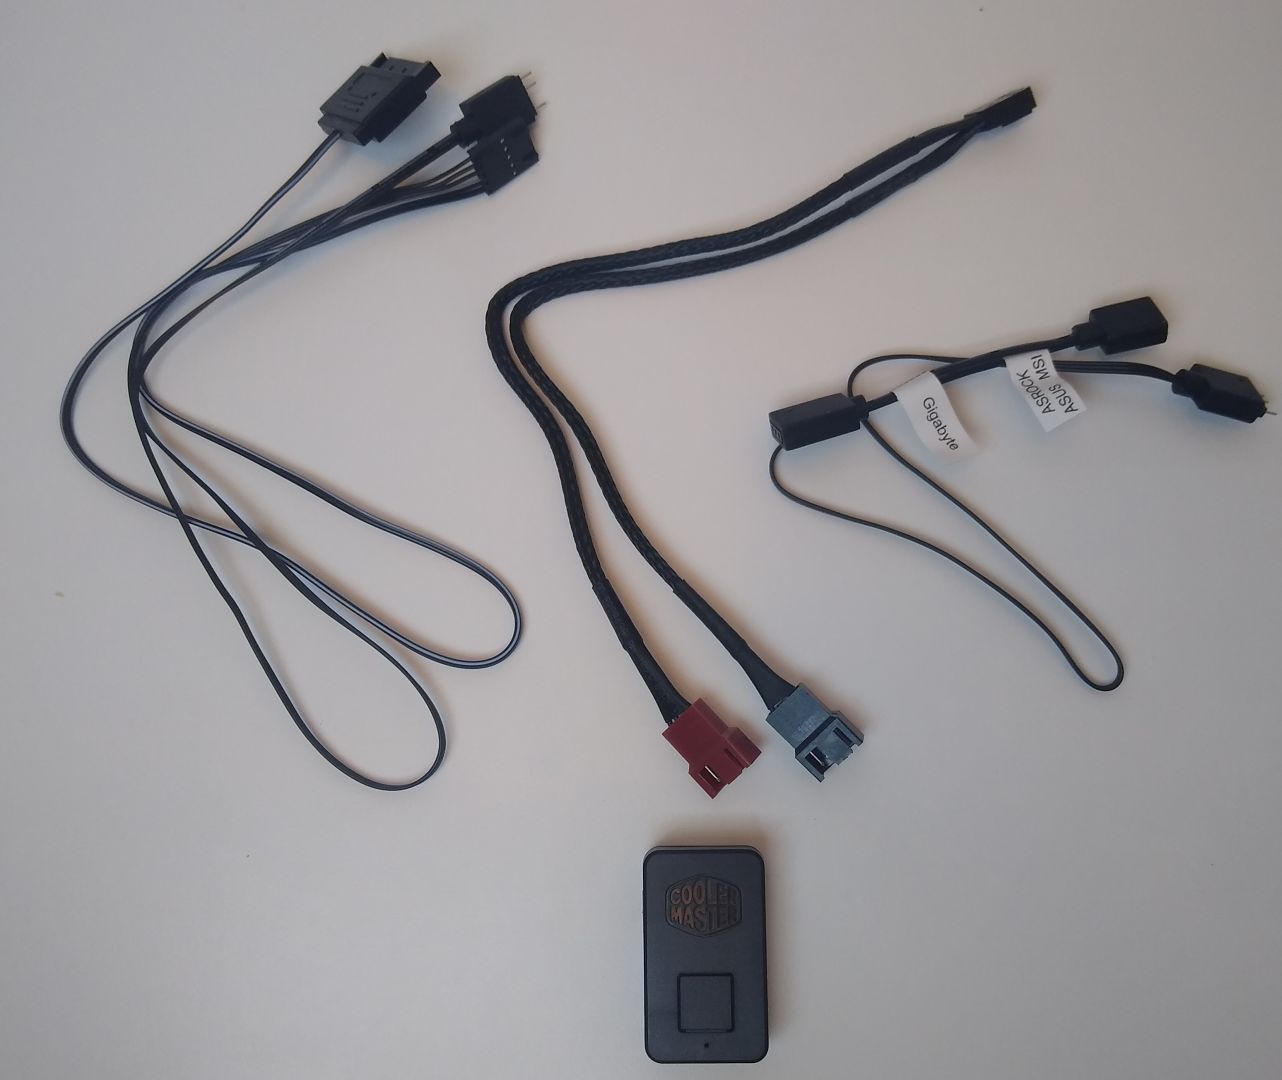
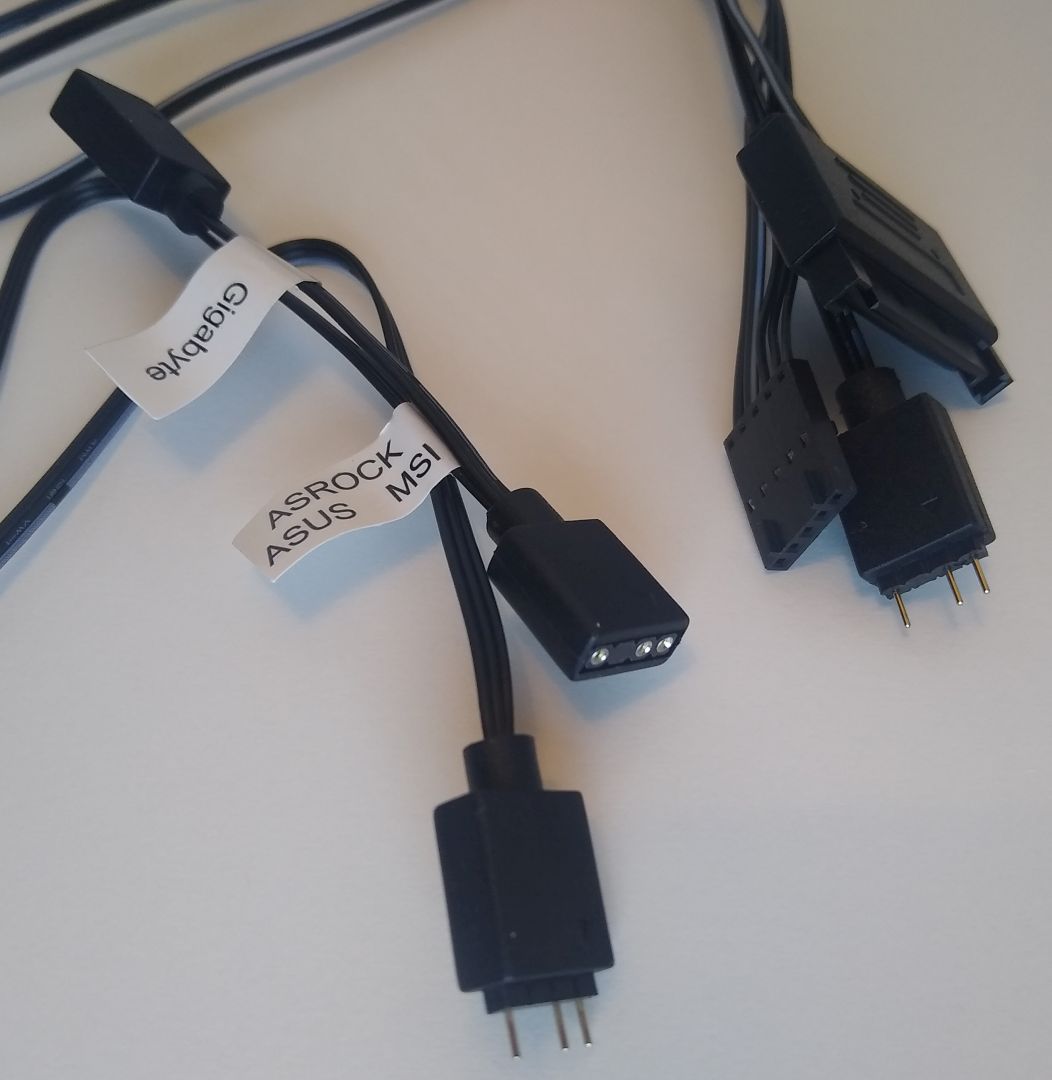
Each of the SickleFlow 120mm fans has two connectors. We find the typical 4-pin PWM fan connector that we expect to see. However, we also have a second connector that handles the addressable RGB. The special 3-pin connector plugs directly into the wiring harness, which is part of the top plastic cover. Both fans plug into the wiring harness, which also has a single ARGB connector for your motherboard. They’ve made it simple for you so that you only need to deal with one ARGB connector.

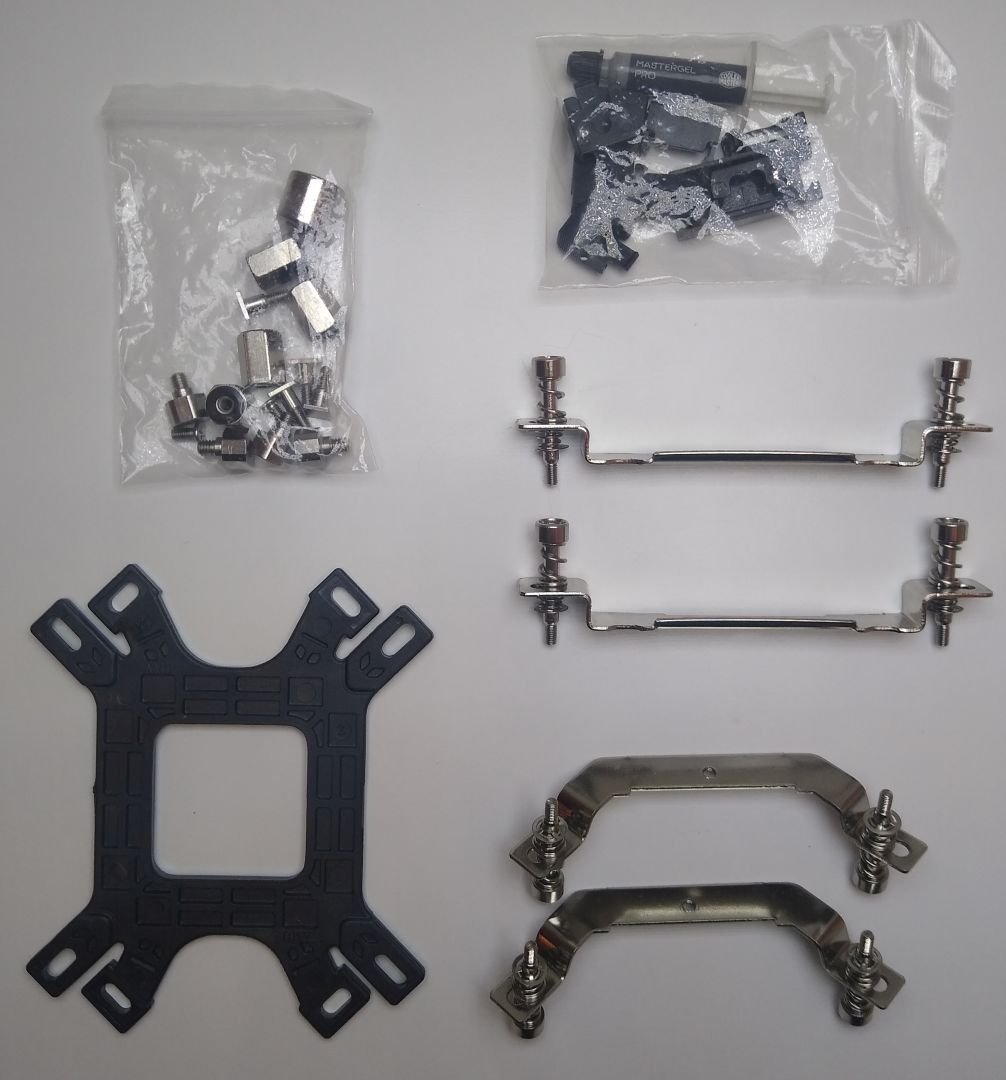
It’s not always a foregone conclusion that every retail cooler will include everything you need for installation, especially where RGB/ARGB is concerned. However, not to worry, Cooler Master literally gives you everything you need, even if you have a legacy motherboard without RGB support.
As we spoke about in the specifications above, the cooler comes with a remote control to handle RGB colour modes if your motherboard does not include the capability. It may be small and simple, but the mini-wired remote is highly effective. For a more detailed look at the installation process for all the various sockets, please refer to the MasterAir MA610P ARGB manual.

Mounting the socket adapter is a very simple process. There are two screws that hold the mounting bracket to the actual cooler. Once those are in place, all you need to do is install the motherboard backplate and apply the thermal paste. There are a total of 4 screws that hold the cooler to the motherboard, and they are of the bottom-out design, so you cannot accidentally overtighten them.

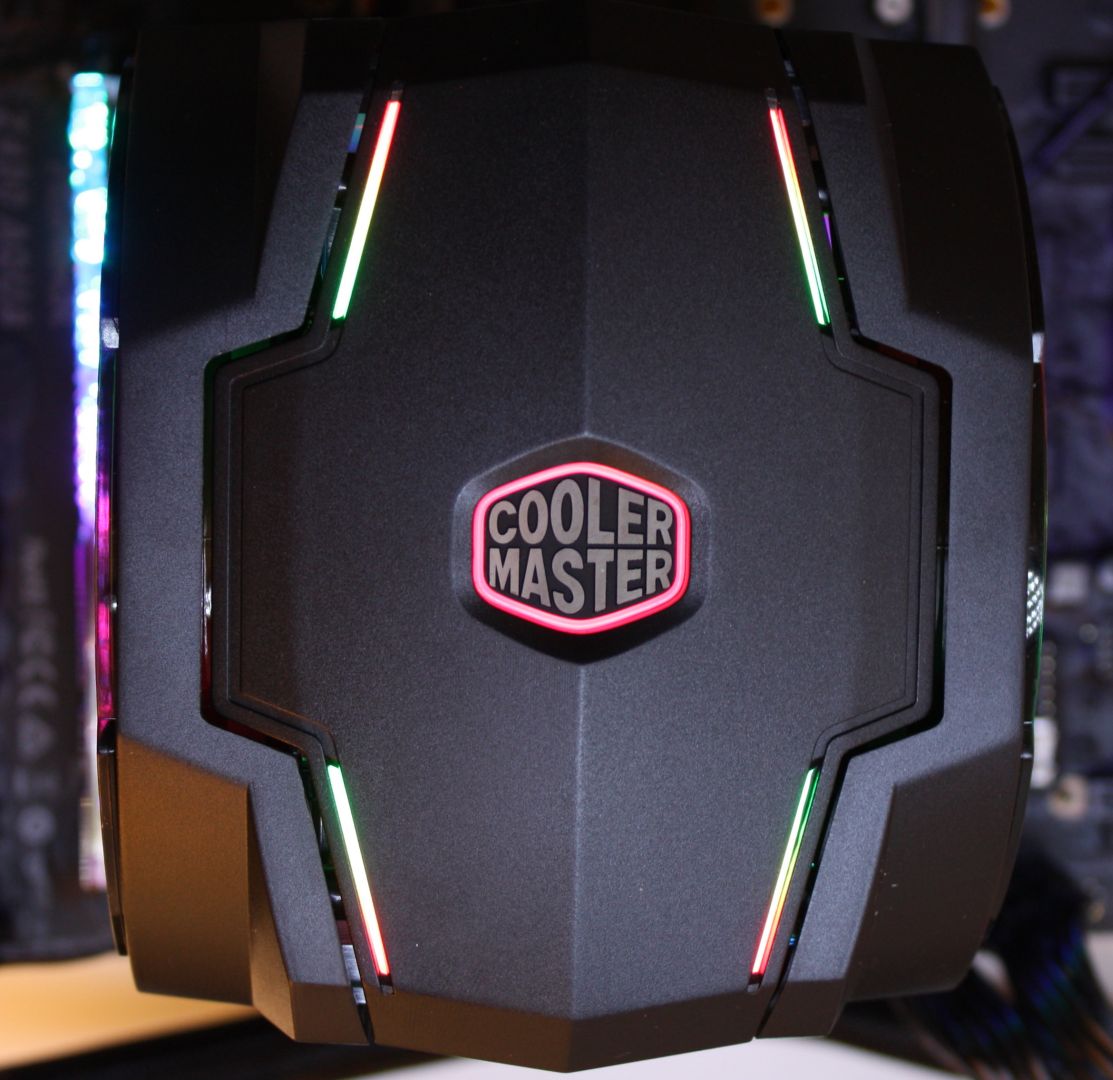
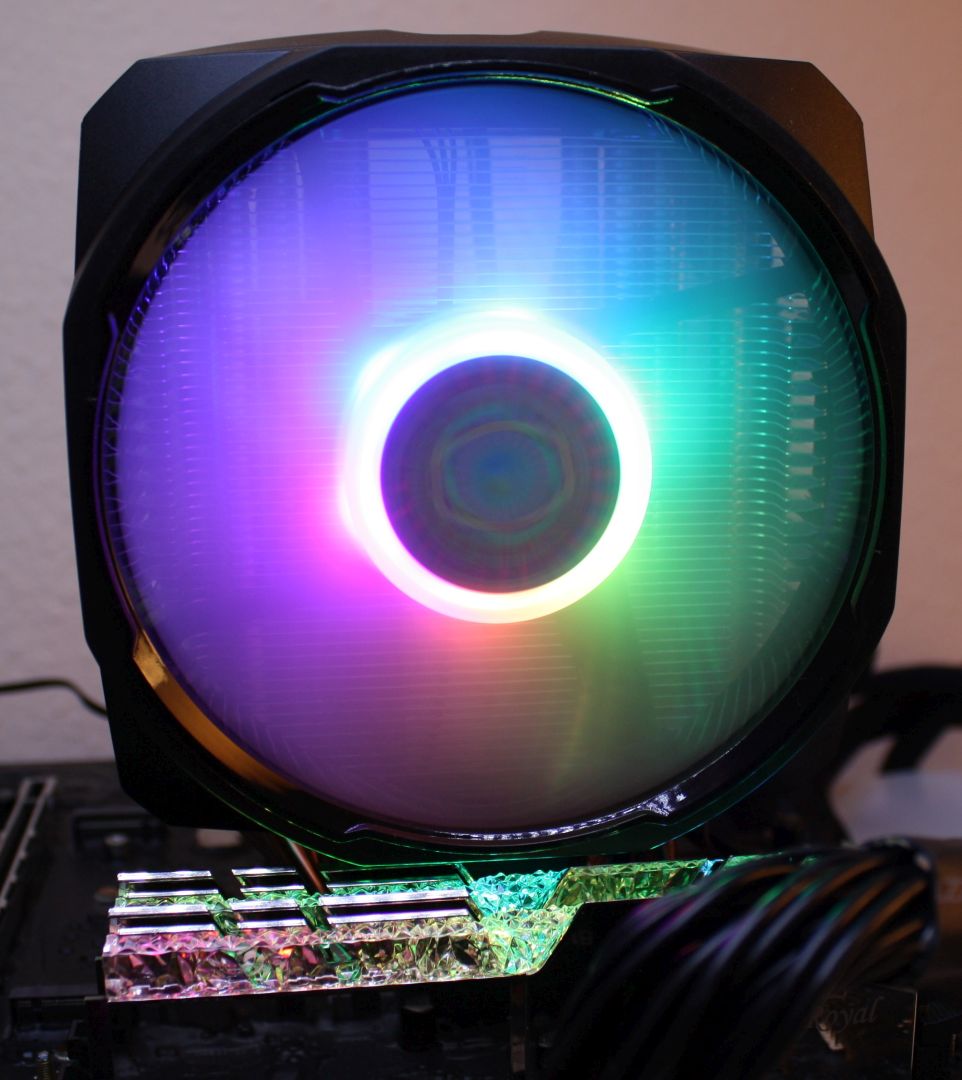
RGB Light Show
We covered all the technical specifications above, so now we’d like to show off its curves and ARGB lighting. The LEDs are very bright and the light-diffuser fan blades do an excellent job of spreading out the light evenly. We could explain the beauty to you in great detail, but the pictures below speak for themselves.

In the top-down view, you cannot see the cooler hardware or fans at all. However, they didn’t skimp on the lighting there either, the top itself has multiple lighting zones.

Memory Compatibility
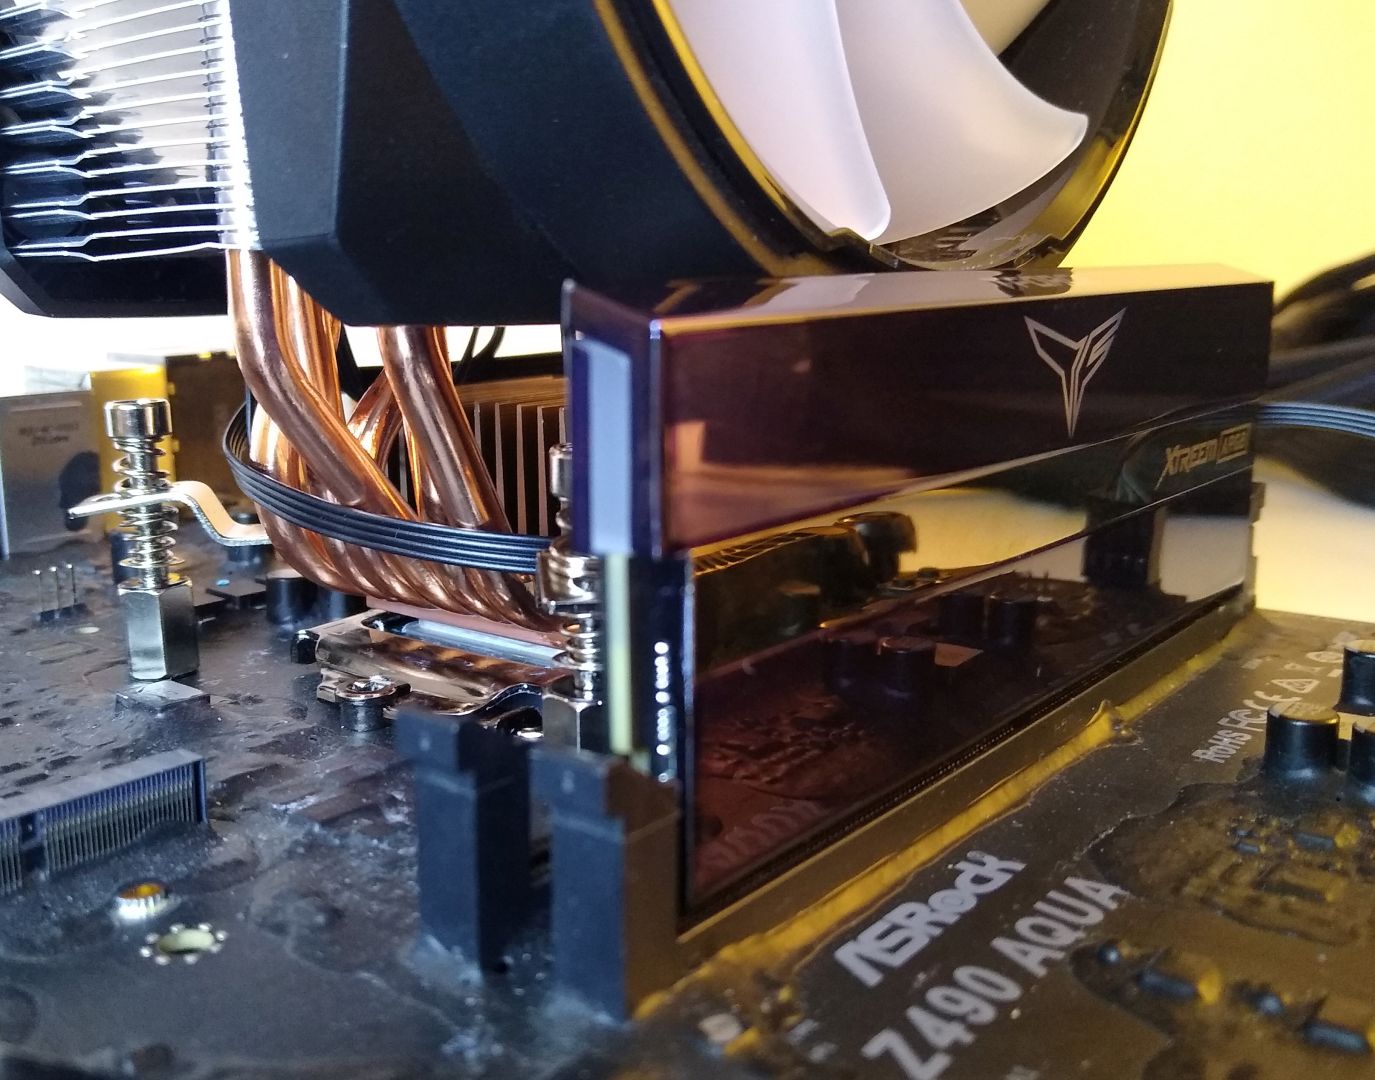
One glaring issue we’d like to bring up is the memory height clearance. We were not able to use the memory we had planned for this review because of the clearance issues. Below you can see that we were only able to install one stick of our Team Group Xtreem ARGB modules because it interferes with the cooling fan. In fact, most of the RGB memory we have for testing will not work with this cooler, a very upsetting fact.
The only RGB memory we found that fit is the G.Skill Trident Z series, which measures 44 mm tall and gives about 2 mm clearance. Cooler Master knows that users who buy this ARGB cooler will also likely pair it with RGB memory modules, so it’s a very big problem that many memory models simply won’t work with this cooler. This seems like a really big oversight.
Test Setup & Methodology
The procedure will consist of setting stable profiles in the bios and then running the stress tests for 30 minutes each time we make a change. While running the stress test, we will record the temperatures and noise levels to summarize later. The testing process is as follows:
- Non-Overclocked, Stock 10900K
- All fans/Pumps PWM controlled and left on auto
- AIDA 64 Stress Test (CPU, FPU, Cache)
- Prime 95 (Small FFT)
- Cinebench R23 (30-minute automatic-loop stress test)
- All fans/Pumps set to the maximum speed possible or 100%
- AIDA 64 Stress Test (CPU, FPU, Cache)
- Prime 95 (Small FFT)
- Cinebench R23 (30-minute automatic-loop stress test)
- All fans/Pumps PWM controlled and left on auto
- Overclocked 10900K running 5100 MHz with 1.25V Fixed voltage set from the bios
- All fans/Pumps PWM controlled and left on auto
- AIDA 64 Stress Test (CPU, FPU, Cache)
- Prime 95 (Small FFT)
- Cinebench R23 (30-minute automatic-loop stress test)
- All fans/Pumps set to the maximum speed possible or 100%
- AIDA 64 Stress Test (CPU, FPU, Cache)
- Prime 95 (Small FFT)
- Cinebench R23 (30-minute automatic-loop stress test)
- All fans/Pumps PWM controlled and left on auto
At the time of the idle/load measurement, the ambient temperature will be recorded with a Fluke K-Type probe, so we can exclude any variance in ambient temperatures. We will use the ambient temperature to arrive at the delta temperature. The graphs will be the average Delta temperature of each test, which is to say the temperature above ambient.

Results
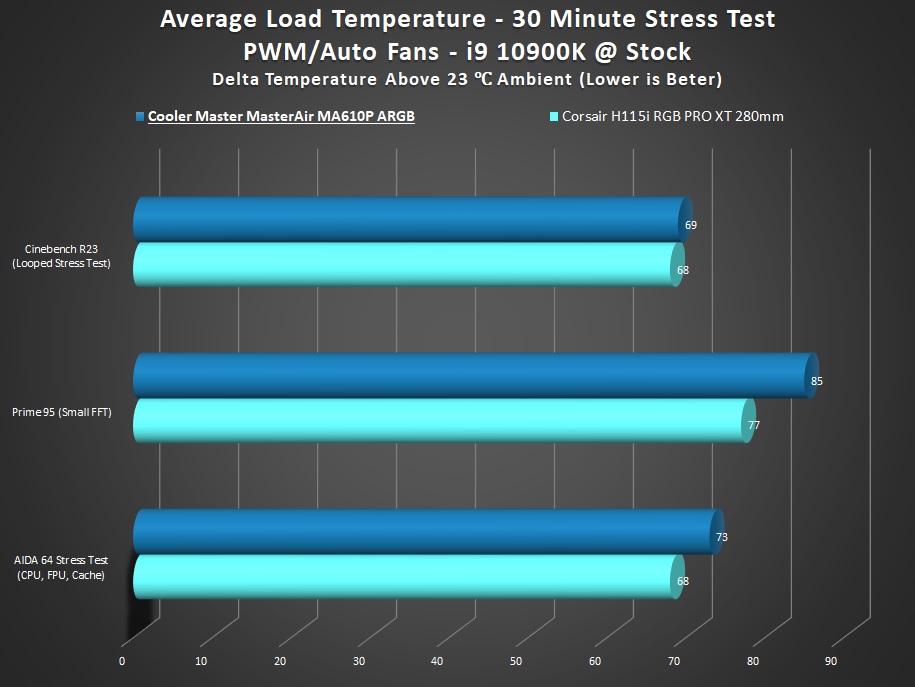
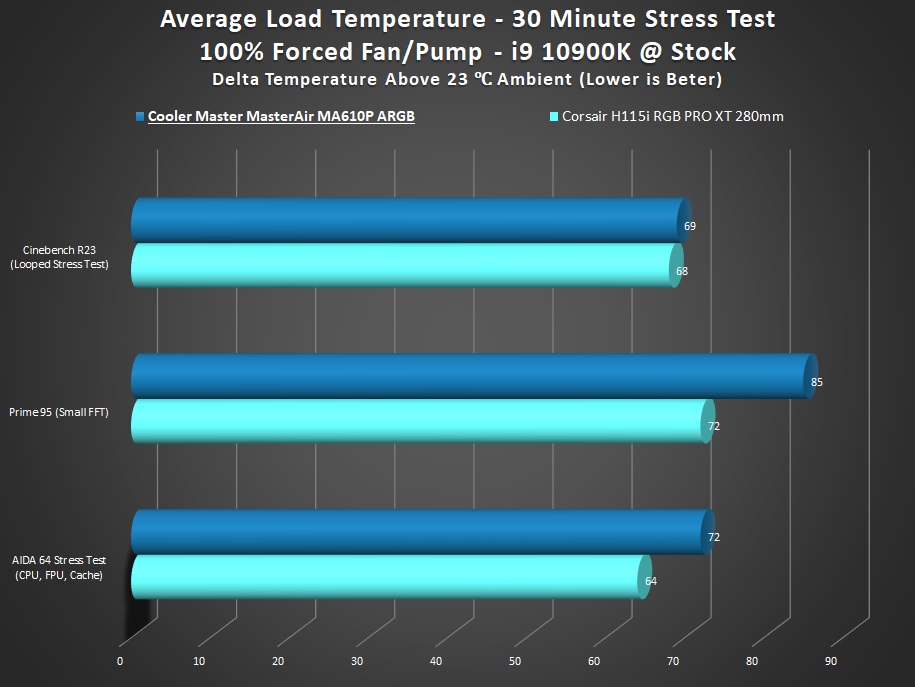
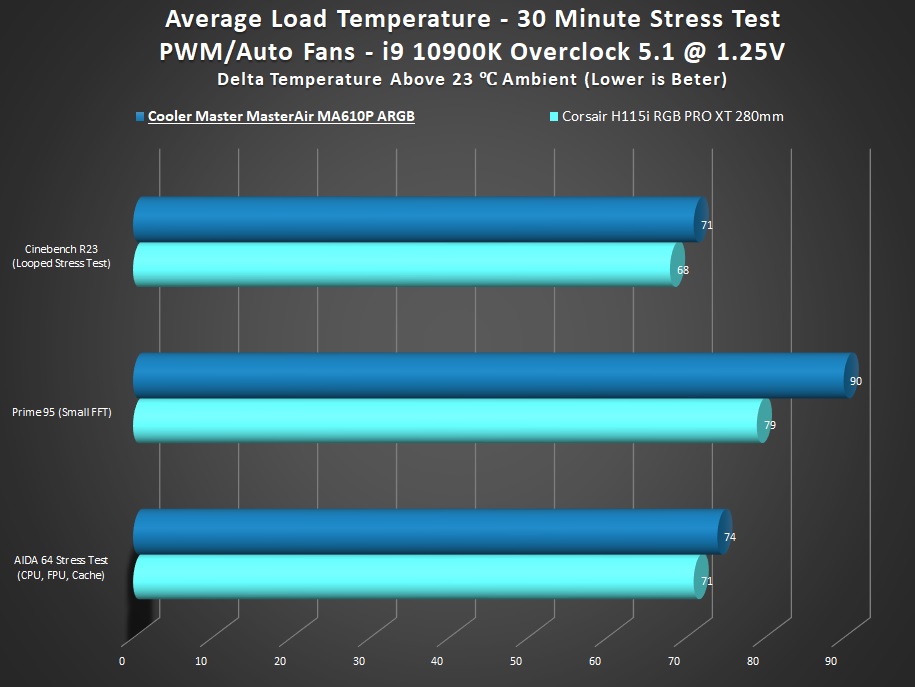
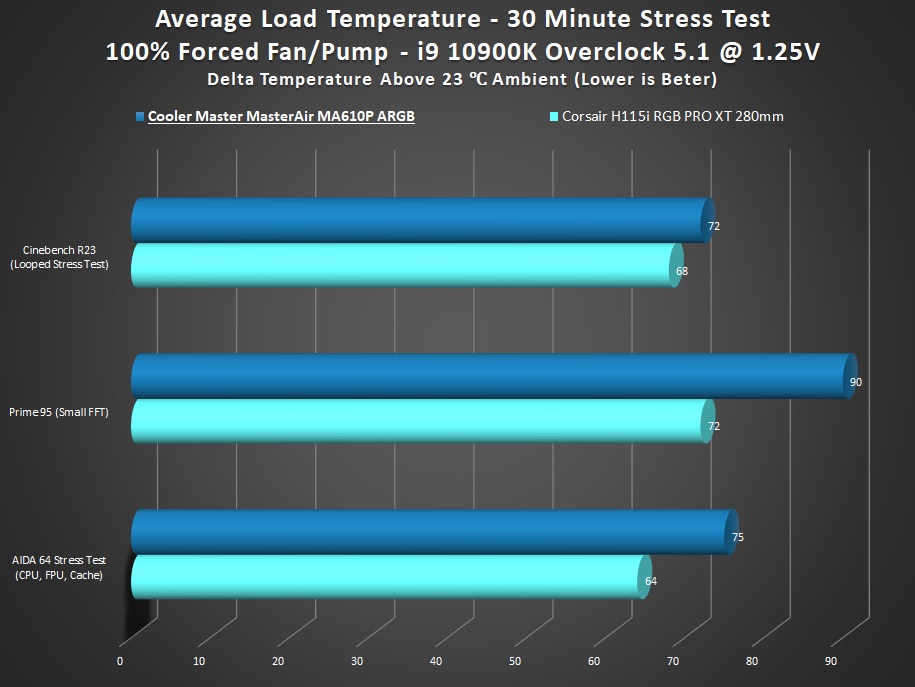
When it comes down to the performance, we compared the MasterAir MA610P ARGB against one of the best performing AIOs we’ve tested to date, the Corsair H115i RGB PRO XT 280mm. As you can see below, the MA610P did an incredible job at cooling the CPU in each of our test scenarios and there was no thermal throttling.
10900k – Stock/Auto
10900k – 5100MHz @ 1.25V Overclock
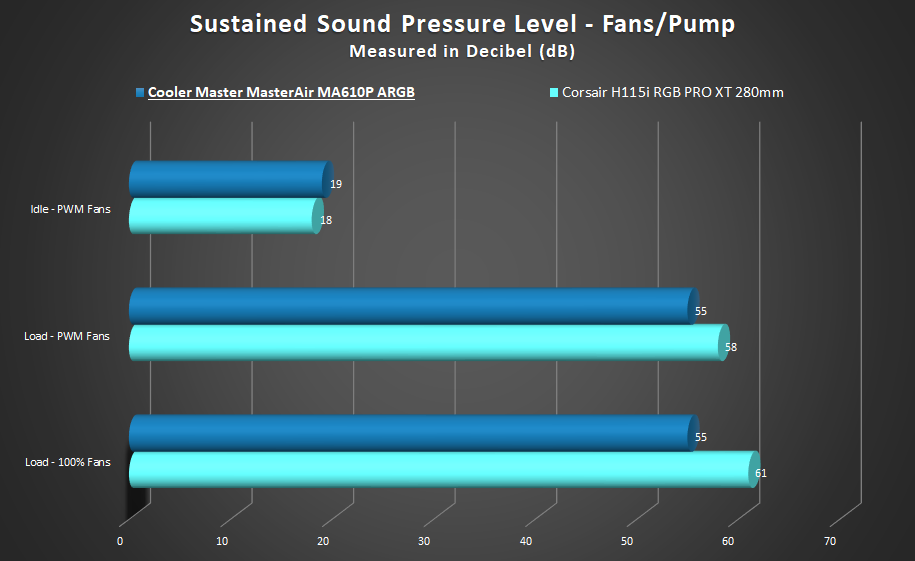
Sound Pressure
Conclusion
All in all, we are happy with the new Cooler Master MasterAir MA610P ARGB. Objectively speaking, from a style perspective it’s a smashing success. The top-down view of the cooler looks sleek and modern with a flat black finish and ARGB LEDs placed in 5 different locations. Moving down the sides and front of the cooler we appreciate that they kept the black shroud theme there as well. The glow and feel of the ARGB LEDs we found to be nearly perfect. The LEDs are bright and colorful with no major hot-spots. We did find that the overall lighting was a bit brighter than our G.Skill Trident Z Royal and the memory looked a bit washed out in comparison.
Our biggest complaint is the memory height limitation. Especially considering that this is an RGB-oriented cooler, we would have expected special accommodation to be made for tall RGB memory modules. However, we found the exact opposite situation. We measured approximately 46 mm of clearance for memory modules, which is simply not enough to accommodate a decent majority of RGB modules out there.
In terms of performance, it did better than we expected and proved that a good quality air cooler can trade blows with a high-tier AIO. While it did get beat by the H115i RGB PRO XT AIO in basically every case, it held up better than we expected. Not only did it hold excellent temperatures for the brutal 30-minute stress test runs, but it did so with less noise than the Corsair AIO. We are exceptionally pleased with the thermal and noise results.
When it comes down to the value you can buy the MasterAir MA610P ARGB for $79.99 on Amazon. Considering that the Corsair AIO we compared against is almost twice as expensive at $139.99, the value of the MA610P becomes very obvious. Cooler Master’s MA610P really does offer a huge value for the price point, and we’d definitely recommend this for your next build, but please keep in mind the memory height limitation.
[table id=28 /]
As always, we want to extend our thanks to Cooler Master for supplying us with this review sample.

Want to discuss this product or give your views and feedback from your own usage? Discuss on the ExtremeHW Forums
Like our content? Please consider Donating to help us to continue our writing.
Related Posts
This Post Has 0 Comments